www.atcom.
www.atcom.cn Version Date Author Description 1.0 2008-April-19 Edwin Creation 1.1 2008-Jul-11 Edwin Interlink, backup 1.
www.atcom.cn 1. Introduce ........................................................................................................... 5 1.1 1.2 2. Install IP04 and make internal calls ................................................................ 8 2.1 2.2 2.3 2.4 2.5 2.6 2.7 3. Add Greeting Menu..................................................................................................... 22 Route incoming route to greeting menu ................................................................
www.atcom.cn 10.11 HOWTO – set CallerID for UK? ............................................................................
www.atcom.cn 1. Introduce This Article This article is an application guide to use IP-XX and ATCOM products to build a simple application on small office application. Through this article, we hope that readers can build the IP PBX solution via IP-XX for small enterprise. The IP-XX series PBXs include IP01, IP04 and IP08 so far, since they have almost same software and structure so we will use IP04 as the demo unit on this article. Same method and user method are available for the IP01 and IP08 also.
www.atcom.cn Normal phone: Connect to IP04, act as ZAP extensions.
www.atcom.cn 1.2 System set up Following devices are used in the structure: 1: IP04 with 2 FXO 2 FXS port loaded: Port 1 and Port2 are configured to FXO ports. Port 3 and port 4 are configured as FXS port. The FXO port is used to connect to PSTN while FXS port is used to connect to your normal phone. 2: Normal phone: connect to the IP04 FXS ports. 3: Working PC, x-lite runs on this computer act as a sip extension. 4: AT-530 IP phone, register to IP04 to act to as SIP or IAX2 extension.
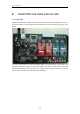
www.atcom.cn 2. Install IP04 and make internal calls 2.1 Install IP04 Simply connect the power cable and Ethernet cable to IP04, make sure that the IP04 connects to your local network. The port configuration of IP04 are fxo for port1,2 and fxs for port3,4 as show below: As show in above picture, we put FXO modules (Red) on Port1 and Port2 so port1 and 2 are configured as FXO port and we can connect the PSTN line to these two ports.
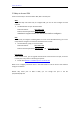
www.atcom.cn 2.2 Ways to Access IP04 There are three ways to access the IP04 : Web, SSH or Console port. Web: The fastest way and easiest way to configure IP04, you can do most configure via web interface Use Web browser to open the GUI of IP04. Default IP address: 192.168.1.100 Default username/password: admin/mysecret IP04 doesn’t support IE well. You need to use Firefox to configure it. SSH: Advance way to configure and debug IP04.
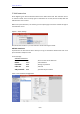
www.atcom.cn 2.3 Add extensions At the beginning, we need to add some extensions to make internal calls. Each extension acts as an internal number. There are many types of extensions we can add, we will use SIP, IAX2 and ZAP extensions in this article. Before set up the extensions, we need to go to the option page and set the numbers of digit of each extension. Go to Option -> Admin Settings Here we set the number to 4, so each extension will be a four digits number.
www.atcom.cn Use the same method to add two other extensions Extension: Name: Password: Caller ID: VM password: 8047 Alice 8047 8047 8047 Extension: Name: Password: Caller ID: VM password: 8469 Crystal 8469 8469 8469 ; Phone number of this extension ; Caller ID Name ; SIP Log on password ; Caller ID ; password of your mailbox ; Phone number of this extension ; Caller ID Name ; SIP Log on password ; Caller ID ; password of your mailbox So far we have created three SIP extensions.
www.atcom.cn 2.4 Register SIP device 1. Register SIP softphone Download the x-lite softphone phone from counter path website www.xten.com After install the x-lite, right click the panel and select the SIP Account Setting and then configure it: Display Name: User Name: Password: Authorization User Name: Domain: Edwin 8806 8806 8806 192.168.1.100 (IP address of IP04) 2. Register IP phone AT-530 a) b) c) d) Connect the AT-530’s WAN port to your switch. And it can get the ip from your router.
www.atcom.cn 2.5 Add Zap extensions Port3 and port4 are configure as the FXS ports, so we can add a normal phone to it and the normal phone will be an extension of our system. We need to assign the numbers for port3 and port4 as below: Kindly notice the zap extensions are only available when you have FXS module on your device.
www.atcom.cn 2.6 Voice Mail Box Voice mail box is enabled when we create the extensions. If somebody calls you and you are unavailable, he will hear the voice mail greeting message and leave voice message. Retrieve voice message To retrieve the voice message, we need to create a voicemail extension in voicemail page. Once a user dial to this extension, he will be prompted the greeting message. After dialing the correct username/password, user will hear the old and new voicemail.
www.atcom.cn 3. Make outbound call To make an outbound call, we need to add trunk/service provider first. There are two types of service provider: Analog Ports: FXO ports of IP04, connect to local PSTN VoIP: SIP or IAX trunk, connect to remote SIP/IAX server In the demo IP04, the port 1 and port2 are configured as FXO ports, port 3 and port 4 are configured as FXS ports. When a port is configured as FXO port, the corresponding LED shows RED.
www.atcom.cn 3.1.2 Add Calling Rule In Calling Rules -> add a new calling rule as below Calling Rules We have now added a new calling rule “OUT_PSTN” in the “DialPlan1”. As we can see from the dialing rule of “OUT_PSTN”, all numbers start with 9 will be cut the first digit (‘9’) and sent to PSTN (port1 or port2). Analog trunk is only available when you have FXO module on your devices. 3.1.3 Choose Dial Plan for extensions In the User page, edit the extensions to choose DialPlan1.
www.atcom.cn 3.2 3.2.1 Make call via VoIP trunk Add VoIP service provider Service Provider -> Add Service Providers: Add a voip service provider. Put your services provider info in this page. Comment: User define local trunk name. Protocol: SIP or IAX2 depends in your service provider Register: enable this if you need the IP04 register to your voip service provider. Host: IP address or domain of your voip service provider. Username: Username of your account. Password: Password of your account. 3.2.
www.atcom.cn The OUT_VOIPBUSTER is in the same DialPlan1. Since we have added this dial plan to the extensions in above, we don’t need to add dial plan again. So far when we have added two calling rules, any call start with 9 will be route to PSTN, and call starts with 00 will be route to voipbuster.
www.atcom.cn 4. Add call route for incoming calls 4.1 Multiple FXO incoming calls to one extension Purpose: Secretary phone to receive multiple FXO incoming calls, put 1st call on hold pickup 2nd call and then transfer or hang call. Be able to do this for 4 FXO. In this case, we use the extension, 6000 as operator, and extension 6001,6002 for clerk. Below is the configure page: Register extension 6000 with eyebeam. And register 6001 and 6002 with IP phone AT-530.
www.atcom.cn Make an incoming pstn call to port 1 and you can see 6000 extension will ring. Use the eyebeam to answer the call. Make another incoming call to port 2 and you can see the line2 of 6000 is ringing. You can press LINE2 to answer the second call; Line1 will be hold and hear the music. To transfer this call to extension 6001, press XFER in the eyebeam and then press 6001 and then XFER again to transfer the call, after transfer the call, press hang up to return to line1. 4.
www.atcom.cn 4.3 Time Base Rule Purpose: set different rules for office time and close time. If there is incoming call in office time, the call will be route to operator as mentioned above. If there is incoming call in close time, the caller will hear that the company is close at this moment.
www.atcom.cn 5. IVR IVR, means Interactive Voice Response. It is very important for the enterprise application. We can use the IVR to do the auto-attendant job. 5.1 Add Greeting Menu Go to Voice Menus--> add new voice menu We have added a new voice menu: Name: Greeting Extension 9999 Then we will need to see how this menu should work.
www.atcom.cn 5.2 Route incoming route to greeting menu In the incoming calls menu, route the incoming calls to the greeting extension (9999). 5.3 Record your voice. You may also need to record your voice for greeting or other voice menu. Go to Record a Menu -> Record a new voice menu Then you will be prompted as below. Type the name of your record and choose the extension to record. After that, click the “Record” button and your extension will ring. Answer the call and make a record.
www.atcom.cn 6. DISA DISA (Direct Inward System Access) allows someone calling in from outside the telephone switch (PBX) to obtain an "internal" system dialtone and dial calls as if from one of the extensions attached to the telephone switch. Frequently the user calls a number DISA number with invokes the DISA application. The DISA application in turn requires the user to enter his passcode, followed by the pound sign (#).
www.atcom.cn 7. Ring Group In a ring group, you can have calls ring multiple user extensions at one time. The first user to pick up the call gets the call and all other phone stop ringing. First, we need to set up a ring group specify what extensions need to ring when the call enter this group. Ring Groups-->Ring Groups We have now set a group Sales_team in above. This group includes the extension 100 and 101 Then we need to “link” the group with the incoming calls.
www.atcom.cn 8. Interconnect two IP04 Purpose of this chapter: show how to link two IP04 in different location. With this function, we can link branches together with IP04. Same method can be used when connect more than 2 IP04 in different branches. 8.1 Link two IP04 in the same network. The simplest case to link two ip04 together is in the same network. We start from this and then try to expand to different network.
www.atcom.cn Password: Caller ID: 8.1.2 6005 6005 ; SIP Log on password ; Caller ID Set up a service provider in IP04B to link to IP04A via this User_IP04B extension. In IP04B, Service Provider --> Custom VoIP and set the service provide as per info from 1) 8.1.3 Set Calling Rule in IP04B, all calls start with 6 will be sent to IP04A In IP04B Calling Rules --> add a new rule officeA as below. Active the change and apply the test: Register an IP phone AT-530B to IP04B with 5001 extension.
www.atcom.cn 8.2 Link two IP04 in different offices. The generally environment for two ip04 in different location is: two IP04 are both behind router and using the private IP. Since the IP04 doesn’t have the public IP, so we need to do port forwarding in the router and make IP04 is reachable to others.
www.atcom.cn 2) Set up the service provider and calling rule in IP04B to make it register to IP04A. This method is almost the same as in Chapter 8.1 , EXCEPT you need to use the 202.8.16.98 as the service provider instead of 192.168.1.21. 3) Use the same method do port forwarding in routerB for IP04B. Your public address from network provider maybe a dynamic ip which will be changed periodically.
www.atcom.cn 9. Manage Configure Files 9.1 Back up file In Backup page Use ‘Take a Backup’ to backup the configure files. The backup file will stored in /storage/gui_configbackups directory 9.2 Restore Backup Files To restore the backup file via Web: Just click the restore button for the back up file you need. Restore from command line: If ‘backup’ page doesn’t work, you can also restore the file from command line in terminal.
www.atcom.cn 8) Download the factory default config from ATCOM root:~> wget http://www.atcom.cn/down/userguide/EN/IP08/backup_factory_IP08__2008jul18.tar 9) Extract the file. root:~> tar -xf backup_factory_IP08__2008jul18.tar -C / 10) Reboot the device. The device will go to factory default and have a default ip 192.168.1.100 after reboot.
www.atcom.cn 10. FAQ: 10.1 HOWTO – get/put file from/to IP04? There is a FTP server built in IP04, to transfer files to IP04, we can use a FTP client such as SmartFTP client to do the job. The FTP user name and password for IP04 is: root/ 12xerXes06 You can also use the linux command wget and tftp for file transfers via SSH terminal. The account/password for SSH are root/ 12xerXes06 or root/uClinux Example: root:~> tftp -g -r voicemail.tar 192.168.1.235 //get the voicemail.tar file from tftp server 10.
www.atcom.cn you are in USA, you need to set the opermode to FCC. If you are in Australia, you need to set the opermode to AUSTRALIA. The opermode can be in the in the /etc/init.d/zaptel file #!/bin/sh # Start up file for Zaptel case $1 in start) modprobe wcfxs opermode=AUSTRALIA lowpower=1; zapscan; ztcfg;; stop) modprobe -r wcfxs;; enable) rm -f /etc/rc.d/S40zaptel; ln -s /etc/init.d/zaptel /etc/rc.d/S40zaptel;; disable) rm -f /etc/rc.d/S40zaptel;; *) cat <
www.atcom.cn Dublin, Ireland GMT+0IST-1,M3.5.0/01:00:00,M10.5.0/02:00:00 Geneva, Switzerland CET-1CEST-2,M3.5.0/02:00:00,M10.5.0/03:00:00 Helsinki, Finland EET-2EEST-3,M3.5.0/03:00:00,M10.5.0/04:00:00 Kyiv, Ukraine EET-2EEST,M3.5.0/3,M10.5.0/4 Lisbon, Portugal WET-0WEST-1,M3.5.0/01:00:00,M10.5.0/02:00:00 London, Great Britain GMT+0BST-1,M3.5.0/01:00:00,M10.5.0/02:00:00 Madrid, Spain CET-1CEST-2,M3.5.0/02:00:00,M10.5.0/03:00:00 Oslo, Norway CET-1CEST-2,M3.5.0/02:00:00,M10.5.
www.atcom.cn Asia Ulaanbaat ar, Mongolia Central and South America Jakarta WIB-7 Singapore SGT-8 Hong Kong HKT-8 ULAT-8ULAST,M3.5.0/2,M9. 5.0/2 Brazil, São Paulo BRST+3BRDT+2,M10.3.0,M2.3.0 Colombia UTC+5 Argentina UTC+3 Central America CST+6 The Asterisk use the /etc/localtime to determine the voicemail time, there is no /etc/localtime file in default, you need to find your time zone /usr/share/zoneinfo in your normal Linux machine.
www.atcom.cn 10.8 HOWTO – Use RS232 port to connect IP-XX? 1) Open the box 2) Connect the RS232 console port to the IP04, there is a console port module ship together with the IP04.
www.atcom.cn Data bits : 8 Parity: None Stop bits: 1 Flow control: None 3) Power on IP04. 4) Remember to put the jumper as where it was after using the Rs232 port. 10.9 HOWTO -- Upgrade the kernel of IP01,IP04 and IP08? In the previous version of IP04, the kernel is not the BAPS kernel, it will be not convenient for the software upgrade (via IPKG) in future. We can use the RS232 console port to upgrade the kernel to a BAPS base kernel. 10.9.
www.atcom.cn ip04>save ip04>bootm 0x1000000 (uClinux will boot.......) NOTE: If Linux doesn't boot or you experience other problems reboot into uboot, type "print", and carefully check bootargs,. The correct bootargs setting should like this: bootargs=ethaddr=00:09:45:56:43:34 console=ttyBF0,115200 root=/dev/mtdblock0 rw If you are using the IP08, the command to set bootargs is ip04>set bootargs ethaddr=your:mac:address eth1addr=you:second:mac:address console=ttyBF0,115200 root=/dev/mtdblock0 rw 10.9.
www.atcom.cn When the system boots with the new kernel, only the network part is available and the IP04 will get the network parameter from your DHCP server. Then you need to install the needed packages for your application. Below is the default packages installed in the IP04.
www.atcom.cn file zapata.conf to set the usecallerid=yes notice: you will need to remove the channel defined line (channel => 1,2,3,4 etc.) in the Zapata.conf file because the Ip04 will auto detect the channels after reboot. If you have modify the zapata.conf file, you may see double lines with channel in the zapata.conf file after reboot, it will cause problem to start the zaptel channels. 10.