Model ATD-36750 Refrigerant Gas Leak Detector Detects all CFC, HFC, HCFC, HFO Refrigerants including blends User Manual Design certified by ASCI and Intertek to meet SAE J2791, J2913 & EN14624
NOTES: INTRODUCTION The ATD-36750 features a patented 3 LED UV that emits the optimum wavelength for A/C dye fluorescence. The UV light can be used simultaneously with the heated sensor or independently. The D440A-UV does not require rechargeable batteries.
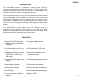
NOTES: ATD-36750 Control Panel Digital Leak Size Indicator Low Battery Indicator UV Light Power On/Off Sensitivity Level Indicators Audio Mute & Sensitivity Level Power On/Off Operating Instructions 1. TURN ON: Press the ON/OFF button once to turn on and again to turn off. NOTE: Hold button down for approximately 1 second to turn unit off. 2. WARM UP: The detector automatically starts heating the sensor.
UV Light Operation Replacement Parts Item Part Number Sensor with Filter Sensor filters (5 pack) Leak Test Vial Carrying Case PRT3700-01 PRT3700-02 PRT3700-03 PRT3699-CASE Before leak checking with the UV light: (a.) Make sure the A/C system is properly charged with sufficient dye. (See manufacturer’s specifications for proper dye charge.) (b.) Run the A/C system long enough to thoroughly mix and circulate the dye with the refrigerant and lubricating oil. 1.
Product Specifications Model # Name Sensitivity Sensor Life Response Time Power Supply Battery Life Warm up time Probe length Numerical Display Weight, lbs Warranty ATD-36750 Leak Detector, Refrigerant Gas .05 oz/yr R134a, .025 oz/yr R22 > 10 years Instantaneous 4 AA Alkaline batteries 8 hours continuous < 20 seconds 17 inches 7 segment digital display (1 to 9) 1.
Maintenance Adjusting Sensitivity Levels The Leak Detector will default to the NORM sensitivity level automatically once the unit comes out of the warm up cycle and the green LED will turn on. To change sensitivity levels, press the SENS once for HI sensitivity (red LED will turn on) and again for LO sensitivity (yellow LED will turn on). Batteries: Install Batteries: Remove screw located at rear end of unit and pull down hinged battery door to open as shown.