
user manual


25
of the gun liner with a wrench and rotate
Gas Valve counterclockwise to unscrew
tting.
Note: Rotate Gas Valve – Do not rotate
brass tting or gun liner twist inside gun
cable and may cause damage to gun
cable.
11.The Live Wire Terminal is held in place
on the Gas Valve by the brass tting on
the end of the gun liner. When the brass
tting is removed , slide the Live Wire
Terminal o of the brass tting.
12.Firmly grip the gun cable and pull the
gun liner all the way out.
13.Install the new gun liner into gun cable,
starting from the end where the welding
gun will be mounted, and feeding the
liner all the way through the gun cable to
the wire feed roller.
Note: It may be helpful to apply a small
amount of liquid soap to the end of the
gun liner to decrease resistance during
installation process.
14.Slide the eyelet of the Live Wire Terminal
onto the threaded end of the gun liner
brass tting.
15. Firmly hold the brass tting on the end
of the gun liner with a wrench and rotate
Gas Valve clockwise to screw it onto t-
ting.
Note: R
otate Gas Valve – Do not rotate
brass tting or gun liner will twist inside
gun cable and may cause damage to
gun cable.
16.Return all components to the handle cas-
ing and realign them as they were origi-
nally.
17.With both halves of the handle case in
place, tighten the ve phillips head screws.
18.Using wire cutters, trim the new gun liner
to approximately 3/16 inch beyond the
edge of the Cable Holding Clamp. ( The
goal is to make sure that the end of the
gun liner will be as close to the drive
roller as possible after the Cable Holding
Clamp is assembled. This will make
installing the welding wire much easier. )
19.Reinstall liner holding clamp at feeder.
20.Reinstall the welding wire according to
specications in INSTALL THE WELDING
WIRE section.
21.Close side panel.
22.Plug welder into power supply and turn
POWER SWITCH to ON position.
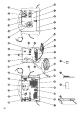
Figure 23. Gun Assembly
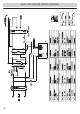
Figure 22. Drive Assembly