
Installation manual Owner's manual
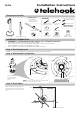


45mm or 65mm
Coach Bolt (x4)
Security Nut (x4)
8mm Drilled
Hole (x4)
Spare Security Nut
(use spare Security Nut to tighten other Security Nuts)
DESK
Furniture Mount
orientation
arrow
Step 5. Locate and Secure the Furniture Mount
OPTION 1
APPLY
ADHESIVE
GLASS or STONE SURFACE
OPTION 2
Step 6. Install the Horizontal Rail
Notch
Pin
1. Hook the notch on to the pin.
HOOK
2. Insert the two M6 Security Screw to secure the Horizontal Rail.
Leave untightened to allow Tilt Adjustment.
M6x10
Security Screw (x2)
Step 7. Tilt Adjustment
4mm Security
Allen Key
use the square holes
as template in drilling
holes to the desk.
NOTES:
1. Use 45mm Coach Bolt for 15-25mm surface
thickness and 65mm Coach Bolt for 25mm-
45mm surface thickness.
2. Remove the spare Security Nut after tightening
other Security Nuts. Keep it in a safe place for
future usage.
Step 4. Cable Management
SNAP OFF
SNAP OFF
OPTION 2
OPTION 3
NOTE: The cable needs to be in place BEFORE the
furniture mount is attached to the furniture top when
using this configuration.
OPTION 1
A 50mm cable access
hole will need to be
made on the desk top to
allow cable access from
below for Option 1.
DESK
Rear Cable Port
Base Cable Port
Atdec recommends a good quality
Brand Name contact adhesive. Please
follow directions on the product.
Adjustable
Wrench
NOTE: If Option 2 is preferred to secure
your Furniture Mount, all cables need to
be in place before the Furniture Mount is
attached to the surface.
M6 Washer (x2)
OPTION 2: 5° Incremental Tilt Adjustment from -5° to +20°
M6x10
Security Screw
20°
10°
0°
5°
-5°
15°
Tighten all screws to lock the
position after tilt adjustment.
4mm Security
Allen Key
M6 Washer
OPTION 1: -5° to +20° Free Tilt Adjustment
-5°
+20°
Loosen Security Screws
on both sides to adjust
and tighten to secure
the desired tilt.
The Security Nuts can only
be tightened or loosened in
conjunction with the spare
Security Nuts.