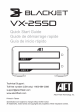
Introduction Thank you for purchasing Blackjack VX-255D Dual 85D Dock! Black jet VX-2850D is designed to be integrated into your video workflow process, Black jet VX-258D boosts your video workflow by using USB 3.1 Gen 2 technology with spreads of unto 10Gbls. You can now quickly and easily ingest edi, ar back up your video contents from your 2.5" 850s. Black jet VX-288D can also be hardware configured for RAID 0, RAID 1, or d Bod modes. be setup simply by choosing your settings on the VX-288D.
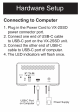
Hardware Setup Connecting to Computer 1: Plug in the Power Cord to VX-288D power connector port. 2, Connect one-end of USB-C cable fo USB-C port on the VX:2880D Unit 3: Connect the other end of LIB-C gable to USB-C port of computer. 4. The LED indicators will Hash once.
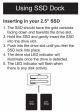
Using SSD Dock inserting in your 2.5” 88D 1. The 58D should have the gold contacts facing down and towards the drive slot. 2. Hold the 88D and gently insert the S8D into the drive slot, 3. Push into the drive slotting you feel the 55D jock into place. 4. The drive slot LED indicator will Illuminate once the drive is detected. 5. The LED indicator will flash when there is any disk activity.
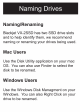
Naming/Renaming Black jet VX-2880D has two 88D drive slots and to help identify them, we recommend naming or renaming our drives being used. Mac Users Use the Disk Utility application on your mac 8. You can also use Finder to select ihe disk to be renamed. Windows Users Use the Windows Disk Management on our Windows. Yau can also Right Click on your drive fo be renamed.
Formatting Types New drives need to be formatted to allow your computer to read/write dale lo them. HF ma Cos Extended or HFS Plus isa file system developed by Apple lnc. which added “Journaling™ for improved data reliability. The formatting decides the way the filled are stored-on your hard disk. This allows. more data to be recovered in rare cases of corruption caused by software or hardware malfunction.
Windows Users Windows irises ex Fat which canals be read from Mac systems. The ex Fat formatting doesn’t support “Journalism, which means there will be less data fo be recovered in rare cases of corruption caused by software or hardware malfunction.
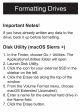
Formatting Drives Important Notes! You have already written any data fo the drive, back it up before formatting. Disk Utility (Macon§ Sierra Click the icon for your external 35D in the 4, In the Finder, choose Go » Utilities. The Applications/Utilities folder will open, Launch Disk Utility. sidebar.on the left. Click the Erase tab along the top of the window. . From the Volume Formalize, choose macs Extended (numeral, . Enter a name for the external bard drive in the Name field. ; Click the Erase button.
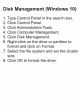
Disk Management (Windows 10) . Type Control Panel in the search box. . Click Control Panel, . Click Administrative Tools. Click Computer Management, : Click Disk Management. . Right-click on the drive or partition to format and click on Format. Select the file system and set the cluster size. 8. Click OK to format the drive.
RAID Setup Important Notes! Drives of identical size and model are recommended for RAID 0 and RAID modes, RAID Types + BOD (Just a Bunch OF Drives) default configuration supports both 85D drive modules as separate volumes in your system, = RAID 0 (Performance) striped across two SSD drives if vou reusing large files, such as digital video files in your system. « RAID 1 (Protection) in whichever is mirrored from one SSD drive to the other to protect your data against. drive failures.
RADIO RAD BOD Disk Configuration & installation 1. Insert 88D Into the open slots of VX-258D, 2. Connect the USB Type-C cable to the unit and plug into your computer. 3. Connect the Power cord into the unit and plug AC Adapter into power outlet. 4. Take'the RAID Selectric Pin tool and adjust the RAID settings on Rear of unit. 5. Push SET (5-7 seconds) after you are Dane with RAID configuration settings. 8.
RAID Configurations {(ma Cos Sierra) For Macon RAID configurations, click. Go on desktop and then select Utilities and launch Disk Utility, Follow the directions or refer-to the ma Cos support page. RAID Configurations (Windows 10) For Windows RAID configurations; search for Control Panel, then select Administrative Tools! Computer Management/Storage/Disk Management. Follow the directions or refer to Windows support page.
Removing Drives Important Notes! your drives are setup for RAID, please shut down supercomputer before ejecting or removing the drives. This will prevent any data loss or any errors. Ejecting Drive [Macon Sierra +) 1. Notate the drive icon on your desktop you wish to eject 2; Right click on the drive icon and select Eject, 3. Blackfeet VX-255D drive bay LED will flash and your drive will be elected. 4. The selected drive icon will disappear from the desktop. 5.
Ejecting Drive (Windows 10) 1. Locale the Safely Remove Hardware and Eject Media icon on bottom right of your desktop. Click the icon and a list of available drives and devices will appear. 2. Delectable click on the drive you wish to act's. 3. The Safe to Remove Hardware notification window will pop-up: 4. Now you can safely remove the drive from Blackjack VX-288D.
Safety Information Caution! Please do nol remove Media Directives when the LED lights are blinking. Failing to dodo may result in damage or data corruption, Make Back-up Copies We strongly recommend that you copy the files in the Media Drives/Cards 16 your computer first before attempting to view or make:any changes to the files. To help prevent the loss of your data, we highly recommend that vou keep back-up copies: of yourself in separable storage locations.
Power Supply Black jet VX-288D utilizes a 5V adapter, please do not use different power adapter fo avoid circumscription to the product and data failure, Limited Warranty Tech Flash Technology, Inc warrants to the original end user ("Customer") that under normal intended use AFT media docking solutions will refresh from defects immaterialness workmanship for one (1). year from the date of purchase. During warranty period, AFT shall dither repair; or replace defective product.
You may register your product at HTTP lwwavatechflash.com. Customer must have proof of purchase and unwarrantable service authorization from AFT within: the applicable warranty period before returning defective products to AFT. Returned products must be shipped prepaid and packaged appropriately, and iris recommended that they be insured or sent by a method that provides for tracking of the package.