
User manual


CS1942 / CS1944 User Manual
6
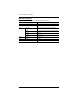
No. Component Description
1 LED Status Panel This panel contains LED icons that light to indicate
mode and port status. The Mode and Port Selection
touch panels have three corresponding LED icons
that light to indicate status – KVM, Audio, and USB
Link. LED Status Indications:
KVM
DIM Orange LED: Device is connected to the
KVMP switch but the port is not selected for use
Bright Orange LED: Port has focus on the switch
for KVM (Keyboard, video and mouse) use
AUDIO
Green LED: Port is selected for audio use
USB LINK
Green LED: Port is selected for USB peripheral use
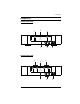
2 Port Selection
Touch Panels
For manual port selection (see Manual Switching,
page 15):
To bring complete focus (KVM, Audio, and USB
Link) to a computer, either: a) press the port selec-
tion touch panel that corresponds to that computer,
or: b) press the Mode touch panel once (the Mode
touch panel icons flash) and then press the port
selection touch panel (1, 2, 3, 4) that corresponds to
that computer. All three port icons light up.
To bring only the KVM focus to a computer, press
the Mode touch panel twice (the Mode touch panel
KVM icon will flash), and then press the port selec-
tion touch panel that corresponds to that computer.
The port’s KVM icon lights up.
To bring only the Audio focus to a computer, press
the Mode touch panel three times (the Mode touch
panel Audio icon will flash), and then press the port
selection touch panel that corresponds to that com-
puter. The port’s Audio icon lights up.
To bring only the USB focus to a computer, press
the Mode touch panel four times (the Mode touch
panel USB icon will flash), and then press the port
selection touch panel that corresponds to that com-
puter. The port’s USB icon lights up.
Press and hold port selection touch panel 1 and 2
simultaneously for 2 seconds to start Auto Scan
Mode (see Auto Scanning, page 19)
Note: If a port is not selected within five seconds of
pushing the Mode touch panel, the Mode touch panel
will power off.