
User manual


- 11 -
Installation
Installation of the VM0404H is simply a matter of plugging in the
appropriate cables.
To install the switch, refer to the installation diagram on page 12
as you perform the following three steps:
1. Use HDMI cables to connect the HDMI In ports on the video
display devices to the HDMI Out ports on the rear of the
VM0404H.
2. Use HDMI cables to connect the HDMI Out ports on the
source device(s) to the HDMI In ports on the VM0404H. Four
HDMI In ports are located on the rear of the switch.
3. Plug the provided power adapter into an appropriate AC
power source; plug the power adapter cable into the Power
Jack on the VM0404H.
This completes the basic installation of the 4x4 HDMI Matrix
Switch. You may now power on the display and source devices.
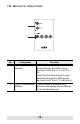
Installing the RS-232 Controller
In order to use the RS-232 serial interface to attach a high-end
controller (such as a PC) to the VM0404H, use a serial cable
such as a modem cable. The end connecting to the VM0404H
should have a 9-pin male connector. Connect this to the serial
interface on the rear of the VM0404H. Refer to number 4 on the
diagram on page 12.
Note: To configure the controller serial port, see page 14.
1. Make sure that the power to any device that you
connect to the installation has been turned off.
2. Make sure that all devices you will be installing are
properly grounded.