QA-341/342 WiFi Phone User Manual Product Release 1.1 Document Release 2.
Preface 1. Regulatory Information FCC Regulation This model phone complies with part 15 of the FCC Rules. Operation is subject to the condition that this device does not cause harmful interference. This device complies with Part 15 of the FCC Rules. Operation is subject to the following two conditions: (1) this device may not cause harmful interference and (2) this device must accept any interference received, including interference that may cause undesired operation.
Table of Contents 1 OVERVIEW ..................................................................................................................................1 Package Contents ...........................................................................................................................1 2 PRODUCT DESCRIPTION ........................................................................................................2 Inserting the Battery............................................................
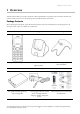
Chapter 1 Overview 1 Overview This WiFi Phone enables you to make VoIP phone calls through IEEE 802.11 b/g (WiFi) wireless networks. Read this user manual carefully to learn how to operate this product and take advantage of its features. Package Contents When unpacking the WiFi phone, ensure all the following items are present and undamaged. If anything appears to be missing or broken, contact your dealer for a replacement.
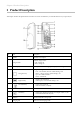
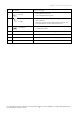
Chapter 2 Product Description 2 Product Description This chapter describes the phone features and other accessories to familiarize you with the functions of your QA-341/342. No.
Chapter 2 Product Description 11 Microphone Receives voice input Star Key Enter symbols in text mode Press and hold to mute ring tone 13 Call Key Dial manually entered or Phonebook numbers Show call history During a Call, sends ‘Flash’ to PBX (Call Hold, Transfer, etc.
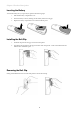
Chapter 2 Product Description Inserting the Battery To insert the battery into your QA-341/342, perform the following steps: 1. Slide off the battery compartment cover. 2. Insert the battery as shown, making sure the battery labels are facing up. 3. Replace the battery compartment cover until it clicks into place. Installing the Belt Clip 1. Fit the belt clip lock into the gap on one side of the phone. 2. Then fit the belt clip lock into the gap on the other side of the phone.
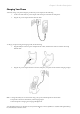
Chapter 2 Product Description Charging Your Phone To directly charge your phone using the provided AC power adapter, do the following: 1. Connect one end of the AC power adapter cable to the port at the bottom of the phone. 2. Plug the AC power adapter into the electrical outlet. To charge your phone using the charging cradle, do the following: 1. Plug the USB jack of the AC power adapter into the cradle, and insert the cable wire into the rib to help hold the cable. 2.
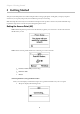
Chapter 3 Getting Started 3 Getting Started This QA-341/342 WiFi phone has a built-in Setup Wizard for setting up the phone. It will guide you step-by-step from wireless AP (access point) setup to SIP (session initiation protocol) account setup. Note: The Setup Wizard can only be seen the first time the phone starts up after a master reset, but the individual steps required for setup can be accessed at any time through the phone’s menu. Setting the Access Point (AP) STEP 1.
Chapter 3 Getting Started After connecting to the wireless network’s access point, the setup wizard proceeds to the Create SIP Profile step. See “Setting the SIP Profile” below. (For more information, see “WPS Registration” on page 20.) (AP Setup Method 2) Using PIN Mode WPS To setup using PIN mode, press the PIN Mode soft key shown in step 2 above. 1. Get the PIN code from the phone’s display, and enter it at your wireless access point.
Chapter 3 Getting Started Note: The network icons indicate the type of security required to connect. Refer to the table below: Icon Description WPA(s) passkey/passphrase is required to connect. WEP passkey is required to connect No passkey required. 3. 4. 5. 6. Enter the access point’s security passkey using the keypad on your phone. (Ask your network administrator for the passkey if one is required.
Chapter 3 Getting Started 1. Press the Ok soft key to continue. 2. Contact your network administrator for the information needed to configure your SIP profile. 3. If you need to set up a profile later: From the phone’s main screen, select Menu->Phone Settings->Profile Settings->New Profile Setup Complete Once setup is complete, press the "Ok" soft key to start using your phone. © 2009, ATI Applied Technology, LLC. All rights reserved. Prepared in the United States of America.
Chapter 4 Menu 4 Menu Display Screen The illustration below shows an overview of the layout of the display screen and its icons. The display screen elements are described in the table below: No. Indicator Description 1 WiFi signal Displays the WiFi signal strength. 2 Key lock mode Indicates the keypad is locked. 3 Quiet mode Indicates the system ring tone volume is set to its lowest level. 4 Battery charge level The presence of all the four bars indicates that the battery is fully charged.
Chapter 4 Menu Main Menu From the Menu, you can access various configuration settings and preferences. 1. From the phone’s main screen, press the Menu soft key to access the main menu. 2. Scroll through the menu options using the navigation key. 3. To choose a menu setting, press the Select soft key. 4. Press the Power/End key to go back to the previous level of the menu. When you access the menu, the display screen shows the menu and the soft key items.
Chapter 4 Menu Modifying a Contact To modify a contact, perform the following steps: 1. Select the contact to modify. 2. Press the Options soft key to display menu. 3. Select Edit. 4. Edit the necessary information. 5. Press the Save soft key to save settings. Deleting Contacts To delete a contact, perform the following steps: 1. Select the contact to delete. 2. Press the Options soft key to display menu. 3. Select whether to: • • 4. Delete: Delete selected contact.
Chapter 4 Menu Phone Settings Phone Settings menu allows you to configure general handset settings as well as to reset the QA-341/342 WiFi phone to factory defaults or upgrade the firmware. Language The Language menu allows you set the on screen display language of your QA-341/342. Options are as follows: • English • French • Korean • Chinese • Japanese • German • Spanish • Russian Select from the list of languages then press the Select soft key.
Chapter 4 Menu Time/Date The Time/Date menu allows you to set the date and time of your phone. It has the following submenus: • Set Time: To set the correct time. • Time Format: To select the time display format. • Set Date: To set the correct date. • Date Format: To select among the date display format options. Profile Settings Create new profiles or edit existing ones using the Profile Settings menu. To create or modify a profile, perform the following steps: 1.
Chapter 4 Menu 1. Select the duration option: 10s, 15s, 25s, or 45s. 2. Press the Select soft key. AP Settings Use the AP Settings menu to set the default access point, or configure IP and security settings for a particular access point. To configure the AP settings, perform the following steps: 1. Select the available network. 2. Press the Default soft key to set selected AP as default. 3. Press the Options soft key to modify selected AP settings.
Chapter 4 Menu 3. 4. 5. 6. 7. 8. 9. Connect the larger plug on the USB to mini-USB cable to an available USB port on your PC (the red charging LED on your WiFi phone should light up when both ends of the cable are connected). Press the “Menu” softkey on your WiFi phone. Use the navigation key to scroll down to “Phone Settings” and press the “Select” softkey. Use the navigation key to scroll down to “Firmware Upgrade” and press the “Select” softkey.
Chapter 4 Menu 3. Reconnect the smaller plug on the USB to mini-USB cable to the mini-USB/charger jack at the bottom of your WiFi phone. 4. Connect the larger plug on the USB to mini-USB cable to an available USB port on your PC if it is not still connected from Step 2.3 (the red charging LED on your WiFi phone should light up when both ends of the cable are connected). 5. Press the “Menu” softkey on your WiFi phone. 6.
Chapter 4 Menu Select AP Use the Select AP menu to connect to an existing AP. 1. When you select Select AP option, the phone lists the available networks. 2. Select the desired network. 3. Press the Connect soft key to connect. AP Find You can scan the local area for a WiFi access point. To scan for an AP, perform the following steps: 1. When you select the AP Find option, the phone starts searching for access points and the display shows Searching… 2. The list of available connections is shown.
Chapter 4 Menu Information The Information screen displays the current IP address, current access point, currently selected SIP profile, Firmware version, and MAC address. To display the information page, select the Information option from the main menu. WPS Registration The QA-341/342 supports two implementations of WPS (WiFi Protected Setup). WPS offers an alternative to manually configuring the security settings needed to connect to a particular access point.
Chapter 5 Operation 5 Operation Making a Call Dialing with the Keypad 1. Enter the telephone number with the keypad. If you enter an incorrect digit, press the Clear soft key to erase the incorrect digit. 2. When you press any number key on the keypad, the main screen displays three kinds of call options. 3. Use the navigation key to select the dial method (SIP, No, or IP), and then enter the number. 4. Press the Call key to make the call. 5. Press the End key to end the call.
Chapter 5 Operation 2. Use the navigation key to scroll to the desired SIP profile (or “Peer to Peer”), and press the Select soft key. The phone will re-register using the selected SIP profile. You can also delete SIP profiles from this menu if needed. Answering a Call When the phone rings, you may choose to answer or reject the call. To answer the call There are three ways to answer a call: 1. Press the Call key to answer. 2. Press the Answer soft key. 3.
Chapter 5 Operation Flash While having a conversation, pressing the Call key will send a DTMF Flash (via RTP) to your PBX (Private Branch Exchange) system. This can be used to initiate a call Hold, Conference, or Transfer in accordance with how these functions are supported and implemented by your PBX. These functions will work on your WiFi phone in that same way that they would for an ordinary analog phone connected to your network through an ATA (Analog Telephony Adapter).
Chapter 6 Specifications 6 Specifications Call Features IEEE 802.11 b/g Ultra Long Talking Time and Standby Time: 10 Hours Talking Time / 7 days Standby Time (with latest AP Support) Multi Language MMI Support WPS (WiFi Protected Setup) for Easy WiFi AP Connection Hardware Overview Phone Features LCD Display: 112 * 64 pixel monochrome graphics display with white LED backlight IEEE 802.11b/g Handset Receiver / Hands-free Speaker Microphone Battery 3.
QuickPhones has made every effort to ensure that these instructions are both accurate and user-friendly. If you have suggestions to help us improve this document further, please tell us at info@quickphones.com Thank you. © 2009, ATI Applied Technology, LLC. All rights reserved. Prepared in the United States of America. QuickPhones is a trademark of ATI Applied Technology, LLC, in the United States and/or other countries.