RADEON™ 8500/ RADEON 7500™ User’s Guide Version 1.0 P/N 137-40282-10 Product Notice MACROVISION PRODUCT NOTICE A. B. Apparatus Claims of U.S. Patent Nos. 4,631,603, 4,577,216, 4,819,098, and 4,907,093 licensed for limited viewing users only. In the printed collateral material that accompanies the Product, the following notice must be printed in an appropriate place in such materials: This product incorporates copyright protection technology that is protected by method claims of certain U.S.
RADEON™ 8500/ RADEON 7500™ User’s Guide Documentation Updates ATI is constantly improving its product and the associated documentation. To maximize the value of your ATI product you should ensure that you have the most up-to-date documentation. ATI’s documentation contains helpful installation/configuration tips and other valuable product feature information. To access the latest documentation for your product visit http://www.ati.com/online/docupdate.
RADEON™ 8500/ RADEON 7500™ User’s Guide 3 Multiple Monitors Your RADEON 8500/RADEON 7500 provides dual display functionality and TV Out from a single video card. This new technology changes the way you view your PC, TV, and video graphics. The RADEON 8500/RADEON 7500 uses HydraVision™ software to create a seamless multiple display desktop. Multiple monitor display works as one large work area. A single application can span all monitors, or many applications can occupy their own specific monitor.
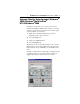
RADEON™ 8500/ RADEON 7500™ User’s Guide TO TV/VCR DISPLAY CABLE TO VGA MONITOR TO DIGITAL/ANALOG DEVICE WITH DVI CONNECTOR DVI-I CONNECTOR ON CARD VGA CONNECTOR FROM MONITOR DVI-I-TO-VGA ADAPTER
RADEON™ 8500/ RADEON 7500™ User’s Guide RADEON 8500/RADEON 7500 Display Configurations Display Configuration Connector(s) Used CRT monitor - 15-pin VGA connector - 24-pin DVI-I connector (with DVI-I-to-VGA adapter) DFP monitor - 24-pin DVI-I connector TV - s-video connector CRT monitor + TV - 15-pin VGA connector + s-video connector DFP monitor + TV - 24-pin DVI-I connector + s-video connector CRT monitor + DFP connector - 15-pin VGA connector + 24-pin DVI-I connector CRT monitor + CRT monito
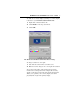
RADEON™ 8500/ RADEON 7500™ User’s Guide Multiple Monitor Controls The Windows® 2000 Multi-Monitor Dialog The Multiple Monitor control for Windows®NT4.0/ Windows® 2000 is found in the Displays tab of the Advanced Settings of the Display Properties. This dialog features a graphic representation of the current monitor array. You can enable and disable monitors by double-clicking on the monitor number in the list box.
RADEON™ 8500/ RADEON 7500™ User’s Guide 7 To enable the secondary display (assuming a secondary display is attached to your RADEON 8500/RADEON 7500): 1 Right-click on monitor labeled “2”. 2 Click “Enable” in the drop-down menu. 3 Click “OK”. The Windows®98SE/Windows®Me Multi-Monitor Dialog To change resolution or color depth: 1 Left-click the desired monitor to make it active. 2 Make the desired changes to the color depth and resolution.
RADEON™ 8500/ RADEON 7500™ User’s Guide Note The RADEON 8500/RADEON 7500 offers Ratiometric expansion. Ratiometric expansion (or digital panel scaling as it is commonly known) expands a low resolution image to fill a higher resolution panel. However, Ratiometric expansion is only available on the primary display. Therefore, if a DFP is set as secondary, the extended desktop is disabled and the resolution is less than the DFP monitor’s native resolution.
RADEON™ 8500/ RADEON 7500™ User’s Guide Dynamic Monitor Reassignment Windows® 98SE/Windows®Me/Windows® NT4.0/Windows®2000 In addition to the fact that you never have to reboot when enabling and disabling multiple monitor settings, you can also change the assignment of your primary and secondary display on the fly without even rebooting! 1 Right-click on the Windows® desktop and click on Properties from the drop down menu. 2 Select the Settings tab. 3 Click on the Advanced button.
RADEON™ 8500/ RADEON 7500™ User’s Guide Note Video overlay allows for the viewing of full-motion video on your computer. However, there is only one video overlay, which is only available on the primary monitor. The RADEON 8500/RADEON 7500 allows you to change the primary monitor while viewing a DVD.
Using HydraVision™ for Windows® 98SE/Windows®Me 11 Using HydraVision™ for Windows® 98SE/Windows®Me The Windows®98SE and Windows®Me operating systems are designed to recognize multiple monitors in a single system. HydraVision™ software is specifically designed for use with Windows®98SE and Windows®Me. HydraVision™ installation enables the Desktop Manager and creates a Windows® program group for HydraVision™ display management software.
Using HydraVision™ for Windows® 98SE/Windows®Me The HydraVision™ Desktop Manager allows you to modify your display options. You can access the Desktop Management and Hot Keys dialog boxes by clicking on the appropriate tab in the Desktop Manager. Along the bottom of each HydraVision™ dialog are four buttons: OK, Cancel, Apply and Help. OK implements the changes you’ve made in the HydraVision™ dialog and exits the Desktop Manager.
Using HydraVision™ for Windows® 98SE/Windows®Me 13 Desktop Management Controls The Desktop Management Dialog The Desktop Management dialog lets you determine the behavior of pop-up windows and dialog boxes in a multiple monitor environment. Dialog control: Enable dialog repositioning—Toggles dialog control on and off. When it is checked, you can choose to have dialog boxes appear on the parent application’s monitor. (The parent application is the application that generated the dialog box.
Using HydraVision™ for Windows® 98SE/Windows®Me Window control: Single monitor windows—When this box is checked, windows are sized no larger than a single monitor. Windows that are placed on monitor splits are automatically relocated to the monitor on which most of the window appears. HydraVision™ Max/Restore button management— Allows you to control the behavior of the Windows® Maximize button.
Using HydraVision™ for Windows® 98SE/Windows®Me 15 NOTE: This control will work only if all monitors are running at the same resolution and your desktop is configured as a rectangle (monitors side-by-side). Remove HydraVision™ titlebar buttons—This box removes or restores the buttons placed on the title bar in installed applications. Remove MultiDesk system tray icon—This box removes or restores the MultiDesk system tray icon. MultiDesk Settings—This button gives access to all the MultiDesk Properties.
Using HydraVision™ for Windows® 98SE/Windows®Me Hot Keys Controls The Hot Keys Dialog HydraVision™ allows you to specify hot key shortcuts for common operations such as starting applications, snapping applications to designated monitors, and changing display resolution. NOTE: Hot Keys only work if HydraVision™ is installed and loaded. Create/Remove Hot Keys To create custom hot key sequences, select a Modifier key (Shift, Alt, etc.
Using HydraVision™ for Windows® 98SE/Windows®Me 17 You can also disable all hot keys listed in the Assigned hot keys list box by checking the Disable hot keys box near the bottom of the Hot Keys dialog. Using Hot Keys You can use any assigned hot key at any time, from within any application, to change your display.
Using HydraVision™ for Windows® 98SE/Windows®Me MultiDesk HydraVision™ software supports multiple desktops. With MultiDesk, one active desktop will always be visible, while up to eight active desktops can reside in the background. When MultiDesk is running, the MultiDesk icon in the system tray displays the number assigned to the current desktop. NOTE: MultiDesk is installed with HydraVision™.
Using HydraVision™ for Windows® 98SE/Windows®Me 19 To switch to another defined desktop, select the appropriate desktop number from the pop-up menu. To enable, disable and name active desktops, select MultiDesk Properties from the pop-up menu. To arrange applications within active desktops, or to enable specific applications on all desktops, select Arrange MultiDesk from the pop-up menu. MultiDesk Properties allows you to control the desktops.
Using HydraVision™ for Windows® 98SE/Windows®Me
Using HydraVision™ for Windows® NT4.0/Windows® 2000 21 Using HydraVision™ for Windows® NT4.0/Windows® 2000 HydraVision™ software is specifically designed for use with Windows®NT4.0 and Windows®2000. HydraVision™ installation enables the Desktop Manager and creates a Windows® program group for HydraVision™ display management software. HydraVision™ and the Desktop Manager are activated whenever Windows® starts. Installing HydraVision™ adds menu options to the ATI Icon.
Using HydraVision™ for Windows® NT4.0/Windows® 2000 The HydraVision™ Desktop Manager allows you to modify your display options. You can access the Desktop Management and Hot Keys dialog boxes by clicking on the appropriate tab in the Desktop Manager. Along the bottom of each HydraVision™ dialog are four buttons: OK, Cancel, Apply and Help. OK implements the changes you’ve made in the HydraVision™ dialog and exits the Desktop Manager.
Using HydraVision™ for Windows® NT4.0/Windows® 2000 Desktop Management Controls The Desktop Management Dialog Windows NT4.
Using HydraVision™ for Windows® NT4.0/Windows® 2000 The Desktop Management dialog lets you determine the behavior of pop-up windows and dialog boxes in a multiple monitor environment. Dialog control: Enable dialog repositioning—Toggles dialog control on and off. When it is checked, you can choose to have dialog boxes appear on the parent application’s monitor. (The parent application is the application that generated the dialog box.
Using HydraVision™ for Windows® NT4.0/Windows® 2000 25 NOTE: The HydraVision™ application title bar icon changes from a single square to two smaller squares when a window is in a HydraVision™ maximized state. Clicking the icon again restores the active window to its default state as a single square. General: Application position memory—Check this box to “remember” the size and location of application windows when they are closed and reapply those settings when the application is reopened.
Using HydraVision™ for Windows® NT4.0/Windows® 2000 Load/Unload MultiDesk—This button restores or removes multiple desktop functionality. NOTE: MultiDesk will not reload automatically when Windows® restarts. You will need to reload MultiDesk from the Desktop Manager dialog box. Individual Application Settings—This button allows you to specify, enable and disable desktop management settings for individual applications.
Using HydraVision™ for Windows® NT4.0/Windows® 2000 27 Hot Keys Controls The Hot Keys Dialog HydraVision™ allows you to specify hot key shortcuts for common operations such as starting applications, snapping applications to designated monitors, and changing display resolution. NOTE: Hot Keys only work if HydraVision™ is installed and loaded. Create/Remove Hot Keys To create custom hot key sequences, select a Modifier key (Shift, Alt, etc.
Using HydraVision™ for Windows® NT4.0/Windows® 2000 You can also disable all hot keys listed in the Assigned hot keys list box by checking the Disable hot keys box near the bottom of the Hot Keys dialog. Using Hot Keys You can use any assigned hot key at any time, from within any application, to change your display.
Using HydraVision™ for Windows® NT4.0/Windows® 2000 29 MultiDesk HydraVision™ software supports multiple desktops. With MultiDesk, one active desktop will always be visible, while up to eight active desktops can reside in the background. When MultiDesk is running, the MultiDesk icon in the system tray displays the number assigned to the current desktop. NOTE: MultiDesk is installed with HydraVision™.
Using HydraVision™ for Windows® NT4.0/Windows® 2000 To switch to another defined desktop, select the appropriate desktop number from the pop-up menu. To enable, disable and name active desktops, select MultiDesk Properties from the pop-up menu. The MultiDesk functionality can be removed by selecting Unload HydraVision™ MultiDesk from the pop-up menu. MultiDesk Properties allows you to control the desktops. Rightclick a Desktop tab to set it Active, Inactive, or Disabled.
OpenGL Display Properties The OpenGL properties page gives you complete control of the OpenGL settings. Optimization Preference Quality allows you to optimize your OpenGL settings for quality. Performance allows you to optimize your OpenGL settings for performance.
OpenGL Settings Convert 32 bit textures to 16 bit allows you to increase video performance for games that make heavy use of textures. However this could also reduce image quality. Enable KTX buffer region extension enables rapid updates of those portions of your screen that have been moved. Enable page flipping allows you to enable hardware acceleration of page flipping to swap full screen buffers.
Direct 3D Display Properties The Direct 3D properties page allows you to adjust the Direct 3D settings. D3D Settings Wait for vertical sync allows you to lower the frame rate of full screen games. This will reduce image tearing that can occur with higher frame rates. W-buffer support allows you to enable or disable W-buffer support. It is recommend that W-buffer support should be disabled for games that do not support this feature.
Alternate pixel center may eliminate problems with some 3D games that displays vertical and horizontal lines around textures or text that appears incorrect. However, this setting should only be used if you are experiencing these symptoms, as it may cause problems with other games. Z-buffer bit depths allows you to set the Z-buffer bit rate. By default 16:24 (16 and 24) is selected to achieve optimum performance.
Color Properties The Color Properties is used to adjust the color settings. It also allows gamma control for video playing of the Video Overlay. The color settings affect all display devices mapped to the view. You can change red, green, and blue display colors. Set Desktop and Video Overlay brightness (gamma) levels can also be changed. Desktop brightness increases or decreases the color brightness of you desktop. The higher the gamma value, the higher the brightness and contrast of your display.
Using TV Out View your PC’s display on a TV! Your new RADEON 8500/RADEON 7500 card has TV Out capability. You can attach your card to a television and monitor at the same time. Or you can connect it to your VCR and record your monitor’s display. Television display is ideal for playing games, giving presentations, watching movies, and browsing the Internet. The following tips will help you get the most out of your TV Out feature.
Connecting your RADEON 8500/RADEON 7500 to a TV or a VCR To connect your graphics card to a television or a VCR, use an S-Video cable from your RADEON 8500/RADEON 7500 to the television (or VCR). However, most televisions (and VCRs) have a Composite video input, in which case you can use the supplied S-Video to Composite video adapter.
Connecting your ATI RADEON 8500/RADEON 7500 card to a TV (or VCR) 5 Turn on your computer and your television (or VCR). 6 To turn your television display on and off, please see Enabling and Disabling the Television Display on page 41.
Using SCART Connectors for European Televisions (Right = Red) Audio In (Left = White) Connect to audio source Connect to TV or VCR Audio Cable Video Adapter Cable SCART Connector Composite Video In (Yellow) Connect to S-Video Out Figure 2. Using a SCART connector with the video adapter cable The SCART connector supports only the Composite video format, which means you will have to use the video adapter cable.
Using and Adjusting TV Out Enabling and Disabling the Television Display 1 Click Start. 2 Point to Settings, then click Control Panel. 3 Double-click Display. 4 Click on the Settings tab and then the Advanced... button. 5 Click on the ATI Displays tab. 6 Click on the green enable/disable button next to the word “TV” to enable/disable television display. If there is no display on your TV, you may need to switch it to video display mode.
During start up, your RADEON 8500/RADEON 7500 will go through a sequence of mode settings, during which your television display will remain blank. This process takes only a few seconds and helps program the television display. Using a Monitor vs. Using the Television Display Using your television for your computer’s display is ideal for playing games, giving presentations, watching movies, and browsing the Internet. However, the display on your monitor may change or looked squashed.
To Use Larger Display Fonts 1 Click Start. 2 Point to Settings, then click Control Panel. 3 Double-click Display. 4 Click on the Settings tab and then the Advanced... button. 5 Make sure you’re on the General tab. 6 In the Font Size box, select the size you want your displayed fonts to be. 7 Click Apply, then follow the onscreen instructions to save your new settings.
To Change the Brightness 1 Click Start. 2 Point to Settings, then click Control Panel. 3 Double-click Display. 4 Click on the Settings tab and then the Advanced... button. 5 Click on the ATI Displays tab. 6 Click on the TV button. 7 Drag the Brightness slider to the left to decrease the brightness. 8 Click Apply to save the changes you have made.