HDTV WONDER™ Getting Started Guide P/N: 117-70125-00 ATI
ii Copyright © 2004, ATI Technologies Inc. All rights reserved. ATI and ATI product and product feature names are trademarks and/or registered trademarks of ATI Technologies Inc. All other company and/or product names are trademarks and/or registered trademarks of their respective owners. Features, performance and specifications are subject to change without notice, Product may not be exactly as shown in diagrams.
iii L IMPORTANT SAFETY INSTRUCTIONS • Read Instructions - All the safety and operating instructions should be read before the product is operated. • Retain Instructions - The safety and operating instructions should be retained for future reference. • Heed Warnings - All warnings on the product and the operating instructions should be adhered to.
iv
v Table of Contents Getting Started 1 Before You Start HDTV WONDER™ Features System Requirements Other Sources of Information Installing the HDTV WONDER™Card HDTV WONDER™ External Connectors Attaching the Antenna ATI Input Adapter Installing the Software Starting the ATI Multimedia Center 1 3 4 4 5 7 8 9 10 10 Using Your HDTV WONDER™ 11 Special Features Setting up DTV Feature Menu Keyboard Shortcuts Display Settings Video Settings Channel List Audio Settings Schedule Settings Closed Captioning HOTWORDS™
vi Warranty Information 43 Getting Additional Accessories Warranty Information Warranty Service 43 43 43 Compliance Information 47 FCC Compliance Information Industry Canada Compliance Statement CE Compliance Information Index 51 47 47 48
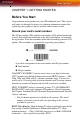
Before You Start 1 CHAPTER 1: GETTING STARTED Before You Start Congratulation on the purchase of your ATI multimedia card. This section will guide you through the process of gathering information required for registering your graphics card for warranty and customer service. Record your card’s serial numbers The 102 part number (P/N) and the serial number (S/N) printed on the addin card, shown bold and underlined in the illustration below, are required for registration.
2 Before You Start HDTV Audio Benefits. Digital television provides digital stereo sound, and DTV programs can include up to six channels of Dolby® Digital sound. With Dolby® Digital 5.1 sound, a DTV program can match the audio quality of high-end DVDs. DTV programs can also offer multiple audio tracks for commentary with a movie, special audio streams for those hard of hearing, or different language options. HDTV Programming Benefits.
HDTV WONDER™ Features 3 HDTV WONDER™ Features DTV Tuner — Watch, pause, and record free-to-air DTV and HDTV on your PC. Analog TV Tuner — Watch, pause, and record analog TV from an antenna or cable feed on your PC. dbx® 5.1 stereo TV audio in North America. Digital VCR — Schedule and record TV shows to your hard drive. Video inputs for VCR, video camera, video game consoles, etc. Video and Audio Capture with a simple mouse click. Live Motion Video Desktop using your favorite TV show as wallpaper.
4 System Requirements System Requirements Computer System 1.2GHz Intel® or AMD® processor, or better, with at least 256MB of system memory. Monitor VGA, minimum 640x480 resolution. Operating System Windows® XP. Audio Sound card and speakers certified for Windows® use. Expansion Slot PCI.
Installing the HDTV WONDER™Card 5 3 Click Start > Run. 4 Type the following: D:\ATISETUP (If D is not your CD-ROM drive, substitute the correct drive letter.) 5 Click OK. 6 Click Documentation. 7 Click User Guides. ATI Multimedia Center Guide The online ATI Multimedia Center User’s Guide explains how to use the special features that the ATI Multimedia Center provides.
6 Installing the HDTV WONDER™Card 5 Replace the computer cover, re-connect the power cable, and then connect your TV cable or video input to the HDTV WONDER™ card. X Y X HDTV WONDER™ card Y PCI expansion slot For more information about the connectors on the HDTV WONDER™ card, see HDTV WONDER™ External Connectors on page 7.
HDTV WONDER™ External Connectors 7 HDTV WONDER™ External Connectors HDTV WONDER™ provides analog audio/video input. DTV X CATV Y Z VID IN X DTV input from antenna. Y Analog input from cable or antenna. Z Analog input from ATI Input Adapter.
8 Attaching the Antenna Attaching the Antenna To attach the HDTV indoor antenna included with your HDTV WONDER™, simply screw one end of the antenna cable into the DTV connector, and then attach the other end to the antenna. • Position your antenna as high as possible. • Place your antenna as close as possible to a window. • If your cable run is greater than 50 feet (15.
ATI Input Adapter 9 ATI Input Adapter Use the ATI Input Adapter to connect a VCR, camcorder, or DVD player to your HDTV WONDER™, as shown. X S-VIDEO OUT COMP. VIDEO OUT L. AUDIO OUT Y R. AUDIO OUT \ \ DTV CATV S L R Z [ VID IN X The audio and video output connectors on your VCR, camcorder, or DVD player will be similar to these. Use composite video out or S-Video out; S-Video will provide better results. Y Cable with S-Video plug at each end. Z ATI Input Adapter (enlarged for clarity).
10 Installing the Software Installing the Software 1 Turn on your computer. Windows Plug and Play will detect your HDTV WONDER™ after you restart your computer, and will automatically launch the Found New Hardware Wizard, which guides you to install the software. 2 Insert the ATI Installation CD into your CD drive, and then follow the Wizard’s prompts to install the HDTV WONDER™ software and the CATALYST™ software suite.
Special Features 11 CHAPTER 2: USING YOUR HDTV WONDER™ Watch digital or analog television on your computer in smooth, full-motion video on the whole screen or in a window. HDTV WONDER™ delivers advanced features: TV-ON-DEMAND™, EAZYLOOK™*, Closed Captioning, Still Capture, Scheduled Events, Electronic Program Information, Parental Control, and more. When you click the ATI logo in the upper left corner of the display panel, the “About” notice appears.
12 Setting up DTV Setting up DTV The first time you start DTV, you must complete the Initialization Wizard. After that, you can launch the Wizard manually in order to change settings. The Initialization Wizard guides you quickly and easily through setting up DTV channels, Autoscanning, Parental Control, Sound, and TV-ONDEMAND™ . Running the Initialization Wizard 1 Click the Setup button 2 Click the Initialization Wizard button, and then follow the Wizard’s instructions.
Setting up DTV 13 To display preset sizes using the CTRL key Display Size Key Combination Tiny CTRL + 1 Small CTRL + 2 Medium CTRL + 3 Large CTRL + 4 Full Screen CTRL + F Native CTRL + 5 Toggle between full screen and current size CTRL + F, ALT + F, Double-click on video, Esc = Exit full screen Increase size of display panel CTRL + Up arrow Decrease size of display panel CTRL + Down arrow
14 Feature Menu Feature Menu You can access DTV functions by right-clicking on the control panel or the viewing area of the display panel. This is very useful in full-screen mode. • The functionality depends upon the skin you choose; this menu is valid for Modern (the default), Classic, and Tranquility. Setting Function Setup Opens the DTV setup page. Hide Controls / Show Controls Hides / shows the control panel.
Feature Menu 15 Setting Function Aspect Ratio Selects the width-to-height ratio for the video window: Auto The DTV program determines the aspect ratio; video fills the screen. 4:3, 16:9 Maintains a fixed-size display with black bars on the sides or top and bottom of the image. Non-Fixed If you choose Non-Fixed, and the aspect ratio of the DTV program is different from the display, video may appear elongated or flattened. Audio Mode Sets the audio mode.
16 Keyboard Shortcuts Keyboard Shortcuts You can use the following keys to control DTV from your keyboard.
Keyboard Shortcuts 17 Command Key(s) THRUVIEW™ Window* (Blended Window, regardless of settings in Display Settings page) * Only with supported ATI products F5 THRUVIEW™ Desktop* (Blended Desktop, regardless of settings in Display Settings page) * Only with supported ATI products F6 Video Desktop, regardless of settings in Display Settings page) F7 Minimize without Video Desktop or THRUVIEW™ F8 Reverse play (Jog Shuttle) increments to next lower speed: -2x, -4x, -8x, -16x F9 Normal play (Jog Shu
18 Display Settings Display Settings The Display settings page lets you control how video is displayed in DTV. To open the Display settings page Click the Setup button Display tab. in the DTV control panel, and then click the Setting Function Video Size Size Select the size for the display panel: • Tiny • Small • Medium • Large • Full Screen • Native (the size of the original source video — only available if your display resolution is greater than the image resolution).
Display Settings 19 Setting Function Options Always On Top Display DTV on top of other applications. Auto hide controls when in full screen Hide DTV controls when displaying DTV in full screen. Controls re-appear when you move your mouse. When Minimized Choose the behavior when DTV is minimized: Minimize DTV DTV becomes an icon on your desktop. Video Desktop DTV display replaces your desktop pattern.
20 Video Settings Video Settings The Video settings page lets you fine-tune video characteristics. To open the Video settings page Click the Setup button Picture tab. in the DTV control panel, and then click the Setting Function Video Properties Brightness Adjusts the amount of white in the image. Contrast Adjusts the gradation of tones between light and dark areas. Saturation Adjusts the amount of color in the image. Gamma Controls the overall brightness of the image.
Channel List 21 To open the Channel List Click the Setup button Channel List tab. in the DTV control panel, and then click the Setting Function Channel number Channel name You can edit channel numbers and names from your keyboard. Channel Lock indicator Channel locked. Favorites List indicator Channel in list. Positioning controls Move channel up one position Move channel down one position. Signal Strength Indicates the strength of the channel’s signal.
22 Channel List When you first start DTV, the DTV Channels Initialization Wizard will guide you through setting up channel numbering. You can use two-part channel numbers (the default) or one-part channel numbers. L DTV channels consist of a major and minor channel number — for example, 10.22. You can enter two-part channel numbers as a single number (for example, 9999) or with a delimiter (for example, 99.99).
Audio Settings 23 Audio Settings To open the Audio Settings page Click the Setup button Audio tab. in the DTV control panel, and then click the Setting Function Multi-channel Audio Options Decode and down-mix to 2 channels Converts a Dolby® Digital audio stream to PCM (Pulse Code Modulation — a method of digital encoding), and downmixes it to 2, 4, or 6 speakers.
24 Schedule Settings Schedule Settings The Scheduler lets you set up DTV to watch or record selected programs at times you specify. For more information, refer to the ATI Multimedia Center User’s Guide. Closed Captioning You can display closed captioned text over video, like a standard TV, and/ or in a separate window beside the video. When you use the separate window, you can use the scroll bar to review the last few minutes of text.
Closed Captioning 25 Closed Caption settings The Closed Caption settings page lets you specify how closed-captioned text is displayed — over video or in a window — and the background color, the font, and the font color for the window. You can also set up and enable the HOTWORDS and TV Magazine features. To set up closed captioning Click the Setup button Closed Caption tab.
26 HOTWORDS™ HOTWORDS™ Have your computer watch TV for you! When you turn on Closed Captioning (see page 24 for more information), you can specify words and phrases that DTV will detect in the closed-captioned text. You can set HOTWORDS™ to show the matched text, restore DTV, play a sound, enable TV Magazine, or start recording when the HOTWORDS appear. You can also have DTV automatically transcribe the text when the specified words appear.
HOTWORDS™ 27 Setting Function Actions to take when your HOTWORDS occur Show Matched Text Displays the text that matches your Hot Word(s). Restore Player Opens DTV in its current state. Beep Recording Enable TV Magazine Activates TV Magazine (see page 28 for more information). Enable Digital Video Recorder Activates the Digital Video Recorder (see page 32 for more information).
28 TV Magazine TV Magazine Use TV Magazine to transcribe closed captioned broadcasting, including pictures and text. You can save files as Rich Text Format (RTF), which preserves formatting, and can be used in many word processors, plain text (TXT), or Hypertext Markup Language (HTML). You can use the Schedule feature to start TV Magazine at dates and times you specify. L • TV Magazine is only available in North America.
Zooming and Panning 29 Setting Function Select Layout (Note: Images are not saved with .TXT files) No image No images are saved. Images on Left Images are placed on the left, text on the right. Images on Right Images are placed on the right, text on the left. Alternate images Images and text alternate left and right. Use black & white pictures Save images as black & white, to save disk space.
30 Channel Lockout Channel Lockout Channel Lockout lets you block particular programs at specific times, and set a password to unlock them. Use the Program Lockout page to specify channel, time, and duration. L • Passwords must be at least four digits long. • If you forget your password, you must uninstall and reinstall your Multimedia Center software to view password-protected programs. To set Channel Lockout 1 Click the Setup button the Channel List tab.
Parental Control 31 Parental Control Parental Control lets you restrict access to programs depending on their content rating. You can record restricted video, but Parental Control information is included with the recording — playback will be scrambled unless you enter the correct password. L • Passwords must be at least four digits long. • If you forget your password, you must uninstall and reinstall your Multimedia Center software.
32 Recording Video Recording Video The Digital Video Recorder provides simple controls and powerful options for recording video and audio. Use the Digital Video Recorder to record full-motion video with audio from your HDTV WONDER™. • Recorded files play only in the File Player. • To save recorded video in other formats, you must export it from the Media Library.
TV-ON-DEMAND™ 33 TV-ON-DEMAND™ TV-ON-DEMAND™ lets you pause a live program, return later, and resume watching where you left off. You can view the show from the beginning, even after it has started, without waiting until the whole program is recorded. You can quickly back up a program, watch the selected portion again, and fast-forward or skip ahead to the live broadcast. You can also export the recorded video as an MPEG (.MPG) file or an ATI VCR file.
34 TV-ON-DEMAND™ TV-ON-DEMAND history When you right-click the Time display in the Recording panel, a Go To Time menu lists all programs that TV-ON-DEMAND™ has recorded. To open the program, click its file name. TV-ON-DEMAND™ uses the Electronic Program Guide (EPG) data to provide the information. If there is no EPG information, or if the data is outdated, the history shows the Channel Number instead of Program Name and Channel Name. One Touch Record One Touch Record provides fast recording modes.
Electronic Program Guide 35 Electronic Program Guide The Electronic Program Guide (EPG) provides an intelligent, free, integrated program guide that lets you view TV listings. It also provides advanced program information, such as station names and numbers, as well as program names and details. You can schedule recording and viewing sessions using the EPG. Normally, the television broadcast contains Electronic Program Guide data, which is used to calculate program start and end times.
36 Stills Gallery Stills Gallery The still images you capture from DTV are saved in the Stills Gallery. You can save images in a variety of graphics formats and sizes. The Stills Gallery controls let you delete images, hide them, save them as wallpaper, and print them. You can check multiple Capture options in the Stills Gallery Setup page. Still images can be captured to the Stills Gallery, numbered files, clipboard, and printer, all at the same time.
Stills Gallery 37 Stills Gallery settings Use the Stills Gallery Setup page to define how the Stills Gallery saves and prints captured images. To set up the Stills Gallery Click the Setup button Stills Gallery tab. in the DTV control panel, and then click the Setting Function Capture Options Capture to Gallery Captures still images to the Stills Gallery. Capture to file Stores captured images in numbered files (pic001.bmp, pic002.bmp ...) on your hard disk.
38 Stills Gallery
Video Problems 39 CHAPTER 3: TROUBLESHOOTING The Readme file on the ATI installation CD-ROM contains last-minute information not provided in the User’s Guide. The Readme file can be found in PM\PMCORE\MAIN. Because a typical computer system consists of many different parts, difficulties may arise from a combination of items. If you encounter a problem, check the following list to find a similar symptom, and then try the suggested solution.
40 Loading Windows® in Safe Mode Loading Windows® in Safe Mode You can start Windows® in Safe mode to diagnose problems. If a symptom does not reappear when you start in safe mode, you can eliminate the default settings and minimum device drivers as possible causes. For more information, refer to Windows® online Help To load Windows® XP in Safe Mode 1 Click Start, click Shut Down, and then, in the drop-down list, click Restart. Or click Start, click Turn Off Computer, and then click Restart.
Customer Care 41 CHAPTER 4: PRODUCT REGISTRATION This chapter contains helpful information concerning ATI product registration, customer service, and warranty. To receive Customer Service you must register your product with ATI within 30 days of purchase. An Online Product Warranty Registration form is available at ati.com/online/registration. Customer Care For detailed instructions on how to use your ATI product, refer to the Online User’s Guide included on your ATI installation CD-ROM.
42 Customer Care Europe and Other Regions English, German, and French support available Monday to Friday 10:30am - 7:00pm GMT. International Customer Care: +49-1803-347345 Support available to registered users (International toll charges to Germany will apply). Mail: ATI TECHNOLOGIES INC. Attention: Customer Service 1 Commerce Valley Drive East Markham, Ontario Canada L3T 7X6 *ATI Customer Care will work to resolve your issue and help you to get your ATI product up and running.
Getting Additional Accessories 43 CHAPTER 5: WARRANTY INFORMATION Getting Additional Accessories Additional and replacement cables, installation CD-ROMs, manuals and other accessories for ATI products can be purchased from the online ATI store at ati.com/online/accessories. Warranty Information Hardware Warranty Service Statement ATI Technologies Inc.
44 Warranty Service • Standard warranty service consists of repair upon receipt. • ATI reserves the right to replace the product with a serviced product at their sole discretion at any time. • You are responsible for the cost of shipping the product to ATI. ATI pays the cost of returning the product to you. Products which are repaired under warranty are guaranteed for the remainder of the original warranty period. Repairing or exchanging a product does not start a new warranty period.
Warranty Service 45 • From the loss of use of the product, as a result of any event, circumstance, action or abuse beyond the control of ATI; whether such damages be direct, indirect, consequential, special or otherwise and whether such damages are incurred by the person to whom this warranty extends or a third party. • Unauthorized repairs to an ATI board level product will void the warranty offered by ATI Technologies.
46 Warranty Service
FCC Compliance Information 47 CHAPTER 6: COMPLIANCE INFORMATION FCC Compliance Information This product complies with FCC Rules part 15. Operation is subject to the following two conditions • This device may not cause harmful interference, and • This device must accept any interference received, including interference that may cause undesired operation. This equipment has been tested and found to comply with the limits for a Class B digital device, pursuant to Part 15 of the FCC Rules.
48 CE Compliance Information CE Compliance Information EMC Directive 89/336/EEC and amendments 91/263/EEC, 92/31/EEC and 93/68/EEC, Class B Digital Device EN 55022:1998/CISPR 22 Class B, Limits and Methods of Measurement of Radio Interference Characteristics Information Technology Equipment.
CE Compliance Information 49 L’Information de conformité de la CE Directive EMC 89/336/CEE et amendement 92/31/CEE et 93/68/EEC, dispositif numérique de Classe B. EN 55022:1998/CISPR 22:1997, - Class B - Limites et méthodes de mesure des caractéristiques d'interférences radiophoniques, Matériel des technologies de l'information.
50 CE Compliance Information
51 Index A Antenna attaching 8 ATI Multimedia Center User’s Guide 5 Audio settings 23 Autoscan 21 C Channel List 20 Channel Lockout 30 Wizard 30 Closed Captioning Settings 24 25 Compliance information CE 48 FCC 47 Industry Canada 47 Low Voltage Directive for TV-tuner-equipped products Customer Care 41 D Display settings 18 E Electronic Program Guide 35 Electronic User’s Guide 4 F Feature menu 14 H HDTV WONDER Features 3 HOTWORDS 26 I Information 47 Initialization Wizard 12 Input adapter 9 Instal
52 Loading Windows in safe mode M Multimedia Center starting 40 10 O One Touch Record 34 Online Help 4 P Parental Control 31 Product registration 41 Customer Care 41 R Recording video 32 S Schedule settings 24 Setting up DTV 12 Sizing display 12 Special features 11 Stills Gallery 36 settings 37 System requirements HDTV 4 T Troubleshooting video problems 39 TV Magazine 28 TV-ON-DEMAND 33 history 34 moving within recorded video, Jog Shuttle 33 skipping backwards and forwards in recorded video st