RADEON™ X800 PCIe Series User’s Guide P/N 137-40680-10 ATI
ii Copyright © 2004, ATI Technologies Inc. All rights reserved. ATI and ATI product and product feature names are trademarks and/or registered trademarks of ATI Technologies Inc. All other company and/or product names are trademarks and/or registered trademarks of their respective owners. Features, performance and specifications are subject to change without notice. Product may not be exactly as shown in diagrams.
iii Disclaimer While every precaution has been taken in the preparation of this document, ATI Technologies Inc.
iv L IMPORTANT SAFETY INSTRUCTIONS • Read Instructions - All the safety and operating instructions should be read before the product is operated. • Retain Instructions - The safety and operating instructions should be retained for future reference. • Heed Warnings - All warnings on the product and the operating instructions should be adhered to.
v Table of Contents Introduction . . . . . . . . . . . . . . . . . . . . . . . . . . . . . . . 1 System Requirements External Connections 1 1 Using Multiple Displays . . . . . . . . . . . . . . . . . . . . . 3 Connecting Your Monitors Display Configurations 3 5 ATI’s CATALYST™ Software Suite . . . . . . . . . . . .
vi Viewing Text on a TV 40 Reducing Edge Distortion 40 Using TV Display Alone 41 Using Games and Applications 42 Introduction 42 Using Your ATI HDTV Video Cable 44 Capturing Video 45 Connecting your media device for video capture 46 Setting the Windows® Volume Control 46 NTSC/PAL Support for the RADEON™ X800 PCIe Series47 Troubleshooting . . . . . . . . . . . . . . . . . . . . . . . . . .
1 CHAPTER 1: Introduction Congratulations on the purchase of your ATI RADEON™ X800 PCIe Series card. We hope that you will enjoy countless hours of trouble-free computing. System Requirements Hardware • Intel® Pentium® 4/III; Celeron II™. • 128 MB of system memory; 256 MB or more for best performance. • Motherboard with free PCI Express™ slot and correct PCIe chipset driver. • CD-ROM drive (for installation software). • PCI Express™ compatible system with a specialized 12v graphics card power connector.
2
3 CHAPTER 2: Using Multiple Displays This chapter describes how to attach multiple monitors to your RADEON™ X800 PCIe Series card, as well as the allowable multi-display configurations. Connecting Your Monitors Your RADEON™ X800 PCIe Series provides hardware support for one DVI-I monitor or two VGA monitors using the supplied DVI-I-to-VGA adapter. A TV can also be used to expand your desktop by using the S-Video out.
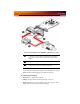
4 Connections and Adapters for the RADEON™ X800 PCIe Series Card X Standard VGA Monitor Connector. To connect a VGA monitor to the DVI-I connector, plug the supplied DVI-I-to-VGA adapter into the DVI-I connector, then plug your monitor cable into the adapter. Y DVI-I-to-VGA Adapter. Z DVI-I Backplate Connection. To connect a flat panel, plug the monitors DVI-I connector into the DVI-I connection. Note: If you use multiple monitors, the RADEON™ X800 PCIe Series card must be the primary graphics card.
Display Configurations 5 4 When the New Hardware Found Wizard appears, at the appropriate prompt insert the ATI Installation CD to load the drivers for your RADEON™ X800 PCIe Series card. To set up a multi-monitor display 1 From the Start menu click Control Panel, then Display. Click the Settings tab to access the basic multi-monitor configuration settings.
6 Display Configurations Display Configuration Connector(s) Used Comments Single HDTV display S-Video Out to HDTV (YPrPb) cable HDTV - High Definition Television CRT display + TV VGA connector + S-Video Out UNSUPPORTED CONFIGURATION if the CRT display is attached to the DVI-I connector via the DVI-I-to-VGA adapter.
Display Configurations 7 Display Configuration Connector(s) Used Comments CRT display + CRT display + HDTV VGA connector + DVI-I connector with DVI-I-to-VGA adapter + S-Video Out to HDTV (YPrPb) cable UNSUPPORTED CONFIGURATION
8 Display Configurations
9 CHAPTER 3: ATI’s CATALYST™ Software Suite This chapter describes how to use the advanced display, multiple-monitor, and 3D graphics features in ATI’s CATALYST™ Software Suite. Multiple Displays and 3D Gaming ATI’s CATALYST™ Software Suite provides multiple-display functionality, and its advanced graphic features, such as SMARTSHADER™ HD, provide the ultimate 3D gaming experience. The CATALYST™ Software Suite also supports the latest versions of Direct 3D® and OpenGL®.
10 ATI Displays Tab Windows® Display Properties Settings Tab ATI Displays Tab The ATI Displays tab provides control over multiple-monitor features. Here you can enable/disable display devices and swap the assignment of Primary and Secondary displays.
ATI Displays Tab 11 . ATI Displays Tab ATI Displays Tab Scheme Displays the drop-down list of available display-device configurations that have previously been created. New configurations can be entered here and then saved using the Save button. Hotkey Associates a hotkey with a scheme. To input the hotkey, highlight the field and press the appropriate key combination on your keyboard. Save button Saves display-device configuration schemes.
12 ATI Displays Tab ATI Displays Tab Troubleshoot button Opens a Troubleshoot dialog to assist with possible display problems. To enable or disable a display If the enable/disable button is green, it indicates the device is enabled. If it is red, it indicates the device is disabled. If the button is greyed out, the device is not an option. For example, if there is only one monitor connected, all buttons will be grey. 1 Click the enable/disable button want to enable/disable.
ATI Color Tab 13 For Windows® XP • The ATI Displays tab shows you the display(s) that are active. The Primary display has the button depressed. To change the display assignment, click the Primary display’s click the button or button of the other display device. For Windows® 2000 • Clicking the button will reassign the Primary and Secondary monitors. Clicking the button creates a clone or mirror image of the Primary display onto the Secondary display.
14 ATI Color Tab ATI Color Tab: Desktop Settings
ATI Color Tab 15 ATI Color Tab: Full Screen 3D Settings ATI Color Tab Desktop radio button Select Desktop to configure your desktop color settings. Full Screen 3D radio button Select Full Screen 3D to configure the color settings for your 3D application. Note that the configured settings will only be apparent within a full screen 3D application environment. Profiles for Indicates whether the profiles in the drop-down list are for your Desktop or a Full Screen 3D environment.
16 ATI Color Tab ATI Color Tab Save button Saves your current color settings to a Desktop or Full Screen 3D profile, using the name you specified in the list box. To restore these settings later, simply select the Profile name from the list and click Apply or OK. Delete button Deletes the profile that is selected in the Profiles list box. All Colors checkbox Adjusts the Gamma, Brightness or Contrast for Red, Green, and Blue simultaneously.
ATI Color Tab 17 2 Adjust the Gamma, Brightness, and Contrast sliders to the desired settings, either individually or using the All Colors checkbox. 3 Type a profile name in the Profile list box. 4 Click Save. To apply the settings for a specific Desktop profile 1 Choose the Desktop radio button. 2 Select the profile name from the drop-down list box. 3 Click Apply or OK. To apply the settings for a Full Screen 3D profile 1 Choose the Full Screen 3D radio button.
18 ATI Color Tab Some 3D applications allow you to switch easily between full-screen mode and windowed mode, and do not load their own color settings. In windowed mode, you can make slider adjustments or select a different profile on the Color tab, then switch back to full-screen mode to see the effects immediately. Color Hotkeys Settings Some full screen 3D applications automatically load their own color settings rather than those set through the ATI Color tab.
ATI Color Tab 19 Color Hotkey Settings Hotkey In combination with the Modifier key, specifies the hotkey combination that triggers an action. Hotkey can be any key listed. To avoid conflicts, be aware of any hotkeys or keyboard controls that may already be assigned to your applications and 3D games. Hotkey action Specifies the action that the assigned hotkey combinations will control within a full screen 3D application environment. You can only assign one hotkey combination to each action.
20 ATI Options Tab To disable hotkeys (so that you do not accidentally activate them, for example), click the Disable Hotkeys checkbox. If you plan to use hotkeys, make sure this box is unchecked. The easiest way to apply your own color settings from within a full screen 3D application is to create a Full Screen 3D profile and save it, assign hotkeys for the “Load Current Profile” action through the Hotkeys dialog, make sure that the profile you prefer is selected from the drop-down list box, and click OK.
ATI Rotation Tab 21 ATI Options Tab Version Information Shows the Catalyst version number, 2D version number, and the driver build information. Details button Gives access to the Details tab, which lists the card’s hardware details and driver information. Reactivate all warning messages Reactivates any disabled graphics warning messages. Enable ATI taskbar icon application Enables/disables the ATI taskbar applications and removes the ATI icon from your system tray.
22 ATI Rotation Tab ATI Rotation Tab ATI Rotation Tab Rotation buttons Rotates the display by the preset amount. Configure Hotkeys dropdown list Lists the rotation actions with which you can associate a hotkey. Hotkey field Associates a hotkey with a rotation. To input the hotkey, click on the field and press the appropriate key combination on your keyboard. Save button Saves a hotkey setting. Defaults Restores the default hotkey settings.
ATI Rotation Tab 23 To rotate a single display 1 Select one of the four rotation settings by clicking the appropriate button. 2 Optionally, check the Mouse Track Rotation checkbox to have the mouse pointer match the display image. 3 Click OK or Apply. To rotate multiple displays 1 Select the Settings tab in the Windows® Display Properties dialog. 2 Select the display to which you want to apply the rotation. 3 Click the Advanced button and select the Rotation tab.
24 ATI Overlay Tab ATI Overlay Tab The ATI Overlay tab allows you to configure the brightness, contrast, saturation, hue, and gamma properties of your video overlay. Video Overlay Video overlay allows for the viewing of streaming video on your PC. However, there is only one video overlay, which is only available on the Primary display. The video overlay controls are automatically activated during playback of any video file type that supports overlay adjustments.
ATI Overlay Tab 25 ATI Overlay Tab Brightness Adjusts the brightness of the video image. Contrast Adjusts the contrast in the video image. Saturation Adjusts the vividness of the color. Sliding it all the way to the left removes all color and produces a black and white picture. Hue Adjusts the pureness or tint of the red, green, and blue components of the color. Gamma Adjusts the overall intensity of the video image. Clone mode options Accesses Clone Mode overlay settings.
26 ATI Overlay Tab Clone Mode Options tab Clone Mode Options Standard Video content is displayed on your Primary display only. Theater Mode Video content is displayed on your Primary and Secondary displays. Video content is displayed on your Secondary display(s) is always in full screen mode. Note: your computer must be set for 16-bit color depth or higher to use this mode. Same on all Video content is displayed on your Primary and Secondary display in exactly the same manner.
ATI 3D Tab 27 Clone Mode Options Full Screen Video The source video is scaled so that your display is showing full screen. Note: if the source video contains horizontal black bars, as do some DVD movies, the full screen video will also contain black bars. 4:3 (Standard TV) Select this option if the aspect ratio of the display device showing full screen video has the standard 4:3 aspect ratio (standard TVs and monitors).
28 ATI 3D Tab ATI 3D Tab 3D Settings for radio buttons Selects either Direct 3D® or OpenGL® as the format to be altered in the workspace. Performance/Quality slider Controls the overall performance/image quality of your graphic application. Moving the slider to the left will maximize application performance, while moving the slider to the right will maximize image quality.
ATI 3D Tab 29 Custom Properties Dialog Custom Properties Dialog Custom Properties Dialog: OpenGL® or Direct 3D® SMOOTHVISION™ HD Anti-Aliasing slider SMOOTHVISION™ (Anti-Aliasing) improves image quality by removing jagged edges from 3D images, resulting in smoother, more natural-looking objects. AntiAliasing can be applied using different sample patterns and sample points such as 2X or 4X. Moving this slider to the right increases sampling to provide the most realistic 3D image.
30 ATI 3D Tab Custom Properties Dialog: OpenGL® or Direct 3D® SMOOTHVISION™ HD Anisotropic Filtering slider Anisotropic filtering uses a texture filtering technique that blends multiple texture samples together. The number of samples taken when anisotropic filtering is performed can vary. By moving this slider to the right, as the number of samples taken increases, the quality of the final image increases significantly.
ATI 3D Tab 31 Custom Properties Dialog: SMARTSHADER™ Effects SMARTSHADER™ Effects drop-down list SMARTSHADER™ applies preset pixel effects on OpenGL® or Direct 3D® applications. Choose the desired effect and click OK. Defaults button Restores the default settings.
32 ATI 3D Tab Direct 3D® Compatibility Settings Direct 3D® Compatibility Settings Dialog Direct 3D® Compatibility Settings Support DXT texture formats There are a few applications that can only support a limited number of texture formats. By selecting Disabled, the driver will not support DXT texture formats, thus reducing the number of texture formats supported.
ATI 3D Tab 33 OpenGL® Compatibility Settings OpenGL® Compatibility Settings Dialog OpenGL® Compatibility Settings Force Z-buffer depth Explicitly set the Z-Buffer depth. Most applications will work best when Disabled is selected Triple Buffering Improves the frame rate of games when Wait for Vertical Sync is enabled in Custom Settings. Enabling Triple Buffering may decrease application performance as there will be less frame-buffer memory available.
34 ATI VPU Recover Tab ATI VPU Recover Tab Hardware crashes may occur when a hardware device and the corresponding software device driver are no longer able to communicate with each other. VPU Recover enables the ATI display driver to detect when the graphics card is no longer able to respond to display driver commands. When this situation arises, the display driver will reset the graphics card.
ATI VPU Recover Tab 35 ATI VPU Recover Tab Prepare an Error Report checkbox When VPU Recover is activated a dialog will prompt you to submit an automatically generated error report to ATI. This error report will help ATI to determine the cause of the problem and help create more stable drivers. To disable this feature, deselect the Prepare an Error Report checkbox.
36 ATI VPU Recover Tab
Using TV Out 37 CHAPTER 4: Using TV Display and Capture Features This chapter describes how to use the TV display and video capture features of your RADEON™ X800 PCIe Series card. Using TV Out Your RADEON™ X800 PCIe Series has TV Out capability. Viewing Your PC’s Display on a TV You can attach your graphics card to a TV and monitor at the same time. You can also connect it to your VCR and record your monitor’s display.
38 Using TV Out To connect S-Video Out 1 Power off your computer and your TV (or VCR). 2 Determine if your TV (or VCR) supports either a S-Video or Composite video connection. 3 Looking at the back of your PC, locate your S-Video Out. Using an SVideo cable or the supplied adapter cable, attach one end of the cable to your graphics card and the other to your TV (or VCR). Refer to the illustration. 4 Power on your TV (or VCR) first, then your computer.
Using TV Out 39 Connecting Your S-Video Out to a TV or VCR Z S-Video Cable (with or without S-Video-to-Composite Adapter) [ Computer Starting Windows® with TV Display Enabled The TV screen may become scrambled during the initial Windows® logo display. This distortion is only a temporary effect, and your screen will be restored within a few seconds. During start up, your RADEON™ X800 PCIe Series will go through a sequence of mode settings, during which your TV display will remain blank.
40 Using TV Out Using a Monitor vs. Using TV Display Using your TV for your computer’s display can be useful, however, the display on your monitor may change or looked squashed. This distortion occurs because the display adjusts to fit the dimensions of your TV. To correct the monitor’s display, use the monitor’s control buttons to adjust its display size and position. Some single-frequency monitors may not work with TV display enabled.
Using TV Out 41 You can reduce edge distortion by increasing the TV display’s horizontal size or contrast. Increasing the horizontal size of a TV display 1 Access the Display Properties dialog by right-clicking on the desktop or navigating through Windows® Control Panel. 2 Click on the Settings tab and then the Advanced button. 3 Click on the ATI Displays tab. 4 Click on the TV button. 5 Click the Adjustments tab.
42 Introduction Using Games and Applications Some older games and applications may program your RADEON™ X800 PCIe Series directly to run under a specific display mode. This may cause your TV display to turn off automatically or become scrambled (the PC monitor will not be affected). Your TV display will be restored once you exit the game or if you restart your computer. Introduction View computer output directly on your High Definition Television (HDTV) or other component input device.
Introduction 43 ATI HDTV Cable X ATI HDTV Video Output Cable Y Backplate of the ATI Graphics Card Z Male RCA Patch Cables – available from consumer electronics dealer [ Typical HDTV Video Input Connections Note: Input and output cables lengths should not exceed 50 feet (15m). Installing your ATI HDTV video cable 1 Turn on your component input device, and set it to YPbPr input. Note: See your HDTV or component input device manual for configuration information specific to your device.
44 Introduction Using Your ATI HDTV Video Cable Use the HDTV Video Cable to watch DVD movies and play video games on your High Definition Television. L Copy-protected DVDs restrict playback to 480i and 480p modes. For maximum performance when you watch DVD movies or play computer games on your HDTV, you should find the mode and screen resolution that provide the best result on your TV, and use those settings exclusively.
Capturing Video 45 Capturing Video The RADEON™ X800 PCIe Series has the ability to capture video from your camcorder, VCR, or TV. Use your favorite video editing application to add effects, make changes, or stream your video on the Internet. The audio and video output connectors on your TV, camcorder, or VCR will be similar those depicted in the illustration. Use Composite Video Out or S-Video Out. S-Video Out will provide better results.
46 Capturing Video Connecting your media device for video capture Use the Video In/Video Out Cable to connect to a TV, VCR, or Camcorder. Use the S-Video connectors. To capture video to your computer 1 Connect the ATI Video In/Video Out cable to the Video In/Video Out connector on the ATI Graphics Adapter. 2 Connect the Video In of the ATI Video In\Video Out cable to the Video Out of your media device.
NTSC/PAL Support for the RADEON™ X800 PCIe Series 47 NTSC/PAL Support for the RADEON™ X800 PCIe Series The RADEON™ X800 PCIe Series provides both NTSC and PAL support. NTSC is the TV standard used in North America. PAL is the TV standard used for most of Europe. The NTSC/PAL DIP switch X TV Standard DIP switch (A dual-slider DIP switch; may not be alongside other components as depicted here). Y NTSC setting (default). Z PAL setting.
48 NTSC/PAL Support for the RADEON™ X800 PCIe Series
Uninstalling Old Graphics Card Software 49 CHAPTER 5: Troubleshooting The following troubleshooting tips may help if you experience problems. ATI’s documentation contains helpful installation/configuration tips and other valuable feature information. Please contact your dealer for more advanced troubleshooting information. More troubleshooting information can be found on the ATI Website at ati.com/support/.
50 Installing the CATALYST™ Software Suite To install and detect your new hardware 1 Click Next to allow Windows® to search for the Standard VGA or Standard PCI Graphics Adapter. If prompted for the Windows® CD-ROM, insert it into your CD-ROM drive. 2 Type the following: D:\ for example D:\WinXP. If D is not your CD-ROM drive, substitute D with the correct drive letter. 3 Click OK. 4 Click Finish to close the Wizard and then restart your system.
Solution Selector 51 9 Click ATI Easy Install to begin the Installation Wizard. 10 Follow the Wizard’s on-screen instructions to complete the installation. Note: The Express installation option is recommended. If your ATI Graphics Accelerator card includes a multimedia component, the software for that component will automatically be installed, along with the ATI graphics driver. Not all software components are installed using the Express installation.
52 Solution Selector General Problems Problem Screen Defects Appear Possible Solution • Check if your monitor supports the resolution, horizontal (kHz) and vertical (Hz) refresh rates as required by the graphics card. • Check your current resolution, refresh rate, and color depth settings in the Settings and Monitor tabs in your Display Properties dialog. Warning! Ensure that both video card and monitor support resolution and refresh rates you select.
Solution Selector 53 HDTV/HDTV Adapter Troubleshooting Problem Possible Solution There is no display on my TV • Your TV will not display anything until Windows starts; this may take several minutes. • Set your TV to YPbPr input. • Ensure that the HDTV Component Video Adapter is properly connected, then restart your computer. DVDs will not play in 720p or 1080i modes • Copy-protected DVDs restrict playback to 480i and 480p modes.
54 Solution Selector
55 Compliance Information FCC Compliance Information This RADEON™ product complies with FCC Rules part 15. Operation is subject to the following two conditions • This device may not cause harmful interference, and • This device must accept any interference received, including interference that may cause undesired operation. This equipment has been tested and found to comply with the limits for a Class B digital device, pursuant to Part 15 of the FCC Rules.
56 CE Compliance Information EMC Directive 89/336/EEC and Amendments 92/31/EEC and 93/68/EEC, for Class B Digital Device. EN 55022:1998/CISPR 22:1997, - Class B - Limits and Methods of Measurement of Radio Disturbance Characteristics of Information Technology Equipment. EN55024:1998/CISPR 22:1997, - Information Technology Equipment - Immunity Characteristics - Limits and Methods of Measurement. Low Voltage Directive for TV-Tuner-Equipped products 73/23/EEC - The Low Voltage Directive.
57 Index Numerics 3D 13 custom settings 28 performance 28 profiles 29 quality 28 3D applications settings 18 A adjusting 24 overlays application profiles creating 27 ATI Overlay tab 24 ATI taskbar applications disabling 20, 21 enabling 20, 21 B brightness 16, 17 13 24 color settings video overlay C capture video 45, 46 card specification information Catalyst version number 21 CATALYST Software installing 50 Clone Mode overlay settings settings 26 25 clone mode primary display 26 secondary
58 color 13 color settings brightness 13 color preview 16 contrast 13 desktop 15 gamma 13 Hotkeys 17 profiles 15 Compliance information Low Voltage Directive for TV-tuner-equipped products 16, 17 color settings 13 TV display 41 video overlay 24 contrast Copy-protection DVDs, DVDs Copy-protection 53 custom settings 3D 28 D desktop color settings 15 display corruption DVI 22 high resolution 22 Displaying PC output on TV 45 displays Hotkey 11 primary 10 scheme 11 secondary 10 dot pitch 40 driver
59 gamma 16, 17 color settings video overlay 13 24 gamma correction graphics card 16 resetting through VPU Recover H HDTV 35 42, 44 troubleshooting 52 HDTV adapter troubleshooting 52 HDTV Component Video Adapter High Definition Television 42 horizontal size TV display 42 41 Hotkeys color settings 17 hue video overlay 24 I Input and output adapters displaying PC output on TV and recording on videotape installing CATALYST Software 50 M multiple displays rotate 23 N NTSC television s
60 Q quality 3D 28 R Recording PC output on videotape 45 resetting graphics card 35 rotate multiple displays 23 single display 23 Rotation HotKeys S saturation video overlay 24 24 secondary display 10 secondary displays clone mode 26 settings 3D applications 18 Clone Mode 26 single display rotate 23 system requirements T tab Overlay 1 24 Theater Mode 26 Triple Buffering 34 troubleshooting general problems 51 HDTV 52 HDTV adapter 52 TV 45 37, 41, 42 contrast 41 games 42 hardware restrictions
61 Video overlay definition 24 video overlay 24 brightness 24 contrast 24 gamma 24 hue 24 saturation 24 Volume control 46 VPU Recover 35 W Windows volume control Y YPbPr 44, 53 YPbPr connector 42 Z Z-Buffer depth explicitly setting 34 46