
User's Manual


AT870 User Reference
10
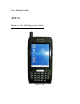
1.4 Table 1 Features Function/Description
Features Function/Description
1.LCD/Touchscreen
LCD touch screen displays information and data.
You can see the results of your work trough the LCD touch screen. The AT870 has a stylus
you can use to select items and inter information.
Caution: Do not use a pen, pencil, or other sharp object on the AT870’ s touch screen. Use
only the supplied stylus or plastic-tipped pens intended for use with a touch-screen
sensitive display.
2.Scan key
(Left and Right)
Use either the right or left <Scan> button to activate the scanner and read a bar code. The
scanner starts to read the bar code. The scanner automatically turns off either when the
barcode is read, when you release the scan button, or after 10 seconds, which ever comes
first.
3.Scan Window
The scanning beam is emitted from this aperture. Aim the scanning beam at the bar code
you wish to scan.
Refer to "Scanning Bar Codes" on page 23 for more information.
4. 22.WLAN
ON/OFF display
light
It makes you know that the WLAN is on or off.
5.Secure Digital
(SD) Slot
The secure digital card slot accepts a secure digital storage card. Refer to the iPC320
Product Reference
Guide for installation instructions.
6.Power LED /
Alarm Indicator
When the battery pack is installed in the PDA and charging in the Dock, this LED is Red.
When the battery is completely charged, the LED changes to Green. When the LED flashes
blue, it indicates a low battery. Some applications use a blue LED to indicate an Alarm or
Error.
7.DC Power
Adaptor Port
Connect the external power adaptor to this port to charge the battery. You must charge the
batteries for thirteen (13) hours prior to first use. Charge the battery completely.
Subsequent charge cycles require four (4) hours.
8.USB/Serial
Synchronization
Port
To synchronize data between a PC and the PDA, connect the USB or Serial cable with
Desktop and the PDA.
You must download and install Microsoft ActiveSync 3.7 or higher in the PC. Download
ActiveSync from the Microsoft Web site at www.microsoft.com.
9.USB Host Port
The USB Host port can be used with a USB keyboard, mouse, compact flash card, and/or
Ethernet connection. When using the dock, you can use standard a USB host port to
connect USB peripherals.
The USB Host Port supports only peripherals with low power consumption.
11.Speaker
The speaker emits the sounds from *.WAV and other media files. It can also be set to emit
beeps or tones to indicate errors or good reads when bar code scanning and inputting data
using the keypad or stylus.
12.Power/ Key
Press the Power/Backlight key briefly to turn the unit on. The Backlight comes on
automatically.
Press this key again briefly to turn the unit off.
For more information on each of these features, please contact Q&A of ATID Home (www.ATID1.com).