AT911 PLUS USER GUIDE
User Manual Guide Before You Begin ......................................................................................................................... 3 Chapter1. Caution when using ..................................................................................................... 4 1. How to use the battery correctly.............................................................................................. 4 2. Caution when using...................................................................
Before You Begin This user manual is protected by copyright. This manual is published by ATID Co., Ltd. and can only be copied, edited or distributed by ATID. Some contents in the manual may be slightly different from the actual device. The contents in the manual is subject to change without notice. This manual is written for the person who is responsible for installing, configuring, and maintaining the AT911 PLUS.
Chapter1. Caution when using Before you handle and operate your device, please read through and familiar with the contents of this manual. 1. How to use the battery correctly ⚫ ⚫ ⚫ ⚫ ⚫ When you dropped the main body or battery in water, please do not put it on the stove or heater for drying. Just keep it in natural temperature or contact with purchase place. Please do not take the metal object to approach to the terminal of battery.
Chapter 2. Products compositions AT911 PLUS, Android OS based device, can support barcode scanner, RFID tag reader, wireless communication modem, camera etc. and can be widely used in a variety of work environments. 1. Package components After opening the product packaging box, check the items listed as below: 1) 2) 3) 4) PDA Standard battery pack for the body Adaptor Sync Cable If there is missing or defective products as below, please contact the customer support center of your place of purchase 1. 2.
2.
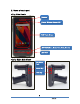
Camera Barcode Scanner UHF RFID Antenna USB Synchronization / DC Power Port 7 AT911 PLUS User Guide
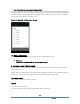
Chapter3. Basic Functions 1. Power and battery PDA is composed of main battery. The Main battery supplies the power to the system and RAM which can save and conserve the data. Main Battery: 3.7V 2,200mA Lithium-ion Attach the main battery to the back side battery compartment of the PDA. Push the batter lever inside so that the battery is firmly attached to the PDA. “Refer to 1.
➢ Attaching Battery Put the top part of battery into the upward groove, and then press down the bottom of battery into the battery compartment, slide battery latch to the left (LOCK side) to attach battery firmly. 1.2 Charging You have to charge the battery via dedicated adapter, which provided from the factory. “Power LED” is Red while charging or is Green when charged completely. When fully charged, the LED light will be turned off. ➢ Connecting Adapter 1. Plug in the adapter into the 220V socket. 2.
➢ Use Automatic low power mode (sleep mode) If the user does not use the device for a while, system is entered into the low power mode (sleep mode) automatically. You can change the setting time in control panel and power management as shown below. Using proper time-out setting prevents the system is on a long time without the user and extends hours of battery use. [Menu] -> [Settings] -> [Display] -> [Sleep] 1.4 Batter replacement If the batteries are damaged or out of its life, buy new batteries to use.
3. Use Micro SD, SIM, SAM Card The image below shows the back side of the PDA when the main battery is removed. There are 1 SIM card slot, 1 Micro SD memory card slot as shown below. Micro SD Memory Card Slot Micro SD Memory Card SIM card Slot 3.1 Micro SD Card Installation Step 1) Slide the cover of Micro SD card slot to the right to release the lock. Step 2) Lift up the top of the slot cover to open. Step 3) Place the SD memory card into the slot and close the cover.
When the SD memory is selected from the File Manager after installing Micro SD memory card, it is shown as below. 3.2 SIM Card Installation Below picture is the screenshot after installing the SIM card. Place and insert the SIM card so that it fits the slot shape.
4. System settings 4.1 Set Screen Brightness Brightness of the screen affects the power consumption the most, so it is recommended to be set as required by the user. [Setting the screen brightness] 1. [Menu] -> [Settings] -> [Display] -> [Brightness Level] 2. Display Options MiraVision : Miravision is a suite of display-enhancing technologies Brightness Level : Adjust the screen brightness. Wallpaper : Choose the wallpaper.
5. Use keypad Keypad is an input method editor that inputs numbers or alphabetic characters easily. 5.1 Use keypad To change the current input language, follow the steps below. [Menu] -> [Settings] -> [Language & input] 5.2 Keypad button execution Describe the Keypad Function. Keypad Function description < > Menu key < < > Home button. < > < > > Contains keyEvent values of KEYCODE_SOFT_RIGHT. It is used to move back to previous state.
Chapter 4. Use Peripheral Device This chapter describes various option modules for use with AT911 PLUS. Please refer to description of necessary option modules and use them. 1. Barcode scanner The barcode scanner of AT911 PLUS can recognize 1D, 2D barcode. 1.1 Read 1D or 2D barcode [Correct barcode reading] 1. The small barcode should be closer to the device. This device is read at the distances of 40~300mm. If the reading not working well, please adjust angle or distance. 2.
[Incorrect barcode reading] 1. Laser beam should cross the barcode. 2. If only part of the barcode is shined by the laser beam, it won’t be recognized. 1D 2D 2. WLAN connection This device can communicate wireless data by 802.11b/g/n radio and describes access pointer and the contents related to wireless communication. AT 911 PLUS device supports TCP/IP network protocol and directly use host computer and TCP/IP in TCP/IP network. When shipping goods, wireless LAN is always set to off 2.
3. Bluetooth The below contents are related to Bluetooth function of AT911 PLUS. AT911 PLUS supports Bluetooth Classic and BLE 4.0 both of them. 3.1 Turn on/off Bluetooth [Menu] -> [Settings] -> [Bluetooth] AT911 PLUS is visible to nearby Bluetooth devices while Bluetooth setting is open.
4. Use Camera The products are installed with 5.0 mega pixel cameras and have the functions of screen brightness, resolution adjustment and screen captures 4.
5. Use UHF 5.
Chapter 5. Appendix Product Specifications Physical Characteristic and Operating Environment Appearance 145mm(L) X 75mm(W) X 129mm(H) Weight 259.5g (PDA only, without Battery) Operating temperature -0℃ ~40℃ Storage temperature -30℃ ~70℃ Humidity 95% Non-condensing Drop 1.5m drop to concrete Product Specifications Process Qurd-Core Cortex-A53, 1.45GHz Operating system Android 6.
Speed 62.5 kbps RF output 0dBm ~ 30dBm, 3dB step, 1W EIRP Protocol EPC Gen2 ISO 18000 6C, ISO 18000(6B option) Multi reading Anti-collision FCC WARNING STATEMENT Changes or modifications not expressly approved by the party responsible for compliance could void the user’s authority to operate the equipment. This equipment has been tested and found to comply with the limits for a Class B digital device, pursuant to Part 15 of the FCC Rules.