AT911N USER GUIDE Series Highlights: • • • • • • • • • • • Android 4.2. ALLWINNER A20 Dual-Core 1GHz Memory RAM 1GB / ROM 8 GB WVGA TFT LCD 480W x 800L with backlight UHF 900MHz GEN2, ISO/IEC 18000-6C 1D and 2D IMAGE Laser Barcode Scanner WLAN(IEEE802.11 a/b/g/n) GSM/GPRS/WCDMA/HSDPA/HSPA+/3G Bluetooth Class II, v4.0 5.
User Manual Guide Before You Begin......................................................................................................................... 4 Chapter 1. Caution when using .................................................................................................... 5 1. How to use the battery correctly.............................................................................................. 5 2. Caution when using....................................................................
Before You Begin This user manual is protected by copyright. This manual is published by ATID Co., Ltd. and can only be copied, edited or distributed by ATID. Some contents in the manual may be slightly different from the actual device. The contents in the manual is subject to change without notice. This manual is written for the person who is responsible for installing, configuring, and maintaining the AT911N.
Chapter1. Caution when using Before you handle and operate your device, please read through and familiar with the contents of this manual. 1. How to use the battery correctly When you dropped the main body or battery in water, please do not put it on the stove or heater for drying. Just keep it in natural temperature or contact with purchase place. Please do not take the metal object to approach to the terminal of battery.
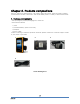
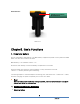
Chapter 2. Products compositions AT911N, Android OS based device, can support barcode scanner, RFID tag reader, wireless communication modem, camera etc. and can be widely used in a variety of work environments. 1.
2.
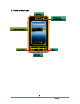
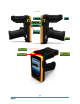
< Front > Ear Jack UHF Power Key Scan Key Side Key GUN < Side view > Scanner Camera Antenna < Front > 7 AT911N User Guide
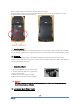
DC Power Port USB Synchronization/ DC Power Port < Bottom > Chapter3. Basic Functions 1. Power and battery PDA is composed of main battery. The Main battery supplies the power to the system and RAM which can save and conserve the data. Main Battery: 3.7V 2,260mA Lithium - ion Attach the main battery to the back battery compartment of the PDA. Push the batter lever inside so that the battery is firmly attached to the PDA. “Refer to 1.
These images as below, shows the back bottom of the PDA. Slide the battery latch to the right (UNLOCK side), and then lift the main battery out of the compartment along both sides of groove. Battery locking lever Attaching Battery Put the top part of battery into the upward groove, and then press down the bottom of battery into the battery compartment, slide battery latch to the left (LOCK side) to attach battery firmly 1.
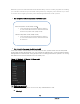
When the system is started and shows the main desktop screen or other programs are running, you can enter into the low power mode (sleep mode) by using the power button. If you want to use the device again, press the power button again and turn on the system Use low power mode (sleep mode) with Power button Enter low power mode (sleep mode): 1. If the power button is pressed when the device is on, the screen will be turned off and the device will enter the low power mode (sleep mode).
Discard the dead batteries to the designated place 2. System reset (Cold reset) If the system is not responding or application program doesn’t work, restart the system by using reset function. System reset is used to reboot and initialize the hardware completely. The installed programs copied files, and registry values will be preserved even after the system reset [Cold Reset Steps] Push and release the reset button. [Result] The system will restart.
3. Use Micro SD, SIM, SAM Cards The image below shows the back side of the PDA when the main battery is removed. There are 1 SIM card slot, 1 Micro SD memory card slot as shown below. Micro SD card slot SIM card slot 3.1 Micro SD Card Installation Slide the cover of Micro SD card slot to the right to release the lock. Lift up the top of the slot cover to open Place the SD memory card into the slot and close the cover Slide the cover to the left to lock the slot.
When the SD memory is selected from the File Manager after installing Micro SD memory card, it is shown as below. 3.2 Installing SIM card Below is the screenshot after installing the SIM card. Place and insert the SIM card so that it fits the slot shape.
4. System settings 4.1 Set Screen Brightness Brightness of the screen affects the power consumption the most, so it is recommended to be set as required by the user. [Setting the screen brightness] 1. [Menu] -> [Settings] -> [Display] -> [Brightness] Brightness: Adjust the screen brightness. Wallpaper: Choose the wallpaper. Auto-rotate screen: Set the Auto-rotate screen function. Sleep mode: Adjust the time period to enter into the sleep mode Font size: Adjust the font size of PDA. 4.
5. Use keypad Keypad is an input method editor that inputs numbers or alphabetic characters easily. 5.1 Use keypad To change the current input language, follow the steps below. [Menu] -> [Settings] -> [Language & input] 5.2 Keypad button execution Describe the Keypad Function. Keypad Function description < > Menu key < < > Home button. < > < > > Contains keyEvent values of KEYCODE_SOFT_RIGHT. It is used to move back to previous state.
Chapter 4. Use Peripheral Device This chapter describes various option modules for use with AT911N.Please refer to description of necessary option modules and use them. Option Module of AT911N AT911N device provides the options as below according to the purpose of use. The Option Modules below are other specifications outside AT911N, so when buying the device, you should confirm it to buy. The types of options provided in AT911N 1) Barcode reader -. 1D Laser Barcode Scanner -.
[Menu] -> [ATID Scanner] [Correct barcode reading] 1. The small barcode should be closer to the device. This device is read at the distances of 40~300mm. If the reading not working well, please adjust angle or distance. 2. Laser beam appears as a dark red line when shined to barcode label. 1D 2D [Incorrect barcode reading] 1. Laser beam should cross the barcode. 2. If only part of the barcode is shined by the laser beam, it won’t be recognized.
2. WLAN connection This device can communicates wireless data by 802.11b/g radio, and describes access pointer and the contents related to wireless communication. AT 911N device supports TCP/IP network protocol and directly use host computer and TCP/IP in TCP/IP network. When shipping goods, wireless LAN is always set to off 2.
3. Bluetooth The below contents are related to “AP6330 COMBO” Module which is used in AT911N. 3.1 Turn on/off Bluetooth [Menu] -> [Applications] -> [Settings] -> [Bluetooth] 1.
4. GPS Module The device can be installed with GPS system as option, and GPS Module will be installed on top of AT911N into Built-in shape. 4.1 Start GPS Demo Program [Menu] -> [Applications] -> [GPS Test] GPS Test Start the program. Confirm GPS reception Data: 1. Confirm whether GPS reception is normal in the open place. 2. Actual reception times of GPS Data may be different according to environment (about 3~5 minutes) If the signal is received previously, it can receive the GPS Data quickly.
5. Use Camera The products are installed with 5.0 mega pixel cameras and have the functions of screen brightness, resolution adjustment and screen captures 5.
6. Use UHF 6.
Chapter 5. Appendix Product Specifications Physical Characteristic and Operating Environment Appearance 145mm(L) X 75mm(W) X 23mm(H) Weight Body 335g Operating temperature -20℃ ~ 50℃ Storage temperature -30℃ ~ 60℃ Humidity Non-condensing Drop 1.2m drop to concrete Product Specifications Process ALLWINNER A20 Dual-Core 1.0GHz Operating system Android 4.
RF output 1W EIRP Protocol EPC Gen2 ISO 18000 6C, ISO 18000(6B option) Multi reading Anti-collision RF Exposure Information and Statement The SAR limit of USA/Canada (FCC/IC) is 1.6 W/kg averaged over one gram of tissue. Device types WCDMA wireless data terminal (FCC ID: VUJAT911N / IC: 20534-AT911N) has also been tested against this SAR limit. The highest reported SAR values for head, body-worn accessory, wireless router(hotspot) , and simultaneous transmission conditions are 0.445 W/kg, 0.
(1) This device may not cause interference; and (2) This device must accept any interference, including interference that may cause undesired operation of the device. Le présent appareil est conforme aux CNR d'Industrie Canada applicables aux appareils radio exempts de licence.