
Operation Manual


16
material of same mechanical stability or be covered with this
material.
Protect yourself against electric shocks. Avoid touching
earthed parts with your body.
The connector of the connection cable must be splash-
proof.
Wind off completely the cable when using a cable drum.
Do not use the cable for purposes for which it is not meant.
Protect the cable against heat, oil and sharp edges. Do
not use the cable to pull the plug from the socket.
Regularly check the saw cable and if damaged, have it
renewed by a recognised skilled electrician.
When running the connection line observe that it does not
interfere, is not squeezed, bended and the plug connection
does not get wet.
Regularly check the extension cables and replace them if
they are damaged.
Do not use any defective connection cables.
When working outdoors, only use extension cables
especially approved and appropriately labelled for outdoor
use.
Do not set up any provisional electrical connections.
Never bypass protective devices or deactivate them.
Only hook up the machine by means of a fault-current
circuit breaker (30 mA).
The electrical connection or repairs to electrical parts of
the machine must be carried out by a certified electrician
or one of our customer service points. Local regulations –
especially regarding protective measures – must be
observed.
Repairs to other parts of the machine must be carried out
by the manufacturer or one of his customer service
points.
Use only original spare parts and accessorie parts.
Accidents can arise for the user through the use of other
spare parts. The manufacturer is not liable for any damage
or injury resulting from such action.
A
A
s
s
s
s
e
e
m
m
b
b
l
l
y
y
o
o
f
f
t
t
h
h
e
e
s
s
a
a
w
w
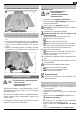
! Mount the table legs (14) to the device unit. Tighten the
screws only hand-tight. (table legs must still be moveable.)
! Fasten the braces (16/17) to the table legs. Attention:
The braces have different lengths.
! Fasten the two long braces (17) first to the table legs.
Pay attention to the correct mounting position h
.
! Tighten the screws only hand-tight.
! Now fasten the two short braces (16). Pay attention to
the correct mounting position h
.
! Tighten the screws only hand-tight.
! Fasten the rubber bases (15) to the table legs.
! Install the additional braces (25).
! Turn the saw right side up so it stands on the table legs.
Install bench width extension
! Attach the supports (26) to the table legs (14) using the
supplied hexagon screws M6 x 12 and washers A 6.4.
!
Mount each one hexagon screw M6 x12 and hexagon
nut M6 in the upper hole of the supports (26).
!
Secure the table width extension (18) using two tallow-
drop screws M5 x 10 on the table plate.
!
Insert the screw on the upper end of the support (26) in
the outer notch of the table width extension (18) on each
side.
!
Tighten the hexagon screws M6 x 12 and hexagon
nuts M6.
Install bench length extension
! Attach the supports (21) to the table legs (14) using the
supplied hexagon screws M6 x 12 and washers A 6.4.
!
Screw the 2 hexagon screws M6 x 12 in the table plate.
!
Hook the table length extension (1) in the screws.
!
Secure the supports (21) on the table length extension
(1) using each two hexagon screws M6 x 12, washers A 6.4
and hexagon nuts M6.
! Now firmly tighten all screw connections.
! Adjust the additional braces (25) so that they touch the
ground.
! Raise the saw blade (19) with the crank (11) to the
highest position.
!
Attach the safety guard (5) on the splitting wedge (20).
! Plug the suction hose (4) onto its connection on the
safety guard (5) and on the housing (32).
! Loosen the knurled nuts on the fence (3A) and place
the fence onto the fence holder (3B) and retighten the nuts.
! Loosen the knurled nuts on the rip fence. Slide the
fence (6A) onto the holding plate (6B) and retighten the
nuts.
! You can place the push rod (24) within reach to the
side.
P
P
r
r
e
e
p
p
a
a
r
r
i
i
n
n
g
g
f
f
o
o
r
r
c
c
o
o
m
m
m
m
i
i
s
s
s
s
i
i
o
o
n
n
i
i
n
n
g
g
L
To achieve flawless functioning of the machine, please
follow the instructions listed:
Place the saw in a place that fulfils the following conditions:
− secured against slipping
− free of vibrations
− even
− free of tripping hazards
− adequate light
Before each use, check
− Connection cables for defects (cracks, cuts, etc.)
Do not use any defective cables.