Models BIO 1.5 PWP Ballast 120v 50/60 Hz Ballast 230v 50/60Hz 10-0010B 10-0504A 375 Marcus Boulevard • Hauppauge, NY 11788 • USA 631.273.0500 • Fax: 631.273.0771 e-mail: info@ultraviolet.com Extensive Product Information Available at: www.ultraviolet.com Document No.
TABLE OF CONTENTS SAFETY WARNINGS.....................................................................................................................................................3 SAFETY INSTRUCTIONS ............................................................................................................................................3 PRODUCT APPLICATION ...........................................................................................................................................
SAFETY WARNINGS • • All personnel should be alerted to the potential hazards indicated by the product safety labeling on this unit. The following conventions are used to indicate and classify precautions in this manual and on product safety labeling. Failure to observe precautions could result in injury to people or damage to property. ! This is the safety alert symbol. It is used to alert you to potential personal injury hazards.
PRODUCT APPLICATION CONSTRUCTION • • • • • • All filtration and disinfection components, of the Bio-Logic ® Pure Water PackTM, are conveniently mounted on a single, stainless steel, mounting bracket. The system is designed to mount on a vertical surface, a secure (stud or concrete) wall or a cabinet wall, by the system-mounting bracket. The faucet, supplied with the system, is a low lead, stainless steel faucet, with a hand operated, spring closed lever.
Pure Water PackTM INSTALLATION LOCATION 1. The Pure Water PackTM is designed for “under the sink” installation. The system should be mounted vertically, to a secure wall or cabinet wall, which provides enough room to perform routine maintenance.
SADDLE VALVE INSTALLATION Check with the local public works department for plumbing codes. Follow all local plumbing codes when installing components of this system. The system comes supplied with a saddle valve and mounting hardware and is intended to be used on 3/8 inch to 1/2 inch copper tubing, and should be connected to the cold water line only. NOTE: This valve is not to be used on flex lines. 1. 2. 3. 4. 5. Shut off the cold-water supply valve under the sink or main valve for the house.
FAUCET INSTALLATION CONT. 1. 2. ! 3. 4. 5. 6. Select faucet location. • Make sure the faucet is far enough away so not to interfere with the regular faucet or any other attachments. • If mounting faucet on the countertop, make certain the spout of the faucet will reach over the sink. • Check underneath the sink/countertop for any obstructions and for tool clearances required for mounting the faucet.
GROUNDING KIT INSTALLATION: BIO-LOGIC®BIO-1.5 PURE WATER PACKTM 230V 50/60HZ USING BALLAST NO.10-0504A 1. Ground Kits are shipped with each Bio-Logic ® BIO-1.5 Pure Water PackTM 230v 50/60Hz water purifier using ballast 10-0504A and is used to permanently connect a ground wire from the water purifier chamber to a known good ground. We recommend checking with local codes or a licensed electrician in your area to determine the best grounding point to attach the ground kit for your installation.
GROUNDING KIT INSTALLATION: BIO-LOGIC®BIO-1.5 PWP 230V 50/60HZ USING BALLAST NO.10-0504A (CONTINUED) 2. Wrap the copper strap tight around the pipe or metal grounding rod with the sharp edges of the strap facing towards the item. 3. While keeping the strap tightly around the pipe or metal ground, align one of the holes in the strap with the long threaded bolt, and tighten using a 7/16" wrench.
TUBING INSTALLATION • • Measure and cut the tubing to desired length. Leave enough slack in the tubing so the system can be easily removed, if necessary. Cut the tubing square; remove all burrs and sharp edges. Insert tubing into fitting; push until it reaches the tube stop. Avoid kinking or stretching tubing. Check that tubing is secure; gently pull on tubing, tubing should not pull free from fitting.
MAINTENANCE • • • • • The Pure Water PackTM is designed to operate with a minimal amount of maintenance, providing the water quality does not exceed maximum concentration levels. Filter cartridge replacement is recommended every 12 months. Over time water pressure to the system faucet will drop, this is an indication that the filter cartridges are nearing the end of their service life.
LAMP INSTALLATION OR REPLACEMENT: BIO-LOGIC® BIO-1.5 PURE WATER PACKTM 120V 50/60HZ USING BALLAST NO. 10-0010B Figure 7 - Lamp Replacement Step 1 - Disconnect Power and Remove Ground Connector 1. 2. 3. 4. 5. Disconnect power to Pure Water PackTM, and remove ground connector from the Bio-Logic ® chamber. Remove easy-off end cap by pulling cap off static gland nut. Carefully withdraw lamp approximately 2" from chamber. While holding lamp end, remove lamp socket from exposed lamp end.
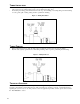
LAMP INSTALLATION OR REPLACEMENT: BIO-LOGIC® BIO-1.5 PURE WATER PACKTM 230V 50/60HZ USING BALLAST NO.10-0504A Figure 8 - Lamp Replacement for Bio-Logic ® BIO-1.5 Pure Water PackTM 230v 50/60Hz (ballast no. 10-0504A) Disconnect Power 1. 2. 3. 4. Step 1 - Disconnect Power Step 2 - Remove End-Cap Step 3 - Remove Socket Step 4 - Remove Lamp Disconnect power to water purifier. Remove easy-off end cap by pulling cap off static gland nut.
QUARTZ SLEEVE CLEANING OR REPLACEMENT Figure 10 - Quartz Sleeve Cleaning or Replacement Bio-Logic ® BIO-1.5 Pure Water PackTM 120v 50/60Hz (ballast no. 10-0010B) Step 4 - Remove Gland Nuts Figure 11 - Quartz Sleeve Cleaning or Replacement Bio-Logic ® BIO-1.5 Pure Water PackTM 230v 50/60Hz (ballast no. 10-0504A) Step 5 - Remove Washer & O-Ring Step 6 - Remove Quartz Sleeve 1. Disconnect power to water purifier. • For 120v 60Hz version using ballast no.
REPLACEMENT OF BROKEN QUARTZ SLEEVE Figure 11 - Chamber Head Removal ! CAUTION: ! CAUTION: Considerable force may be required to pull purifier from the mounting clips. Broken Quartz is SHARP. It is recommended that protective goggles and gloves are worn when handling. 1. Follow the steps in “Quartz Sleeve Cleaning or Replacement” to remove lamp and quartz sleeve. Exercise extreme care when removing purifier. 2.
TROUBLESHOOTING ! WARNING: Always disconnect power to the water purifier before performing any service or maintenance. IMPORTANT: This unit is to be serviced ONLY by qualified, and appropriately licensed, personnel. Table 2 - Troubleshooting Problem Possible Cause Corrective Action Purifier not operating. No electrical power… Verify that the purifier is connected to a live power source. Cracked or broken Shut down purifier, drain, and replace quartz sleeve.
TECHNICAL SPECIFICATIONS MODEL: Pure Water PackTM Flow Rate (GPM): 1.5 Inlet\Outlet Size: 1 Number of Lamps: 1 Lamp Model No.
REPLACEMENT PARTS Figure 12 - Exploded View Bio-Logic ® BIO-1.5 Table 4 - Replacement Parts Bio-Logic ® 1.5 ITEM NO. QUANTITY MODEL BIO-1.
REPLACEMENT PARTS Figure 13 - Exploded View Bio-Logic ® BIO-1.5 Pure Water PackTM Table 5 - Replacement Parts Bio-Logic ® Pure Water PackTM ITEM NO 1 DESCRIPTION QUANTITY Pure Water PackTM Filter Bracket 1 25-9132A 2A Bio-Logic® 1.5 120v 50/60Hz 1 25-9125A1 2B Bio-Logic® 1.
USER ASSISTANCE Atlantic Ultraviolet Corporation Please read and become familiar 375 Marcus Boulevard with the contents of this manual Hauppauge, New York, 11788 before installing or using this unit. If after reading the manual you still Tel: 631.273.0500 have questions, or concerns, Fax: 631.273.0771 regarding the installation or use of this unit, contact our offices, weekdays between 8:30 am and 5:00 pm E-mail: info@ultraviolet.com Website: www.ultraviolet.