
Installation Manual


1
4
16in. /407mm
or
24in. /610mm
A
D
C
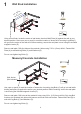
Using a stud finder, locate the center of wall studs, then hold Wall Plate (A) against the wall at your
desired position. Next use a pen or pencil to mark the location of where the 4 mounting Lag Bolts(C)
will go into the center of the wall stud. Before marking, ensure the wall plate is level using the included
magnetic leveler (E).
Remove wall plate. Drill pilot holes at the marked 4 holes using 7/32 in. (5mm) drill bit. Fasten Wall
Plate (A) to wall with Lag Bolts (C) and Washers (D).
Do not over-tighten Lag Bolts (C).
Wall Stud Installation
Masonry/Concrete Installation
Use a pen or pencil to mark the location of where the 4 mounting Lag Bolts (C) will go into wall while
holding wall plate (A) against the wall at your desired position. Before marking, ensure the wall plate
is level using the included magnetic leveler (E).
Remove wall plate. Drill holes at the marked 4 holes using 3/8 in. (9,5-10mm) drill bit. Sink Lag Bolt
Anchors (not included) into holes with hammer until flush with wall surface. Fasten Wall Plate (A) to
wall with Lag Bolts (C) and Washers (D).
Do not over-tighten Lag Bolts (C).
C
D
Wall Anchor
(Not Included)