NOTICE D’UTILISATION ET D’INSTALLATION Installation and operating manual / Bedien-und montage anleitung / Gebruiks- en installatiehandleiding / Manual de utilización e instalación / Manual do Utilizador e de Instalação / TIMELIS CHROME RADIATEUR SÈCHE-SERVIETTES ÉLECTRONIQUE Towel rail electronic radiator Elektronischer Handtuchtrockner Elektrisch en gemengd model Radiador secatoallas electrónico Toalheiro electrónico F GB D NL SP P PL GUIDE À CONSERVER PAR L’UTILISATEUR Manuel must be kept by end user Do
Nous vous remercions de votre choix et de votre confiance. Le radiateur sèche-serviettes que vous venez d’acquérir a été soumis à de nombreux tests et contrôles afin d’en assurer la qualité et ainsi vous apporter une enF tière satisfaction. Les appareils munis de ce symbole ne doivent pas être mis avec les ordures ménagères, mais doivent être collectés séparément et recyclés.
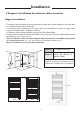
Installation 1/ Préparer l’installation du radiateur sèche-serviettes Règles d’installation - Ce radiateur sèche-serviettes a été conçu pour être installé dans un local résidentiel. Dans tout autre cas, veuillez consulter votre distributeur. - L’installation doit être faite dans les règles de l’art et conforme aux normes en vigueur dans le pays d’installation (NFC 15100 pour la France). - Le radiateur sèche-serviettes doit être alimenté en 230 V Mono 50Hz.
2/ Raccorder le radiateur sèche-serviettes F Règles de raccordement - Le radiateur sèche-serviettes doit être alimenté en 230 V Mono 50Hz. - L’alimentation du radiateur sèche-serviettes doit être directement raccordée au réseau après le disjoncteur et sans interrupteur intermédiaire. - Le raccordement au secteur se fera à l’aide du câble du radiateur sèche-serviettes par l’intermédiaire d’un boîtier de raccordement.
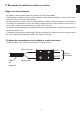
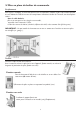
3/ Fixer le radiateur sèche-serviettes au mur 1 Prenez le couvercle de l’emballage et dépliez le rabat afin de bien le poser sur le sol. 2 Repérez et pointez les 4 points du gabarit de perçage dessiné sur la face marquée du couvercle. Puissance 3 Cote A 300 W 819 mm 500 W 1209 mm 750 W 1599 mm 4 Enlevez le couvercle. Avec un crayon, dessinez une croix de 2 cm de large afin de la visualiser lorsque vous aurez installé les fourreaux à l’étape 4. Percez les 4 trous et mettez des chevilles.
5 6 Vissez les plots sur les tubes sans les bloquer. Vérifiez leur positionnement en les mettant avec le radiateur sècheserviettes dans les fourreaux. Une fois la position trouvée, bloquez les vis de chaque plot. 4/ Monter et démonter la patère 1 Positionnez la base avec la vis derrière le radiateur sèche-serviettes dans la position désirée. 2 Vissez la patère sur le cadre et serrez avec une légère pression. 5 Mettez le radiateur sècheserviettes au mur dans les fourreaux.
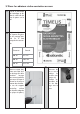
5/ Mise en place du boîtier de commande Emplacement Pour réguler le chauffage, le thermostat doit mesurer la température ambiante la plus représentative possible de votre habitat.
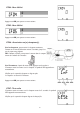
Paramétrage F 1/ Paramétrage du thermostat Tournez le bouton sur Arrêt et appuyez 5 secondes sur la touche de droite jusqu’à afficher H200 vx:xx (menu de maintenance réservé à l’installateur). Appuyez sur OK. L’écran affiche CF01. 5 sec.
CF04 - Non Utilisé Appuyez sur OK pour passer au menu suivant. CF05 - Non Utilisé Appuyez sur OK pour passer au menu suivant. CF06 - Association au(x) récepteur(s) Sur le récepteur, pour associer le récepteur, maintenez l’aimant sur la zone de détection environ 3 secondes, jusqu’à ce que le voyant rouge clignote. NB : L’aimant est fourni, vous pouvez le trouver dans le compartiment de l’embase de l’émetteur. Sur l’émetteur, à partir du menu CF06, appuyez sur la touche +.
Fonctionnement Vous pouvez faire fonctionner votre radiateur séche-serviettes dans plusieurs modes, quel que soit le type de commande que vous aurez choisi (commande manuelle ou par programmation) : Le mode Auto AUTO : votre radiateur séche-serviettes basculera automatiquement du mode eco au mode confort suivant les créneaux horaires programmés pour chaque jour de la semaine. Le mode Confort Le mode Boost choisi. : qui vous permet d’obtenir la bonne température ambiante.
Utilisation 1/ Mise a l’heure Tournez le bouton sur les jours clignotent, pour choisir le jour de la semaine appuyez sur + ou (1. Lundi, 2.Mardi , 3.Mercredi. ......7.Dimanche) Pour valider, appuyez sur OK. L’heure clignote, pour la régler appuyer sur + ou - et valider avec “OK” Faites de même pour les minutes.
4/ Mode automatique (AUTO) F Tournez le bouton sur AUTO. Consigne en cours (ex : confort) Heure Jour Température mesurée ou de consigne Demande de chauffe Mode boost (voir ci-dessous) Information sur la température ambiante A la mise en service, la température de consigne s’affiche (le symbole apparaît au-dessus du °C indiquant que c’est la température mesurée). Appuyez sur la touche pour afficher la température mesurée par le thermostat.
La durée du mode boost clignote. Appuyez sur + ou - pour régler la durée souhaitée (ex : 1h00). Validez par OK. Le message boost défile. Pour annuler le mode boost, appuyez sur la touche C ou tournez le bouton. Pour mettre en arrêt le chauffage (en été, par exemple), tournez le bouton sur 6/ Mode arrêt Le thermostat affiche la température ambiante mesurée.
Conseils 1/ Conseils d’utilisation - Il est inutile de mettre le radiateur sèche-serviettes au maximum, la température de la salle de bains ne montera pas plus vite. - Pour un chauffage optimal, les serviettes doivent être disposées sur les tubes chauffants et les peignoirs sur les patères fournies. 2/ Mise en garde - Les enfants ne doivent pas escalader le radiateur sèche-serviettes.
4/ En cas de problème PROBLÈME RENCONTRÉ VÉRIFICATION À FAIRE Le radiateur sèche-serviettes ne chauffe pas. - Assurez-vous que les disjoncteurs de l’installation sont enclenchés, ou bien que le délesteur (si vous en avez un) n’a pas coupé l’alimentation du radiateur sèche-serviettes. - Vérifiez la température ambiante de la pièce : si elle est trop élevée, le voyant de chauffe ne s’allume pas : le radiateur sèche-serviettes ne chauffe pas. - Ajuster la valeur de la consigne (cf.
Thank you for your choice and your trust in us.The heated towel rail that you have bought has been rigorously checked and tested to ensure its quality and give you complete satisfaction. Appliances bearing this symbol must not be disposed of along with the domestic rubbish; they must be collected separately and recycled. Products that have reached the end of their useful life should be collected and recycled as instructed under local by-laws.
Installation 1/ Preparing to install the heated towel rail Location of the device - This device was designed to be installed in residential premises. In any other case, please call your distributor. - Installation must comply with the standards currently enforced in the country of use. - Locate the heater within minimum distances from obstacles. Do not install the device : • In a draft likely to affect its control (under centralised mechanical ventilation, etc…). • Under a fixed mains outlet.
2/ Connecting the device - The device must be supplied with 230V, 50Hz. - Mains connection must be ensured using the 3-wire cable factory fitte to the heater , through a connecting box. In damp premises, such as bathrooms and kitchens, install the connecting box at least 25cm from the ground. - If power cable is damaged or too short, to avoid any danger it must be replaced by a qualified electrician using special tools.
3/ Fixing the heated towel rail to the wall 1 Unfasten the carton’s flaps and place it against the wall with the lower flap folded back and resting flat on the floor. Prick out the four drill holes though the packaging (without drilling) and then remove the packaging. 2 Carefully mark the drilling points with a pencil (draw a cross, 4cm wide). Puissance 3 Cote A 300 W 819 mm 500 W 1209 mm 750 W 1599 mm 4 Drill the four holes. 18 Position the four hooks and screw them tight.
5 6 Screw the supports onto the tubes without blocking them. Check their position by putting them with the towel-drying radiator into the sheaths. Once you found the right position, lock the screws for each contact. 4/ Fitting and removing the hanger 1 Fit the base with the screw behind the towel-drying radiator in the wanted position. 2 Screw the hanger onto the frame and tighten gently. 19 Fit the toweldrying radiator on the wall in the sheaths. Screw down each of the locking blocks.
5/ Installing the control unit Location To correctly control the heating, the thermostat must measure an ambient temperature that is the most representative of your house.As the temperature probe is in the transmitter's unit, you must place the unit: - in the bathroom, - fixed on a wall placed on a shelf or a piece of furniture, that can be accessed by someone measuring 1.
Parameters 1/ Setting the thermostat Turn the knob to Stop and press the right button down for 5 seconds until H200 vx:xx is displayed (maintenance menu only to be used by the installer). Press OK. GB CF01 appears on the screen. 5 sec.
CF04 - Not Used Press OK to move onto the next menu. CF05 - Not Used Press OK to move onto the next menu. CF06 - Associating the receiver(s) To associate the receiver, hold the magnet on the receiver's detection zone for about 3 seconds, until the red light flashes. Light Detection zone 3 seconds On the transmitter, in the CF06 menu, press the + key. The transmitter sends a frame to the receiver.The X2D symbol appears briefly. Check that the light on the receiver has stopped blinbing.
Using the device You can operate your heated towel rail in several modes, whatever the type of controls you have chosen (manual or programmed) : Auto mode AUTO : your heated towel rail will automatically switch between Eco mode and comfort mode, depending on the time slots programmed for each day of the week. Comfort mode Boost mode Eco mode energy. allows you to maintain the correct ambient temperature. : used to start the heated towel rail in override mode for a certain period of time.
Use Day 1/ Setting the time Turn the knob to the days blink and press + or – to choose the day of the week (1. Monday, 2.Tuesday, 3.Wednesday. ......7.Sunday) Press OK to confirm. The hour blinks and press + or - to set it and press OK to confirm Do the same thing for the minutes.
4/ Automatic mode (AUTO) Turn the knob to AUTO. Current instruction (ex: comfort) The hour Day Moderate temperature or programmed Request of stoking Boost mode (see below) Information about the ambient temperature When the device is first started up, the programmed temperature is displayed (the symbol indicating that this is the measured temperature). Press the key to display the temperature measured by the thermostat.
The duration of the boost mode blinks. Set the duration using + or - (e.g. 1h00). Confirm with OK. The boost message appears. To cancel the boost mode, press the C key or turn the knob. To stop the heating (in summer for example), turn the knob to 6/ Stop Mode The thermostat displays the measured ambient temperature. When the low battery indicator light comes on, you have about 3 months to change the batteries (two 1.5V alkaline batteries, LR03 or AAA).
Advice 1/ Advice for use - There is no point in setting the heated towel rail to maximum, the bathroom will not heat up any quicker. - For optimum heating, towels should be hung over the warm rails and dressing-gowns on the clothes hooks supplied. GB 2/ Advice - Children must not climb on the towel rail. - Do not let children lean against the towel rail or play nearby when it is on.
4/ If there are problems PROBLEM WHAT TO DO ENCOUNTERED The radiator does not heat up. - Ensure that the mains switches are turned on, and that the load-shedding device (if you have one) has not cut off the power supply to the heated towel rail. - Check the ambient temperature of the room: if it is too high, the heating indicator will not come on and the heated towel rail will not heat up.
GARANTIE DOCUMENT À CONSERVER PAR L’UTILISATEUR, À PRÉSENTER UNIQUEMENT EN CAS DE RÉCLAMATION La durée de garantie est de 2 ans à compter de la date d’installation ou d’achat et ne saurait excéder 30 mois à partir de la date de fabrication en l’absence de justificatif. Atlantic assure l’échange ou la fourniture des pièces reconnues défectueuses à l’exclusion de tous dommages et intérêts. Les frais de main d’œuvre, de déplacement et de transport sont à la charge de l’usager.