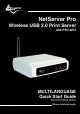
NetServer Pro Wireless USB 2.
ITALIANO Questo prodotto è coperto da garanzia Atlantis Land Fast-Swap della durata di 3 anni. Per maggiori dettagli in merito o per accedere alla documentazione completa in Italiano fare riferimento al sito www.atlantisland.com. ENGLISH This product is covered by Atlantis Land 3 years Fast-Swap warranty. For more detailed informations please refer to the web site www.atlantisland.com. For more detailed instructions on configuring and using this device, please refer to the online manual.
The award of the information is facultative, but its lack will prevent ATLANTIS LAND® from starting the Guarantee process requested. R R g o u p o d u Reeeg giiisssttteeerrr yyyo ou urrr p prrro od du ucccttt!!! w w w w n n d o m ww ww w...aaatttlllaaan ntttiiisss---lllaaan nd d...ccco om m Registration on the web site www.atlantis-land.
MULTILANGUAGE Quick Start Guide ITALIANO 1.1 Contenuto della confezione ........................................... 10 1.2 I LED frontali .................................................................. 10 1.3 Le porte posteriori.......................................................... 11 1.4 Settaggi di default .......................................................... 12 1.5 Cablaggio ...................................................................... 12 1.6 PS-Utility e PS Wizard .................
MULTILANGUAGE Quick Start Guide FRANCAIS 1.1 Contenu de la boîte ....................................................... 33 1.2 Face avant..................................................................... 33 1.3 Face arrière ................................................................... 34 1.4 Configuration initiale ...................................................... 35 1.5 Câblage ......................................................................... 35 1.6 Utiliser le utilitaires...........
ITALIANO AVVERTENZE Abbiamo fatto di tutto al fine di evitare che nel testo, nelle immagini e nelle tabelle presenti in questo manuale, nel software e nell'hardware fossero presenti degli errori. Tuttavia, non possiamo garantire che non siano presenti errori e/o omissioni. Infine, non possiamo essere ritenuti responsabili per qualsiasi perdita, danno o incomprensione compiuti direttamente o indirettamente, come risulta dall'utilizzo del manuale, software e/o hardware.
ITALIANO con i limiti EMC. Il Produttore non è da ritenersi responsabile nel caso il prodotto sia utilizzato al di fuori delle limitazioni EMC. CE Mark Warning Questo dispositivo appartiene alla classe B. In un ambiente domestico il dispositivo può causare interferenze radio, in questo caso è opportuno prendere le adeguate contromisure. ATTENZIONE Lasciare almeno 30cm di distanza tra le antenne del dispositivo e l’utilizzatore.
ITALIANO Italia: Questa periferica è conforme con l’Interfaccia Radio Nazionale e rispetta i requisiti sull’Assegnazione delle Frequenze. L’utilizzo di questa apparecchiatura al di fuori di ambienti in cui opera il proprietario, richiede un’autorizzazione generale. Per ulteriori informazioni si prega di consultare: www.comunicazioni.it.
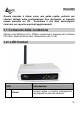
ITALIANO Questo manuale è inteso come una guida rapida, pertanto per ulteriori dettagli sulla configurazione fare riferimento al manuale esteso presente sul CD. Consultare il sito Web www.atlantisland.com per reperire eventuali aggiornamenti. 1.1 Contenuto della confezione Atlantis Land NetServer Pro, CDRom contenente il manuale ed il software PS-Utility, Guida di Quick Start, Alimentatore (5V, 2.5A). 1.
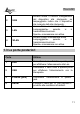
ITALIANO 2 USB 3 LAN 4 WLAN Acceso indica il corretto collegamento del dispositivo alla stampante, se lampeggiante indica che il dispositivo sta inviando dati alla stampante. Acceso Fisso= connessione attiva Lampeggiante= quando vi è trasmissione/ricezione. Spento= connessione non attiva Acceso Fisso= connessione attiva Lampeggiante= quando vi è trasmissione/ricezione. Spento= connessione non attiva 1.
ITALIANO 1.4 Settaggi di default Prima di iniziare la configurazione dell’Atlantis NetServer Pro, è necessario conoscere quali siano i settaggi di default: Password: Username: Indirizzo IP: 192.168.0.1 1.5 Cablaggio Per utilizzare al meglio e senza difficoltà le funzioni del server di stampa, si raccomanda di attenersi alla seguente procedura: 1. Verificare che la stampante da collegare al server di stampa funzioni correttamente. 2. Dopo questa verifica di funzionamento, spegnere la stampante. 3.
ITALIANO 6. Accendere la stampante. 7. Collegare il capo CC dell’adattatore CA alla presa di alimentazione CC del server di stampa e il capo CA alla presa di corrente a muro. Questo servirà ad alimentare correttamente il server di stampa. Il server di stampa è configurato con un Indirizzo IP predefinito. Per evitare conflitti di rete, si raccomanda di modificare l'impostazione dell'IP con la PS-Utility nel caso in cui un altro dispositivo della rete presenti lo stesso indirizzo IP del server di stampa. 1.
ITALIANO PS-Utility può servire per la modifica delle impostazioni del server di stampa (per esempio l’indirizzo IP) dopo l’installazione, al fine di evitare conflitti all'interno della rete. 1.6.2 Avvio di PS-Utility Per aprire PS-Utility: 1. Fare clic su Avvio -> Programmi -> PS-Utility, e successivamente sulla voce PS-Utility v3.11. 2. Apparirà la seguente schermata principale, e verrà avviata la ricerca del server di stampa collegato alla rete. 1.
ITALIANO stampante), Discover Device (Cerca periferica), About (Informazioni su...), e Close (Chiudi). 3. Campo Informazioni : In questo campo sono riportate le informazioni principali sul server di stampa selezionato nell’elenco periferiche. 4. Barra di stato: Indica lo stato del sistema. Prima di poter eseguire lavori di stampa in tutta la rete con il server di stampa, potrebbero essere necessarie alcune operazioni di configurazione con PS-Utility.
ITALIANO 1. Inserire nell'unità CDRom il CD di installazione del server di stampa e selezionare il prodotto A02-PSU-W54. 2. Fare click sulla voce PS Wizard. 3. Nella finestra successiva, selezionare una stampante dall’elenco delle stampanti per impostarne la connessione. 4. Dall’elenco dei server di stampa, selezionare un print server (nel caso ce ne fossero diversi) e poi una porta stampante. 5. Cliccare su Connect per terminare. 6. PS Wizard consente di completare automaticamente la connessione.
ITALIANO cliccando Avanti e poi Fine. Il Sistema Operativo chiederà adesso l’installazione dei driver adeguati alla stampante. Stampante già Installata:Andare in Pannello di Controllo, doppio click in Stampanti e Fax, cliccare sulla stampante collegata al NetServer, premere il tasto destro e selezionare proprietà. Spuntare il tab Porte e cliccare su Aggiungi porta. Selezionare LPR Port e cliccare su Nuova Porta. Inserire l’indirizzo IP del Print Server ed il nome della porta usata (P1).
ITALIANO 1.7 Supporto Offerto Per ogni problema con questo dispositivo consultare il anuale completo fornito a corredo sul CDRom. Per qualunque altro problema o dubbio è possibile contattare l’help desk telefonico (02/93907634) gratuito di Atlantis Land che fornirà assistenza da lunedì al giovedì dalle 9:00 alle 13:00 e dalle 14:00 alle 19:00. Il venerdì dalle 9 :00 alle 13 :00. E’ possibile anche utilizzare il fax (02/93906161) la posta elettronica (info@atlantis-land.com oppure tecnici@atlantis-land.
ENGLISH Copyright Statement No part of this publication may be reproduced, stored in a retrieval system, or transmitted in any form or by any means, whether electronic, mechanical, photocopying, recording or otherwise without the prior writing of the publisher. Windows™ 98SE/2000/ME/XP are trademarks of Microsoft® Corp. Pentium is trademark of Intel. All copyright reserved. The Atlantis Land logo is a registered trademark of Atlantis Land SpA.
ENGLISH liability for any damage or violation of government regulations arising from failing to comply with these guidelines. CE Mark Warning This is a Class B product. In a domestic environment, this product may cause radio interference, in which case the user may be required to take adequate measures. CE in which Countries where the product may be used freely: Germany, UK, Italy, Spain, Belgium, Netherlands, Portugal, Greece, Ireland, Denmark, Luxembourg, Austria, Finland, Sweden, Norway and Iceland.
ENGLISH in all countries applying Directive 1999/5/CE, without restriction, with the exception of the following countries: France: When this equipment is used outdoors, output power is limited to within the frequency bans listed on the chart. For more info, consult the website www.art-telecom.fr. Location Frequency (MHz) Band Power (EIRP) Indoor (no restriction) 2400-2483,5 100mW(20dBm) Outdoor 2400-2454 2454-2483,5 100mW(20dBm) 10mW(10dBm) Italy: For more info, consult the website www.
ENGLISH For more detailed instructions on configuring and using the NetServer Pro, please refer to the manual included in NetServer Pro CDRom. 1.1 Package contents Atlantis Land NetServer Pro, CDRom with manual and PS-Utility, Quick Start Guide, Power Adapter AC-DC (5V, 2.5A). 1.2 The Front Panel LEDs LED 1 Meaning Power A steady light confirms that NetServer Pro is powered on.
ENGLISH 2 3 4 USB Steady light confirms that the print server has a good connection to a printer. When it blinks, the printer connected is printing. print your LAN Steady light confirms that the server has a good connection to network. When it blinks (briefly dark), the server is receiving/ transmitting from/to the network. print your WLAN Steady light confirms that the server has a good connection to wireless network.
ENGLISH 4 RESET Press this button for 10 seconds to restore factory default setting. 1.4 Default Settings Before you configure the NetServer Pro, you need to know the following default settings: Password: Username: IP address : 192.168.0.1 1.5 Cabling Follow these steps for a trouble-free start of the print server operations with your print server. 1. Confirm proper operation of the printer to be connected to the print server. 2.
ENGLISH 7. Connect the DC end of the AC Power adapter to the DC power input socket of the print server and the AC end to the wall outlet. This will supply power to the print server immediately. Your print server is built with a default IP Address. To prevent from any conflict in your network, it is recommended to use the PS-Utility program to change the IP setting when there is some other device’s IP Address is the same as the print server’s default IP Address. 1.
ENGLISH To avoid the conflict in your network, you can use PSUtility to change the related settings of your print server (such as the IP address) after finishing the installation. 1.6.2 Launching PS-Utility To launch PS Utility: 1. Click Start -> Programs -> PS-Utility, and then click the PS-Utility v3.11 item. 2. The main screen will appear as below, and it starts to search the connected print server within the network. 1. Device List: Display the connected print server within the network. 2.
ENGLISH 3. Information Field: Display the basic information of the selected print server in the Device List. 4. Status Bar: Display the system status. Before you can print over the network using your print server, you may need to perform some basic setup tasks through PS-Utility. These settings include: Change the print server’s IP Address: clicking the Change IP Address button will bring up a dialog box that allows you to change the IP Address of selected print server.
ENGLISH 7. PS Wizard will help you to complete the port connection automatically. You can start your printing task without any complex configuration. If you use Windows 98, the system will restart after configuration. 1.6.4 Setting Up Windows XP TCP/IP Printing Following is the correct procedure for setting up TCP/IP LPR printing under Windows XP. Click Start > Printer and Faxes. Double Click Add a Printer then click Next. In the next windows select Local Printer.
ENGLISH 1.7 Support If you have any problems with this device, please consult the full manual on CDRom. If you continue to have problems you should contact the dealer where you bought this device. If you have any other questions you can contact the Atlantis Land company directly at the following address: Atlantis Land SpA Viale De Gasperi, 122 20017 Mazzo di Rho(MI) Tel: +39. 02.93906085, +39. 02.93907634(help desk) Fax: +39. 02.93906161 Email: info@atlantis-land.com or tecnici@atlantis-land.
FRANCAIS Copyright Copyright. 2002 est la propriété de cette société. Tout droits réservés.
FRANCAIS Marquage CE Cet appareil, qui appartient à la Classe B peut causer des interférences radio, dans ce cas nous vous invitons à prendre les contre-mesures appropriées. ATTENTION Laisser au moins 30 cm de distance entre les antennes du dispositif et les utilisateurs. Domaine de régulation Chaque pays utilise des bandes de fréquences fixées par cet organisme, l’utilisateur final doit donc s’assurer du bon réglage de son AP sur un canal autorisé dans son pays.
FRANCAIS Italie : Cet appareil est conforme à l’interface radio nationale et aux exigences de la table d’allocation des fréquences. L’utilisation de ce produit sans fil en dehors du cadre de la propriété de l’acquéreur nécessite une autorisation générale. Pour da plus amples informations, consultez le site www.comunicazioni.
FRANCAIS Ce guide d’installation rapide vous permet d’installer et de configurer le NetServer Pro suivant des paramètres standards. Pour plus de précisions, tant sur la méthode de configuration que sur le paramétrage avancé, reportez-vous au manuel sous format électronique (PDF) disponible sur le CDRom fourni. 1.
FRANCAIS 2 USB 3 LAN 4 WLAN Allumée fixe lorsque connecté. Clignote lors des transferts de données. Allumée quand le LAN (réseau) est connecté. Clignote lors des transferts de données. Allumée quand le LAN (réseau) est connecté. Clignote lors des transferts de données. 1.3 Face arrière Port Usage Reliez directement avec un câble Ethernet standard ou croisé aux PC ou à un port uplink (Hub/Switch). 1 Cable réseau 2 USB Reliez directement avec un câble USB à l’imprimante.
FRANCAIS 1.4 Configuration initiale Avant de commencer la configurationdu NetServer Pro, il est nécessaire d’en connaître la configuration par défaut : User: Password : Adresse IP: 192.168.0.1 1.5 Câblage Suivez ces étapes pour utiliser votre serveur d’impression sans soucis. 1. Assurez-vous que l’imprimante est en bon état de fonctionnement et qu’elle est connectée au serveur d’impression. 2. Une fois que vous avez vérifié le bon fonctionnement de l’imprimante, coupez son alimentation. 3.
FRANCAIS Votre serveur d’impression dispose d’une adresse IP par défaut. Pour éviter tout conflit se produisant sur votre réseau, il est recommandé d’utiliser le programme PS-Utility pour modifier le paramétrage IP lorsque l’adresse IP d’un autre périphérique est identique à l’adresse IP par défaut du serveur d’impression. 1.6 Utiliser le utilitaires Cette section décrit les utilitaires fournis avec le serveur d’impression: PS-Utility PS Wizard 1.6.
FRANCAIS Pour éviter tout conflit sur le réseau, vous pouvez utiliser PS-Utility pour modifier les paramètres correspondants de votre serveur d’impression (comme l’adresse IP). 1.6.2 Lancer PS-Utility Pour lancer PS-Utility : 1. Cliquez sur Démarrer -> Programmes -> PS-Utility, puis cliquez sur PS-Utility v3.11. 2. L’écran principal apparaîtra (figure ci-dessous) et le programme débutera la recherche des serveurs d’impression connectés sur le réseau. 1.
FRANCAIS 2. Boutons de Contrôle: Changer l’adresse IP, Mettre à jour le microprogramme, Afficher la Configuration Web, Réinitialiser. Valeurs Par Défaut, Découvrir les Périphériques, A Propos et Fermer. 3. Informations: Affiche les informations de base du serveur d’impression sélectionné sur la Liste des Périphériques. 4. Barre d’état : Indique l’ètat du système.
FRANCAIS 1.6.3 Utiliser PS Wizard PS Wizard est un utilitaire qui vous permet de configurer la connexion du port du serveur d’impression. Pour lancer PS Wizard: 1. Insérez le CD d'installation du serveur d’impression dans votre lecteur de CDRom. 2. Cliquez sur A02-PSU-W54 sur l’écran du menu Exécution Automatique. 3. Cliquez sur PS Wizard. 4. Dans la fenêtre suivante, sélectionnez une imprimante dans la Liste des Imprimantes pour configurer la connexion. 5.
FRANCAIS 1.7 Support Pour tous problèmes ou renseignements, vous pouvez contacter la « help desk » téléphonique gratuite d’Atlantis Land qui vous fournira assistance du: Lundi au vendredi de 9.00 à 13.00 et 14.00 à 18.00 Vous pouvez aussi nous contacter par email : tech.fr@atlantis-land.com Atlantis Land France 57, Rue d’Amsterdam 75008 Paris WWW: http://www.atlantis-land.
ESPANOL AVISO Hemos hecho todo lo posible para evitar que en el texto, las imágenes, tablas, software y hardware, y la información presentada en general sea carente de errores. A pesar de ello, no podemos garantizar la ausencia de estos.
ESPANOL dispositivos que no respetan la normativa EMC y que, por tanto, no han sido certificados. Asimismo, es posible, que de forma puntual ocurran picos de valor que se encuentran por encima de las tolerancias. En este caso, el usuario es responsable que el dispositivo vuelva a ser conforme con los límites EMC. El fabricante no puede hacerse responsable en el caso de que el producto sea utilizado fuera de los límites dictados por la normativa EMC.
ESPANOL Francia: En el caso de utilizar el dispositivo en exteriores, la potencia de salida y la frecuencia usada deberán de ajustarse a los que se detallan en la tabla. Para mayor información consulte el sitio Web www.art-telecom.fr. Lugar Interior restricciones) Exterior (sin Banda de Frecuencias (MHz) 2,400-2,483.5 Potencia (EIRP) 2,400-2,454 2,454-2,483.
ESPANOL Este manual es una guía rápida, para los detalles relativos a la configuración personalizada puede acudir al manual completo que se encuentra en el CD. 1.1 Contenidos de la caja Antes de utilizar el producto verifique que la caja contenga el siguiente material: Atlantis Land NetServer Pro, un CD con los utilidades y el manual de usuario, una guía rápida multilingüe, Alimentador (5V, 2.5A). 1.
ESPANOL 3 LAN 4 WLAN lampeggiante indica che il dispositivo sta inviando dati alla stampante. Encendido verde cuando esta conectado a 10 o 100 Mbps a la red LAN e intermitente cuando hay transferencia de datos. Encendido verde cuando esta conectado a 10 o 100 Mbps a la red inalámbrica e intermitente cuando hay transferencia de datos. 1.3 Los puertos posteriores Conector Uso 1 LAN Conectar con un cable Ethernet, directo o cruzado, a la tarjeta de red de un ordenador o a un switch (conmutador).
ESPANOL 1.4 Configuración de fábrica Antes de iniciar la configuración del Atlantis NetServer Pro le detallamos la configuración de fábrica: Contraseña: Nombre de usuario: Dirección IP: 192.168.0.1 1.5 Cableado Siga estos pasos para comenzar a utilizar el servidor de impresión sin problemas. 1. Compruebe el funcionamiento y la conexión de la impresora al servidor de impresión. 2. Cuando haya comprobado el funcionamiento de la impresora, apáguela. 3. Confirme que la red funciona con normalidad. 4.
ESPANOL El servidor de impresión incluye una dirección IP. Para evitar conflictos con la red, es recomendable que utilice el programa PS-Utility para cambiar la configuración IP cuando la dirección IP de otro dispositivo coincida con la dirección predeterminada del servidor de impresión. 1.6 Utilización de las utilidades Esta sección describe las utilidades de software del servidor de impresión: PS-Utility PS Wizard 1.6.
ESPANOL 1.6.2 Ejecución de PS-Utility Para ejecutar PS Utility: 1. Haga clic en Inicio -> Programas -> PS-Utility y, a continuación, haga clic en el elemento PS-Utility v3.11. 2. La pantalla principal aparecerá como la siguiente y comenzará a buscar el servidor de impresión de la red. 1. Lista de dispositivos: Muestra el servidor de impresión de la red. 2.
ESPANOL Antes de poder imprimir a través de la red utilizando el servidor de impresión, puede que sea necesario realizar algunas tareas de configuración básicas mediante PS-Utility. Esta configuración incluye: Cambiar la dirección IP del servidor de impresión: Al hacer clic en el botón Cambiar dirección IP, se abrirá un cuadro de diálogo en el que podrá cambiar la dirección IP del servidor de impresión seleccionado.
ESPANOL 5. Seleccione un Puerto de mpresora de la Lista de ervidor de impresión y hagaclic en Next (Siguiente). 6. La configuración se ha completado, haga clic en Terminar para ompletarla o haga clic en Continuar para configurar otra mpresora. 7. PS Wizard le ayudará a completar automáticamente la conexión del Puerto. Puede comenzar las tareas de impresión sin necesidad de complicados procesos de configuración. Si utiliza Windows 98, el sistema se reiniciará tras la configuración. 1.
Atlantis Land S.p.A. Viale De Gasperi, 122 Mazzo di Rho – MI – Italy info@atlantis-land.com sales@atlantis-land.com www.atlantis-land.