WebShare RB Wireless Broadband Router A02-RB-W54 MULTILANGUAGE QUICK START GUIDE A02-RB-W54(V1.
ITALIANO Questo prodotto è coperto da garanzia Atlantis Land Fast Swap della durata di 3 anni. Per maggiori dettagli in merito o per accedere alla documentazione completa in Italiano fare riferimento al sito www.atlantis-land.com. ENGLISH This product is covered by Atlantis Land 3 years Fast Swap warranty. For more detailed informations please refer to the web site www.atlantis-land.com. For more detailed instructions on configuring and using this device, please refer to the online manual.
The award of the information is facultative, but its lack will prevent ATLANTIS LAND® from starting the Guarantee process requested. R R Reeegggiiisssttteeerrr yyyooouuurrr ppprrroooddduuucccttt!!! w w w w m w...aaatttlllaaannntttiiisss---lllaaannnddd...cccooom ww ww m Registration on the web site www.atlantis-land.com within 15 days from the purchase of the product dismiss the customer from showing a valid proof of purchase (Sale Receipt or Invoice) in case of the request of intervention.
MULTILANGUAGE QUICK START GUIDE ITALIANO 1.1 Contenuto della confezione................................................................................ 8 1.2 I LED frontali ...................................................................................................... 8 1.3 Le porte posteriori .............................................................................................. 9 1.4 Cablaggio...................................................................................................
MULTILANGUAGE QUICK START GUIDE Configuration sous Windows 2000.................................................................. 55 Configuration sous Windows XP ..................................................................... 55 1.7 Vérification ....................................................................................................... 58 1.8 Configuration avec le Browser ......................................................................... 59 Quick Wizard Setup ......................
ITALIANO AVVERTENZE Abbiamo fatto di tutto al fine di evitare che nel testo, nelle immagini e nelle tabelle presenti in questo manuale, nel software e nell'hardware fossero presenti degli errori. Tuttavia, non possiamo garantire che non siano presenti errori e/o omissioni. Infine, non possiamo essere ritenuti responsabili per qualsiasi perdita, danno o incomprensione compiuti direttamente o indirettamente, come risulta dall'utilizzo del manuale, software e/o hardware.
ITALIANO Dichiarazione di Conformità Questo dispositivo è stato testato ed è risultato conforme alla direttiva 1999/5/CE del parlamento Europeo e della Commissione Europea, a proposito di apparecchiature radio e periferiche per telecomunicazioni e loro mutuo riconoscimento. Dopo l’installazione, la periferica è stata trovata conforme ai seguenti standard: EN 300.328(radio), EN 301 489-1, EN 301 489-17(compatibilità elettromagnetica) ed EN 60950(sicurezza).
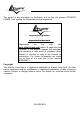
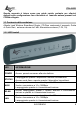
ITALIANO Questo manuale è inteso come una guida rapida, pertanto per ulteriori dettagli sulla configurazione fare riferimento al manuale esteso presenti sul CDRom allegato. 1.1 Contenuto della confezione Atlantis Land Wireless Broadband Router, CD-Rom contenente il manuale, Guida di Quick Start, antenna esterna da 2 dBi, Alimentatore esterno (7.5V, 1A). 1.2 I LED frontali LED INFORMAZIONE POWER Acceso quando connesso alla rete elettrica.
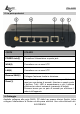
ITALIANO 1.3 Le porte posteriori PORTE UTILIZZO POWER Jack(2) Connettere l’alimentatore a questo jack. WAN(3) Connettere con un cavo UTP. LAN(4) Connettere con un cavo UTP. Reverse SMA(5) Collegare l’antenna fornita in dotazione. Reset(1) Dopo che il dispositivo è acceso, premere per effettuare il reset per una decina di secondi, rilasciare e questo punto il bottone. Tutti i LED si accenderanno e poi il sistema effettuerà un reboot caricando i parametri di default.
ITALIANO collegamenti il prodotto effettuerà una diagnostica la cui durata è di circa una decina di secondi. Terminata questa fase il Led POWER sarà acceso verde fisso ed il Led STATUS comincerà a lampeggiare indicando il corretto funzionamento del prodotto. I Led LAN/WLAN/WAN saranno accesi (a seconda dei collegamenti fatti) o lampeggianti .
ITALIANO • • • • • • Username:admin Password: admin Indirizzo IP LAN: (192.168.1.1), Subnet Mask (255.255.255.0) Indirizzo IP WAN: client DHCP DHCP Server: abilitato (192.168.1.100-192.168.1.199) SSSID= default, Channel=6, WEP/WAP=disabilitato 1.
ITALIANO 3. Selezionare l’opzione Obtain an IP address from a DHCP server e premere OK. Configurazione del PC in Windows 2000 1. Andare su Start/Settings/Control Panel. Cliccare due volte su Network and Dial-up Connections. 2. Cliccare due volte su Local Area Connection. 3. In Local Area Connection Status cliccare Properties. 4. Selezionare Internet Protocol (TCP/IP) e cliccare su Properties. 5.
ITALIANO 4. Selezionare Internet Protocol (TCP/IP) e cliccare su Properties. 5. Selezionare l’opzione Obtain an IP address automatically successivamente Obtain DNS server address automatically. 6. Premere su OK per terminare la configurazione.
ITALIANO A02-RB-W54 14
ITALIANO 1.8 Configurazione del Router Digitare nel browser web il seguente indirizzo IP: http://192.168.1.1 e premere il tasto invio. Utilizzare admin (come nome utente) e admin (come password). Premere OK per continuare. Apparirà a questo punto la configurazione Wizard che consente una configurazione guidata dell’apparato. Chiudendo la Wizard è possibile accedere al Menù Principale dove è possibile configurare dettagliatamente il dispositivo (si rimanda al manuale completo presente su CDRom).
ITALIANO Quick Wizard Setup Grazie a questo Wizard è possibile configurare il dispositivo in brevissimo tempo. Apparirà l’immagine di sotto (qualora non fosse così, cliccare sul bottone Wizard). Cliccare su Next per proseguire.
ITALIANO Step 1: Modifica Password E’ possibile adesso cambiare la password, cliccare poi su Next per passare al prossimo step.
ITALIANO Step2: Scelta della Time Zone Selezionare adesso dal menù a tendina il fuso orario di appartenenza. Cliccare poi su Next per proseguire.
ITALIANO Step 3: Configurazione LAN ed impostazioni del DHCP E’ possibile cambiare l’indirizzo IP del dispositivo e la subnet mask. Il valore di default è: 192.168.1.1. Spuntare Enabled per abilitare il DHCP server del dispositivo. Il DHCP server assegnerà automaticamente gli indirizzi IP ai vari client Wireless o Wired. E’ possibile assegnare il range di IP che saranno assegnati (inserite l’IP di partenza in Range start e l’IP finale in Range end). Cliccare su Next per continuare.
ITALIANO Step 4: Impostazione della Connessione Internet Selezionare la modalità di connessione ad Internet tra le scelte disponibili. Se il dispositivo è utilizzato come Access Point (la porta WAN non viene collegata) saltare allo step (5) successivo.
ITALIANO Obtain IP automatically (DHCP client): Scegliendo "Obtain IP automatically (DHCP client)" l’interfaccia WAN prenderà l’indirizzo IP da un server DHCP presente sulla rete cui viene collegata. Cliccare Next per proseguire. A questo punto è possibile clonare sul Wireless Broadband Router un indirizzo MAC particolare. Nel caso non ci fosse questa necessità proseguire cliccando Next.
ITALIANO Fixed IP Address: Introdurre l’indirizzo IP manualmente sull’interfaccia WAN. Introdurre anche gli IP dei DNS. PPPoE to obtain IP automatically oppure PPPoE with a fixed IP address: Introdurre l’Username e Password (eventualmente l’IP) dell’abbonamento con l’ISP. Spuntare la voce Specify IP nel caso in cui l’IP sia statico. Il campo Service Name può essere richiesto dal fornitore di servizio (in caso non sia espressamente richiesto ignorare questo campo). Cliccare Next per proseguire.
ITALIANO PPTP/L2TP: Introdurre l’Username (PPTP Account) e Password ed il nome o IP (eventualmente l’IP) del server PPTP. Spuntare la voce Static IP nel caso in cui l’IP sia statico. Cliccare Next per proseguire.
ITALIANO Step 5: Set Wireless LAN connection Cliccare Enable per abilitare l’interfaccia wireless. Introdurre il valore di SSID (deve essere identico in tutti i dispositivi) e scegliere il canale su cui opererà il dispositivo.
ITALIANO Step 6: Restart A questo punto la configurazione è terminata, riavviare il Wireless Broadband Router premendo su Restart. Cliccando invece su Exit tutti i settaggi impostati non verranno salvati. Provare ad effettuare una prova di navigazione. In caso di problemi fare riferimento al manuale esteso presente sul CDRom allegato.
ITALIANO 1.9 Supporto Offerto Per ogni problema con questo dispositivo consultare il manuale completo fornito a corredo sul CDRom. Per qualunque altro problema o dubbio (prima è opportuno munirsi del seriale e codice prodotto) è possibile contattare l’help desk telefonico (02/93907634) gratuito di Atlantis Land che fornirà assistenza da lunedì al giovedì dalle 9:00 alle 13:00 e dalle 14:00 alle 18:00 ed il venerdì dalle 9:00 alle 13:00.
ENGLISH Copyright Statement No part of this publication may be reproduced, stored in a retrieval system, or transmitted in any form or by any means, whether electronic, mechanical, photocopying, recording or otherwise without the prior writing of the publisher. Windows™ 98SE/2000/ME/XP are trademarks of Microsoft® Corp. Pentium is trademark of Intel. All copyright reserved. The Atlantis Land logo is a registered trademark of Atlantis Land SpA.
ENGLISH Germany, UK, Italy, Spain, Belgium, Netherlands, Portugal, Greece, Ireland, Denmark, Luxembourg, Austria, Finland, Sweden, Norway and Iceland. France: except the channel 10 through 13, law prohibits the use of other channels. CE/EMC Restriction of Liability The product described in this handbook was designed, produced and approved according to the EMC-regulations and is certified to be within EMC limitations.
ENGLISH For more detailed instructions on configuring and using the Broadband Router, please refer to the online manual. 1.1 Package contents Atlantis Land Wireless Broadband Router, CD-Rom with manual, Guide, External 2 dBi Antenna, Power Adapter AC-DC (7.5V, 1A). Wireless Quick Start 1.2 The Front Panel LEDs LED MEANING POWER This indicator lights green when the hub is receives power, otherwise it is off.
ENGLISH These indicators blink green while the LAN ports were transmitting data. 1.3 The Rear Ports PORT POWER Jack(2) MEANING Connect the supplied power adapter to this jack. WAN(3) Connect an UTP Ethernet cable to one of the four LAN ports when connecting to a PC or an office/home network of 10Mbps or 100Mbps. LAN(4) Connect an UTP Ethernet cable to one of the four LAN ports when connecting to a PC or an office/home network of 10Mbps or 100Mbps.
ENGLISH Reset(1) After the device has turned on, press it to reset the device or restore to factory default settings. Use a pinshape item to push to reset this device to factory default settings. It will be useful too when the manager forgot the password to login, but the setting will be back to default setting. 1.4 Cabling Plug in one end of the network cable to the WAN port of the Wireless Internet Broadband Router.
ENGLISH 1.5 Default Settings The Wireless Broadband Router can be configured with your Web browser. The web browser is included as a standard application in following operation systems, UNIX, Linux, Mac OS, Windows 95/98/NT/2000/Me, etc. The product provides a very easy and user-friendly interface for configuration.
ENGLISH Please follow the steps below for PC’s network environment installation. First of all, please check your PC’s network components. The TCP/IP protocol stack and Ethernet network adapter must be installed. If not, please refer to MS Windows relative manuals. Before you configure this Wireless Broadband Router, you need to know the following default settings: • Username:admin • Password:admin • IP LAN address: (192.168.1.1), Subnet Mask (255.255.255.
ENGLISH Configuring PC (Windows NT4.0) 1. Go to Start / Settings / Control Panel. In the Control Panel, double-click on Network and choose the Protocols tab. 2. Select TCP/IP Protocol and click Properties. 3. Select the Obtain an IP address from a DHCP server radio button and click OK. Configuring PC (Windows 2000) 1. Go to Start / Settings / Control Panel. In the Control Panel, double-click on Network and Dial-up Connections. 2. Double-click LAN Area Connection. 3.
ENGLISH 3. In the LAN Area Connection Status window, click Properties. 4. Select Internet Protocol (TCP/IP) and click Properties. 5. Select the Obtain an IP address automatically and the Obtain DNS server address automatically radio buttons.
ENGLISH 6.
ENGLISH 1.8 Browser configuration Open the web browser, enter the local port IP address of this Wireless Broadband Router, which default at 192.168.1.1, and click Go to get the login page. The default username is admin, password admin and click OK to continue.Click on the desired item to expand the page with all settings in the main navigation panel. Following next steps you can make operating Wireless Broadband Router in short time using PCs in DHCP mode.
ENGLISH Quick Wizard Setup The following screen will appear. Please click Next to continue. You also can go back to modify the setting by clicking Back (when available).
ENGLISH Step 1: Set Password You can change the password as you like and then click Next to continue.
ENGLISH Step2: Chose Time Zone Select your time zone from the drop down list. Please click Next to continue.
ENGLISH Step 3: Set LAN & DHCP Server Set your IP address and mask. The default IP is 192.168.1.1. If you like to enable DHCP, please click Enabled. DHCP enabled is able to automatically assign IP addresses. Please assign the range of IP addresses in the fields of Range start and Range end. Please click Next to continue.
ENGLISH Step 4: Select Internet Connection Type Select how the router will set up the Internet connection: Obtained IP automatically; Fixed IP address; PPPoE, PPTP/L2TP.
ENGLISH Obtain IP automatically (DHCP client): If you have enabled DHCP server, choose Obtain IP automatically (DHCP client) to have the router assign IP addresses automatically. Please click Next to continue. If Your ISP requie you to enter a specific MAC/Name, please enter it in. Click Next to continue.
ENGLISH Fixed IP Address: If Fixed IP address is assigned, the below screen will pop up. Please set the WAN address and DNS server. Click Next to continue. PPPoE to obtain IP automatically or PPPoE with a fixed IP address Enter in the username, password (and IP address) provided to you by your ISP. If Fixed IP address is assigned, please check Specify IP. Click Next to continue.
ENGLISH PPTP/L2TP: Enter IP Server adresses and PPTP/L2TP account and password. If Fixed IP address is assigned, please check Specify IP. Click Next to continue.
ENGLISH Step 5: Set Wireless LAN connection Click enable to enable wireless LAN. If you enable the wireless LAN, type the SSID in the text box and select a communications channel. The SSID and channel must be the same as wireless devices attempting communication to the router. Select a channel number and click on Next.
ENGLISH Step 6: Restart The Setup wizard is now completed. The new settings will be effective after the Wireless Broadband Router restarted. Please click Restart to reboot the router. If you do not want to make any changes, please click exit to quit without any changes. Then relaunch your Web browser, to link to your favorite Web site to test your Internet connection. For additional settings or information, refer to the Manual located on the CD.
ENGLISH 1.9 Product Support If you have any problems with this device, please consult this guide then manual on the CDRom. If you continue to have problems you should contact the dealer where you bought this device. If you have any other questions you can contact the Atlantis Land company directly at the following address: Atlantis Land SpA Viale De Gasperi, 122 20017 Mazzo di Rho(MI) Tel: +39. 02.93906085, +39. 02.93907634(help desk) Fax: +39. 02.93906161 Email: info@atlantis-land.
FRANCAIS Copyright Copyright. 2002 est la propriété de cette société. Tout droits réservés.
FRANCAIS Déclaration de Conformité Cet appareil a été testé et est conforme à la Directive 1999/5/CE du Parlement européen et du Conseil concernant les équipements hertziens et les équipements de terminaux de télécommunications et la reconnaissance mutuelle de leur conformité. Après évaluation du matériel, celui-ci est conforme aux normes suivantes : EN 300.328 (radio), EN 301 489-1, EN 301 489-17(compatibilité électromagnétique) et EN 60950 (sécurité).
FRANCAIS Ce guide d’installation rapide vous permet d’installer et de configurer le Wireless Broadband Router suivant des paramètres standards. Pour plus de précisions, tant sur les méthodes de configuration que sur le paramétrage avancé, reportez-vous au Manuel sous format électronique (PDF) disponible sur le CD Rom fourni. 1.1 Contenu de la boîte Avant l’installation, assurez-vous de disposer des éléments suivants : Wireless Broadband Router, adaptateur secteur (7.
FRANCAIS LAN Allumée quand le LAN (réseau) est connecté Vert= connexion à 100Mbps ou 10Mbps. Il clignote lors des transferts de données. 1.3 Face arrière PORT USAGE POWER Jack(2) Connectez l’alimentation fournie à cette prise. WAN(3) Relier directement avec un câble Ethernet standard ou croisé aux PC ou à un port uplink (Hub/Switch). LAN(4) Relier directement avec un câble Ethernet standard ou croisé aux PC ou à un port uplink (Hub/Switch).
FRANCAIS 1.4 Câblage Après avoir terminé le câblage, raccordez l’alimentation pour mettre le Wireless Broadbnad Router sous tension. Assurez-vous que les LEDs sont correctement allumés. Connectez un câble réseau standard ou croisé pour relier le Router à un Hub/Switch ou aux PC. L’interface Wireless intégrée permet aux utilisateurs dotés d’interfaces wireless d’aller sur Internet en utilisant le protocole IEEE802.11b ou IEEE802.11g.
FRANCAIS 1.5 Configuration initiale Avant de commencer la configuration du Wireless Broadband Router il est nécessaire de connaître la configuration initiale (paramètres par défaut). Pour pouvoir utiliser le Wireless Broadband Router en peu de temps, il suffit de garder la configuration par défaut, de mettre les PC en client DHCP. Pour une configuration plus détaillée faire référence au manuel complet sur le CD-Rom.
FRANCAIS 3. Sélectionnez (votre carte Réseau) l’onglet Obtenir une adresse IP par un serveur DHCP et après cliquez sur OK pour terminer la configuration. Configuration sous Windows 2000 1. Allez au Panneau de Configuration. Double-cliquez sur Connexions Réseau et accès à distance.. 2. Double-cliquez sur connexion au réseau local. 3. Dans Connexion au réseau local cliquez sur Propriétés. 4. Sélectionnez Internet Protocol (TCP/IP) et cliquez sur Propriétés. 5.
FRANCAIS 3. Cliquez Propriétés. 4. Sélectionnez Internet Protocol (TCP/IP) et cliquez sur Properties.
FRANCAIS 5. Sélectionnez Obtenir une adresse IP automatiquement et après Obtenir les adresses des serveurs DNS automatiquement.
FRANCAIS 6. Cliquez sur OK pour terminer la configuration. 1.7 Vérification Pour vérifier le succès de la configuration (après avoir redémarré le PC, opération nécessaire sous Win98, SE, ME) utiliser le PING. Dans la fenêtre Dos écrivez: PING 192.168.1.1. Si le message suivant apparaît: Pinging 192.168.1.1 with 32 bytes of date: Reply from 192.168.1.1: bytes=32 times <10ms TTL=64 Reply from 192.168.1.1: bytes=32 times <10ms TTL=64 Reply from 192.168.1.
FRANCAIS Request timed out. Request timed out. Vérifiez que le Led LAN est bien allumé. Vérifiez l'adresse de votre PC en écrivant WINIPCFG (pour, Win95,98,ME) ou IPCONFIG (pour Win2000, XP) et éventuellement réinstallez le stack TCP/IP. 1.8 Configuration avec le Browser Pour accéder à l’interface Web, lancez un navigateur Internet et tapez dans la barre adresse l’IP suivante : http://192.168.1.1 Un mot de passe vous est demandé, pour la première connexion.
FRANCAIS Quick Wizard Setup Grâce à cet Wizard vous pourrez configurer le dispositif en très peu de temp. Vous devrez voir l’image en bas (dans le cas que n’est pas comme ça, cliquez sur le bouton Wizard). Cliquez sur Next pour continuer.
FRANCAIS Step 1: Modification du mot de passe Vous pouvez maintenant changer le mot de passe, cliquez puis sur Next pour passer au prochaine pas.
FRANCAIS Step 2: Choix de la Time Zone Sélectionnez maintenant du menu l’horaire décalé d’appartenance. Cliquez puis sur Next pour continuer. Step 3: Configuration LAN et positions du DHCP Vous pourrez changer l’adresse IP du dispositif et la subnet mask. La valeur de default est: 192.168.1.1. Sélectionnez Enabled pour habiliter le DHCP serveur du dispositif. Le DHCP serveur assignera automatiquement les adresses IP aux différents utilisateurs Wireless ou Wired.
FRANCAIS Step 4: Position de la Connexion Internet Sélectionnez la modalité de connexion à Internet entre les choix disponibles. Si vous utilisez les dispositifs comme Access Point (n’utilisez pas la porte WAN) vous pouvez sauter au pas (5) successif.
FRANCAIS Obtain IP automatically (DHCP client): En choisissant Obtain IP automatically (DHCP client) l’interface WAN prendra l’adresse IP d’un serveur DHCP présent sur le réseau à lequel est connectée. Cliquez sur Next (2 fois) pour continuer. Fixed IP Address: Introduisez l’adresse IP manuellement sur l’interface WAN. Introduisez même les IP de DNS. Cliquez sur Next pour continuer.
FRANCAIS PPPoE to obtain IP automatically ou PPPoE with a fixed IP address Introduisez le Username et Password (éventuellement l’IP) du votre abonnement avec l’ISP. Si vous utilisez une IP fixe Introduisez l’adresse IP manuellement en choisissant Specify IP. Cliquez sur Next pour continuer.
FRANCAIS PPTP/L2TP: Introduisez l’IP de l’interface WAN et l’adresse IP du dispositif qui fait la connexion à Internet. Introduisez enfin username et password. Si vous utilisez une IP fixe Introduisez l’adresse IP manuellement en choisissant Specify IP. Cliquez sur Next pour continuer.
FRANCAIS Step 5: Set Wireless LAN connection Introduisez la valeur de SSID (il doit être identique en tous les dispositifs). Si vous habilitez le wireless LAN, introduisez le SSID dans le champ du texte et sélectionnez le canal de communication. Le canal SSID doit être le même que celui des apparats wireless qui essayent la communication avec le router. Cliquez sur Next pour continuer.
FRANCAIS Step 6: Restart À ce point la configuration est terminée, redémarrez les Router en appuyant sur Restart. En cliquant par contre sur exit vous effacerez toutes les positions faites. En exécutant maintenant le browser vous devriez être capables d’aller sur internet. Pour problèmes faire référence au manuel complet.
FRANCAIS 1.9 Support Pour tous problèmes ou renseignements, vous pouvez contacter la « help desk » téléphonique gratuite d’Atlantis Land qui vous fournira assistance du: lundi au jeudi de 9.00 à 13.00 et 14.00 à 18.00. Le vendredi de 9.00 à 13.00. Vous pouvez aussi nous contacter par email : tech-fr@atlantis-land.com Atlantis Land France 57, Rue d’Amsterdam 75008 Paris WWW: http://www.atlantis-land.
NOTE A02-RB-W54 70
NOTE APPENDIX A: Regulatory Domains For some European Country, it may have its own domain; users are responsible for ensuring that the channel set configuration is in compliance with the regulatory standards of these countries.
NOTE APPENDIX B: Technical Features Physical Interface WAN: 1 x RJ45 10/100 Base-T Ethernet auto-crossover (MDI/MDI-X) LAN: 4 x RJ45 10/100 Base-T Ethernet auto-crossover (MDI/MDI-X) WLAN: 2 x 2 dBi (1 external orientable detachable Antenna Reverse SMA) 8 diagnostic LEDs Reset Button Hardware: Wireless Chipset: Atheros® 2317 Radio Specifications: Frequancy Range: 2.412 ~ 2.484Ghz Standard Compliance: 802.11b, 802.11g Modulation: 802.11g: OFDM / 802.
NOTE Package Contents One Wireless Broadband Router 1 x 2 dBi Antenna One Quick Start Guide (English, French, Italian and Spanish) One AC/DC Adapter (7.
Atlantis Land S.p.A. Viale De Gasperi, 122 Mazzo di Rho – MI – Italy info@atlantis-land.com sales@atlantis-land.