A05-15AM-E01 - MONITOR LCD User Manual Manuale utente Manuel d’utilisation A05-15AM-E01_X02
IMPORTANT SAFETY INSTRUCTIONS ..................................................... 5 1 GETTING STARTED................................................................................. 6 1.1 1.2 1.3 1.4 PRECAUTIONS .................................................................................. 6 ELECTRIC SHOCK ............................................................................. 6 CLEANING THE TFT LCD MONITOR ...................................................
7.3 7.4 7.5 PULIZIA DEL PANNELLO LCD ........................................................... 16 COMUNICATO RELATIVO ALLE INTERFERENZE RADIO ......................... 16 PRECAUZIONI PER IL CAVO DI ALIMENTAZIONE .................................. 17 8 INSTALLAZIONE DEL MONITOR.......................................................... 17 8.1 8.2 8.3 8.4 8.5 DISIMBALLO .................................................................................... 17 CONNESSIONE .....................................
15.2 15.3 15.4 15.5 CONNEXION .................................................................................... 27 COTE POSTERIEUR ......................................................................... 28 TOUCHES FONCTION....................................................................... 28 LED D'ETAT.................................................................................... 28 16 MENÙ ....................................................................................................
ENGLISH Important Safety Instructions • • • • • • • • • • • • • • • • • • • Read the Safety Instructions carefully and keep it for later use. Be aware of all warnings and instruction signs marked on the products. When cleaning, turn off the electrical supply at all times. Never use liquid or aerosol detergent, use a damp rag instead. For more details, please refer to Pag. 4 “Cleaning the Monitor.” Always keep the product away from heavy moisture. Keep this product stable all times.
ENGLISH 1 Getting Started Congratulations on your purchase of a TFT LCD Color Monitor. This section lists package contents, features, precautions, as well as cleaning and installation instructions. IMPORTANT! PLEASE KEEP THE ORIGINAL BOX AND ALL PACKING MATERIAL FOR FUTURE SHIPPING NEEDS. 1.1 • • • • • • • • • • 1.2 Precautions Sit at least 18"(45 cm) away from the screen when in use. Do not touch the LCD panel with your bare hands. Oil from your skin is difficult to remove and may damage the screen.
ENGLISH the equipment off and on, the user is encouraged to try to correct the interference by one or more of the following measures: • Reorient or relocate the receiving antenna. • Increase the separation between the equipment and receiver. • Connect the equipment into an outlet on a circuit different from that to which the receiver is connected. - Consult the dealer or an experienced radio/TV technician for help. 2 2.1 Installing the Monitor Unpacking Open the shipping cartons and check the contents.
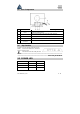
ENGLISH 2.3 Rear Components Ref Icon⁄Components VESA Mounting Holes 1 2 3 4 Power Connector 5 Audio Input Connector Description ® Allow the monitor to be fixed on an UL listed VESA FPMPMI™ compliant mounting device. Connects the monitor to the VGA port of the computer. Signal Cable Locks the panel in a secure tilting range. Latch 2.4 Connects the AC adapter. Connects the Audio Output connector of the computer.
ENGLISH 3 MENU Press Menu enter main control menu Color Picture Function OSD menu Miscellaneous Press ◄► button choose and MENU button enter OSD menu 3.1 AUTO AUTO 3.
ENGLISH OSD V. Position: OSD Timer: Translucent: Exit: 3.6 adjust OSD V. Position adjust OSD timer adjust OSD translucent Return to main MENU Other Function Press ◄► button choice and MENU button to enter OSD menu Volume: adjust speaker volume Exit Return to main MENU 3.7 EXIT If you choose EXIT , press MENU button to exit main menu 4 4.
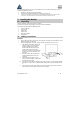
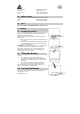
ENGLISH Follow these steps to pack the monitor: Disconnect the AC adapter, signal cable, and any cables connected to the monitor. Tile the panel backward to approx. 25°. Slide the latch outward and hold it in place 1. NOTE: Do not tilt the LCD beyond the allowed angles without first sliding the latch to the right. Doing so may damage the hinge arm. Then, you can keep on tilting the panel to the horizontal position 2 for packing into a carton.
ENGLISH 5.1 6 Factory Preset Timings Timing Horizontal Vertical Sync Frequency Frequency Polarity (KHz) (Hz) (H/V) VGA 720 X 400 31.467 70.082 -/+ VESA 640 X 480 31.469 59.940 -/- VESA 640 X 480 37.861 72.809 -/- VESA 640 X 480 37.500 75.000 -/- VESA 800 X 600 37.879 60.317 +/+ VESA 800 X 600 48.077 72.188 +/+ VESA 800 X 600 46.875 75.000 +/+ VESA 1024 X 768 48.363 60.004 -/- VESA 1024 X 768 56.476 70.069 -/- VESA 1024 X 768 60.023 75.
• • ENGLISH Use “AUTO ADJUST” or manually adjust “PHASE” and “CLOCK”, refer the Controls section. The characters on the screen are too dim or too bright Choose fit color temperature, use “AUTO COLOUR ADJUST or manually adjust “RGB ADJUSTMENT, refer the Controls section. Interference appear at the view of “CLOSE WINDOWS” Use the “AUTO ADJUST” or manually adjust the values of “PHASE” and “CLOCK”, refer the Controls section.
ITALIANO Avvertenze • • • • • • • • • • • • • • • • • • • • • Leggere attentamente queste informazioni e tenerle disponibili per una eventuale consultazione successiva. Tenere presente anche tutte le indicazioni riportate sul prodotto. Staccare ogni collegamento elettrico quando viene effettuata la pulizia. Non usare mai liquidi o un detergente a spruzzo, usare sempre un panno leggermente umido.
ITALIANO 7.1 • • • • • • • • • • 7.2 Precauzioni Tenersi ad almeno 45 cm di distanza dal pannello durante l’uso. Non fare pressioni sul pannello: è fragile Non toccare il pannello con le mani sporche. L’unto della pelle risulta di difficile rimozione. Non esporre direttamente il pannello alla luce solare o ad altre fonti di calore. Durante l’utilizzo, non indirizzare luci dirette sul pannello, per evitare fastidiosi riflessi. È importante scegliere un posto ben ventilato dove posizionare il monitor.
• • ITALIANO Alimentare l’apparecchiatura da una presa diversa rispetto a quella alla quale sia collegata il ricevitore. Consultare il rivenditore o un esperto tecnico radio/TV per un aiuto. 7.4.1 FCC Avvertimento Per assicurare la continuità del rispetto delle normative FCC, l’utilizzatore deve assicurare un corretto collegamento di terra al cavo di alimentazione, assicurarsi che il cavo di collegamento video sia schermato con una opportuna maglia di ferrite.
• 8.3 ITALIANO Collegare il cavo audio 4alla presa del computer ed all’apposita presa sulla scheda del computer Lato Posteriore Rif 1 2 3 4 5 8.4 Descrizione Fori montaggio VESA Consentono l’installazione del monitor su bracci snodati o supporti secondo la standard VESA®FPMPMI™. Cavo segnale Connette il Monitor alla porta VGA del computer Blocco Blocca il monitor in posizione verticale.
ITALIANO 9 MENÙ Premere Menu per entrare nella funzione di controllo del: Colore Immagine Funzioni Varie OSD Altre Tramite i pulsanti ◄► selezionare la funzione e quindi il pulsante MENU per attivarla. 9.1 AUTO AUTO 9.2 Per una autocalibrazione del Monitro in funzione del Segnale in ingresso e delle sue caratteristiche. Colore Tramite i pulsanti ◄► selezionare la funzione e quindi il pulsante MENU per attivarla.
ITALIANO • • • • • Exit: Lingue selezione tra sette Posizione orizzontale dell’OSD Posizione verticale dell’OSD Tempo di permanenza dell’OSD Trasparenza Ritorna al MENU 9.6 Altre Funzioni Tramite i pulsanti ◄► selezionare la funzione e quindi il pulsante MENU per attivarla. Le regolazioni possibili sono: • Volume Exit Ritorna al MENU 9.7 EXIT Dopo aver selezionato EXIT, premere il pulsante Menu per uscire. 10 Ulteriori Informazioni 10.
ITALIANO NOTA: Non inclinare il pannello oltre l’angolazione consentita, senza aver prima sbloccato il meccanismo. Facendo questo si potrebbe danneggiare la struttura della base. Ora ruotare il pannello sino a porlo parallelo alla base 2 per l’imballo. Customer ser 11 Specifiche : Pannello Frequenze Segnale d'ingresso Tipo TFT (Thin Film Transistor), Matrice Attiva Area visibile 15" Dimensioni Schermo 304.1 x 228.1 mm Pixel Pitch (mm): 0,297 Colori Massimo supportato 16.
ITALIANO 11.1 Risoluzioni preimpostate in fabbrica Risoluzione Frequenza Frequenza Sincro Orizzontale (KHz) Verticale (Hz) (H/V) VGA 720 X 400 31.467 70.082 -/+ VESA 640 X 480 31.469 59.940 -/- VESA 640 X 480 37.861 72.809 -/- VESA 640 X 480 37.500 75.000 -/- VESA 800 X 600 37.879 60.317 +/+ VESA 800 X 600 48.077 72.188 +/+ VESA 800 X 600 46.875 75.000 +/+ VESA 1024 X 768 48.363 60.004 -/- VESA 1024 X 768 56.476 70.069 -/- VESA 1024 X 768 60.023 75.
• ITALIANO Utilizzare la funzione di Regolazione Automatica del Colore o regolare manualmente i colori fondamentali. Appaiono interferenze durante la fase di uscita da Windows. Utilizzare la funzione di Auto Regolazione o regolare manualmente la Fase ed il Clock.
FRANCAIS Instructions • • • • • • • • • • • • • • Lire ces renseignements attentivement et les conserver pour une consultation ultérieure. Conserver aussi toutes les indications se reportant au produit. Déconnecter chaque liaison électrique avant d’effectuer le nettoyage de l’écran. Ne jamais pas utiliser de liquides ou de détergent, utiliser toujours un tissu légèrement humide. Consulter tout ce qu'a été reporté à la page 22 Nettoyage du panneau LCD, pour de plus ample informations.
• • • • • • • • FRANCAIS Ne pas exposer le panneau directement à la lumière solaire ou à toutes autres sources de chaleur. Pendant l’utilisation, ne pas positionner l’écran face a une lumière directe, pour éviter les reflets. Il est important de choisir une place adaptée et aérée où positionner l'écran. Ne pas rien mettre sur l'écran. En présence de fumée, bruits étranges, éteindre l'écran immédiatement et appeler le centre d’assistance. Ne pas continuer à utiliser l'écran.
FRANCAIS 15 Installation de l'écran 15.1 Déballage Ouvrir le carton d’emballage et vérifier le contenu. Si un élément est manquant ou endommagé, contacter votre revendeur immédiatement. Le package doit comprendre les éléments suivants • • • • • • Moniteur couleur TFT Guide de l’utilisateur Câble d’Alimentation Câble Vidéo ( Sub D 15) Adaptateur d’alimentation DC Câble Audio 15.
FRANCAIS 15.3 Côté Postérieur Rif Description Trous assemblage VESA Permis l'installation de l'écran sur les supports selon le standard VESA®FPMPMI™ 2 3 4 Câble signal Joint l'Écran à la porte VGA de l'ordinateur Bloc Bloqué l'écran en position verticale Prise alimentateur Joint l'écran à l'adaptateur extérieur 5 Entrée Audio Pour la connexion à la fiche sonore de l'ordinateur 1 15.
FRANCAIS • • • • • Luminosité Correction Gamme Correction Couleur Saturation Exit Revenu au MENU 16.3 image Par les boutons ◄► sélectionner la fonction et ensuite le bouton MENU pour l'activer. Les régulations possibles sont: • • • • • • Position horizontale Position Verticale Synchronisation fine Phase Sync Exit Revenu au MENU 16.4 Fonctionnes Par les boutons ◄► sélectionner la fonction et ensuite le bouton MENU pour l'activer.
FRANCAIS 17 Autres Renseignements 17.1 Assemblage de l'écran Il est possible d'installer cet écran sur un bras dénoué ou au mur par un support relatif, pourvu que ceux-ci respectent les normatifs VESA, Écran Electronics Standards Association, Avant d'effectuer l'installation faut libérer l'écran de sa base. ATTENTION: Utiliser produits seuls standards UL/VESA, avec autres produits on pourrait endommager l'écran. 17.2 Inclination Pour une meilleure vision il est possible d'incliner l'écran.
FRANCAIS 18.3 Réglage Pré-Configuré Dans cette parite, on a définit quelques modes d’affichage préférentiels utilisable par le micro-réglage. Des modes d’afficahge sont pré-configurés à l’usine, incluant les modes d’affichage disponibles les plus utilisés actuellement. Le micro-réglage ne cherchera un mode d’affichage utilisable dans cette partie Mode Résolution ( points*lignes ) Fréq.Horizz. (KHz) Fréq.Vert. (Hz) 1 VGA 720x400 31,467 70,082 2 VGA 640x480 31.
FRANCAIS 18.7 Specifications LCD Input Signal Video Sync Taille 15.0" (full 15.0" viewable diagonal area) Model TFT (Thin Film Transistor), Active Matrix Panel Pixel Pitch 0,297 x 0.297 mm N.bre de couleurs affichées 16.7 M Luminosité 200 cd/m2 Contraste 300:1 Angles de vision +/- 60( H) . 45(-)/55(+) at CR>10 Response Time <20ms Surface visible 304.1 x 228.1 mm Surface Anti-Glare & Hard Coat 2H Video RGB Analog Sync H. V., Separate Sync, Fréq.Horizz. 30-62kHz, Fréq. Vert.
WARRANTY CERTIFICATE We thank You for your decision to have bought an ATLANTIS LAND® product. Our society, thank to the quality of its products, offers You an extended guarantee lasting 36 months, both if the product serves for a private use and if it works for a professional one. This service will be provided to you directly by ATLANTIS LAND®, without asking you for more interventions, for example brought off by your usual retailer or by others operators.
25. All the elements that undergo wear and tear as accumulator’s batteries , batteries themselves , fuses and bulbs even when furnished , cables for the connection or the feeding and connectors are not included in the Guarantee. 26. Exactly only for the line of UPS products the batteries that are furnished with the product itself are in Guarantee for 12 months. 27. The external feeders, of every kind of apparatus, are covered by a 12months Guarantee. 28.
CERTIFICATO DI GARANZIA ® La ringraziamo della Sua decisione di aver acquistato un prodotto ATLANTIS LAND . La nostra società, in virtù della qualità dei suoi prodotti, Le offre una garanzia estesa di 36 mesi, sia che il prodotto sia utilizzato in ambito privato che in ambiente professionale. ® Tale servizio Le verrà fornito direttamente da ATLANTIS LAND , senza richiederLe ulteriori interventi, da parte ad esempio del suo rivenditore di fiducia o di altri operatori del mercato.
48. Non si intendono coperte da Garanzia tutte le parti soggette ad usura in seguito all’utilizzo come le batterie di accumulatori, pile, fusibili e lampadine anche quando vengono fornite a corredo, cavi per la connessione o l’alimentazione e connettori. 49. Solo ed esclusivamente per la linea di prodotti UPS le batterie fornite a corredo del prodotto sono coperte da Garanzia di 12 (dodici) mesi. 50. Anche gli alimentatori esterni, di qualunque apparato, sono coperti da Garanzia di 12 (dodici) mesi. 51.
CERTIFICAT DE GARANTIE Nous vous félicitons et vous remercions d’avoir acheté un produit ATLANTIS LAND. Notre société, grâce à la qualité de ses produits, vous offre une garantie étendue de 36 mois, que le produit soit utilisé dans un milieu privé, ou dans un milieu professionnel. Ce service vous sera fourni directement par ATLANTIS LAND, sans interventions ultérieure de votre part ou de la part de votre revendeur habituel ou d’autres opérateurs du marché.
72. Toute partie sujette à usure à la suite d’utilisation comme les batteries d’accumulateurs, piles, fusibles, et lampes, même fournies à l’achat, câbles de connections ou d’alimentation, ne bénéficie pas de la Garantie. 73. Pour la gamme des produits UPS A03 les batteries fournies avec le produit bénéficient d’une Garantie de 12 (douze) mois. 74. Les alimentations externes fournies avec le produits bénéficient d’une Garantie de 12 (douze) mois. 75.
Demand of assistance Form Fill all the blanks, attach always a copy of the proof of purchase (Sale Receipt or Invoice), and add it all to the product for which you are asking for assistance.
A05-15MA-E01_X02 40 - 44
MODULO RICHIESTA ASSISTENZA Compilare in ogni sua parte, allegare sempre una copia della prova di acquisto valido (Scontrino Fiscale o Fattura), ed unire il tutto al prodotto per il quale si richiede l’assistenza.
A05-15MA-E01_X02 42 - 44
FICHE DE DEMANDE D’ASSISTANCE Remplissez cette fiche et joignez y une copie de la preuve d’achat (ticket de caisse ou facture), du produit pour lequel vous demandez une assistance.
HEADQUARTER & EUROPE ATLANTIS LAND S.p.A. Viale De Gasperi, 122 Mazzo di Rho – MI – Italy info@atlantis-land.com sales@atlantis-land.com ATLANTIS LAND FRANCE CENTRE AMSTERDAM 7, RUE D’AMSTERDAM PARIS – FRANCE info.fr@atlantis-land.com sales.fr@atlantis-land.com FAR EAST AND USA SALES: Atlantis Land International Sales Office N° 249 Hsing South Rd. Taipei – Taiwan info.tw@atlantis-land.com sales.tw@atlantis-land.com Atlantis Land Technology L.t.d. 3rd.