I-See P 17” Series A05-17AM-L03 A05-17BM-L04 USER MANUAL A05-17XM-L0X_MX01
A05-17XM-L0X_MX01
A05-17XM-L0X_MX01 INDEX ITALIANO ..................................................................................1 1.0 Prima di Iniziare .................................................................1 1.1 Caratteristiche principali ...............................................1 1.2 Contenuto della confezione .........................................1 2.0 Installazione del prodotto .................................................1 2.1 Collegamento al Personal Computer .........................1 2.
A05-17XM-L0X_MX01 FRANCAIS ..............................................................................17 1.0 Avant de commencer ......................................................17 1.2 Caractéristiques ...........................................................17 1.3 Contenu de l’emballage..............................................17 2. Installation...........................................................................17 2.1 Installation du moniteur ............................................
A05-17XM-L0X_MX01 Copyright The Atlantis Land logo is a registered trademark of Atlantis Land SpA. All other names mentioned mat be trademarks or registered trademarks of their respective owners. Subject to change without notice. No liability for technical errors and/or omissions. CE Mark Warning This is a Class B product. In a domestic environment, this product may cause radio interference, in which case the user may be required to take adequate measures.
A05-17XM-L0X_MX01 ITALIANO 1.0 Prima di Iniziare Questo monitor è un monitor ad alte prestazioni, con funzioni di multifrequenza, dotato di una matrice attiva LCD che utilizza la tecnologia TFT. Emette bassissime radiazioni, il display è trattato con superficie antiriflesso e occupa uno spazio molto limitato. È ideale sia per la casa che per l’ufficio. 1.
• • • • A05-17XM-L0X_MX01 Connessione del cavo segnale: collegare un estremità del cavo segnale al personal computer e serrare le viti di fissaggio. Ripetere l’operazione con l’altro capo del cavo e il connettore presente nella parte posteriore del monitor. Connessione del cavo di alimentazione: collegare l’alimentatore a una presa di corrente tramite il cavo di alimentazione, collegare quindi l’alimentatore al monitor utilizzando l’apposito jack.
A05-17XM-L0X_MX01 • • • • • permette di regolare automaticamente il posizionamento verticale e orizzontale dell’immagine, il Clock e il fuoco. Se il monitor è provvisto di connettore DVI (opzionale), questo pulsante permetterà di selezionare l’input corretto.
A05-17XM-L0X_MX01 3.3 Regolazione dell’immagine 1. LUMINOSITA’ 1.1 Regolazione automatica del guadagno: aggiusta automaticamente il guadagno. 1.2 Luminosità: aggiusta automaticamente la luminosità. 1.3 Contrasto: aggiusta automaticamente il contrasto 1.4 Uscita 2. COLORE 2.1 Regolazione automatica: Aggiusta il colore automaticamente. 2.2 Exit 3. IMAGE 3.1 Regolazione automatica: aggiusta automaticamente la posizione dell’immagine. 3.2 Clock: Aggiusta automaticamente il clock dell’immagine. 3.
A05-17XM-L0X_MX01 5. TEMPERATURA COLORE: Selezionare l’opzione desiderata tra le seguenti: 5000k caldo, 6500k normale, 9300k freddo. Se le impostazioni di default non corrispondono con il risultato desiderato, è possibile selezionare l’opzione USER-DEFINED per regolare le singole componenti colore. 6. LINGUA: Selezionare la linugua desiderata per il menù OSD. 7. ANALOGICO/DIGITALE: Selezionare l’ingresso desiderato (funzione DVI opzionale). 8. EXIT: Chiude il menù OSD. 4.
A05-17XM-L0X_MX01 primari non è visibile (rosso, blu o verde) L’immagine non è correttamente centrata e dimensionata nell’area dello schermo Il colori dell’immagine sono alterati Sub sia piegato o rotto. Aggiustare CLOCK e FASE, oppure premere il pulsane AUTO. Aggiustare la temperatura colore. APPENDICE A: SPECIFICHE A05-17AM-L03/ A05-17BM-L04 Modello 17” Pannello 1280 x 1024 Risoluzione 337.920 x 270.336 mm Area attiva 0.264 mm Pixel pitch 500:1 Contrasto 300 cd/m2 Luminosità 8 ms Tempo di risposta 16.
A05-17XM-L0X_MX01 Consumo massimo Consumo in stand-by Consumo da spento Tensione ingresso alimentatore Tensione in ingresso monitor Controllo risparmio energetico Norme Temperatura di stoccaggio Temperatura di funzionamento Umidità <40 W <5 W <3 W 100 V~240 VAC 60/50Hz 12 VDC 4 A Si CE -20°C~+55°C 5°C~40°C 10%~85% APPENDICE B: TIMING TABLE STANDARD VGA SVGA XGA SXGA RISOLUZIONE 720×400 640×480 640×480 640×480 800×600 800×600 800×600 800×600 1024×768 1024×768 1024×768 1280×1024 1280×1024 FREQUENZA ORI
A05-17XM-L0X_MX01 APPENDICE C: RESOLUTION TABLE RISOLUZIONE 640×480 720×400 640×480 640×480 800×600 800×600 800×600 FREQUENZA ORIZZONTALE 60Hz 70Hz 72Hz 75Hz 56Hz 60Hz 72hz RISOLUZIONE 800×600 1024×768 1024×768 1024×768 1280×1024 1280×1024 FREQUENZA VERTICALE 75Hz 60Hz 70Hz 75Hz 60Hz 75Hz APPENDICE D: CAVO D-SUB PIN NO. 1. 2. 3. 4. 5. 6. 7. 8. DESCRIZIONE Red Green Blue Ground Ground R-Ground G-Ground B-Ground PIN NO. 9. 10. 11. 12. 13. 14. 15.
A05-17XM-L0X_MX01 ENGLISH 1.0 Before start This monitor is a high-performance intelligent multi-scanning color monitor adopting active matrix TFT LCD display that uses amorphous silicon TFT as a switching devices. With very low radiation, anti-glary surface treatment and occupying small place , it is very suitable for home and office applications. 1.2 Features • LCD TFT monitor • Built-in multimedia speakers • Multi-language OSD interface • Image auto regulation • DVI input (mod.
A05-17XM-L0X_MX01 1. Signal cable connection: firstly lock the base and knighthead, then Plug one end of the signal cable into computer and lock the two bolts to ensure firmly grounding. Then plug the other into the monitor and lock the two bolts. 2. Power cord connection: connect the AC adapter and AC power source with power cord. then connect the AC adapter output to the power input of the monitor. 3.
A05-17XM-L0X_MX01 • • • • Adjust brightness or adjust function (tone down the volume while have the audio frequency) Contrast : Adjust contrast or adjust function.(tone up the volume while have the audio frequency) MENU : Activate the OSD menu or confirm the function adjusting. Power Key : Press this button to switch ON/OFF of monitor’s power. Power Indicator: Blue/Green ---- Power On mode. Orange/Red ---- Off mode. 3.2 How to adjust a setting 1. Press the MENU button to activate the OSD window. 2.
A05-17XM-L0X_MX01 2.1 Auto color: Adjust the color automatically. 2.2 Exit 3. IMAGE (In the state of DVI without this item) 3.1 Auto configuration: Adjust the image position automatically 3.2 Clock: Adjust the image clock. 3.3 Phase: Adjust the image focus 3.4 H-Position: Adjust the image horizontal position 3.5 V-Position: Adjust the image vertical position. 3.6 Exit 4. TOOLS 4.1 OSD Timeout: Control the quit time of quit the OSD menu automatically. 4.
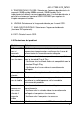
A05-17XM-L0X_MX01 No Plug & Play Picture is fuzzy Picture bounces or a wave pattern is present in the picture The power LED is ON(Red) but there's no video or no picture. Missing one of the primary colors(RED,GREEN,or BLUE) Screen image is not centered or sized properly.
A05-17XM-L0X_MX01 Poor brightness or contrast Horizontal or vertical disturbances on the screen The life time of the back-light is limited. In 30000 Hours the luminance of the light has been reduced to half of its original value. Please send the monitor to an authorized service Agent for service. Use win 95/98/2000/XP shut-down mode Adjust CLOCK and PHASE or perform hotkey(AUTO-key). APPENDIX A: SPECIFICATIONS A05-17AM-L03/ A05-17BM-L04 Model 17” Panel 1280 x 1024 Resolution 337.920 x 270.
A05-17XM-L0X_MX01 APPENDIX B: TIMING TABLE STANDARD VGA SVGA XGA SXGA RESOLUTION 720×400 640×480 640×480 640×480 800×600 800×600 800×600 800×600 1024×768 1024×768 1024×768 1280×1024 1280×1024 HORIZONTAL FREQUENCY 31.47 kHz 31.469 kHz 37.861 kHz 37.5 kHz 35.156 kHz 37.879 kHz 48.077 kHz 46.875 kHz 48.363 kHz 56.476 kHz 60.023 kHz 63.981KHz 79.
A05-17XM-L0X_MX01 APPENDIX D: D-SUB CABLE PIN NO. 1. 2. 3. 4. 5. 6. 7. 8. DESCRIPTION Red Green Blue Ground Ground R-Ground G-Ground B-Ground PIN NO. 9. 10. 11. 12. 13. 14. 15.
A05-17XM-L0X_MX01 FRANCAIS 1.0 Avant de commencer Ce moniteur haute performance est équipé d’une matrice active TFT en silicium amorphe. Grâce à son très faible niveau de radiation, son traitement anti-reflet et la faible place qu’il occupe, c’est l’outil idéal pour une utilisation domestique ou professionnelle. 1.2 Caractéristiques • • • • • • Moniteur LCD TFT Haut-parleurs intégrés Interface OSD multi-langue Auto-régulation de l’image Connecteur DVI (mod. A05-17BM-L04) Plug & Play 1.
A05-17XM-L0X_MX01 6. Connexion de l’Alimentation: connecter le câble secteur sur le boitier d’alimentation puis raccorder la prise secteur et le jack d’alimentation sur le moniteur. 7. Connexion du câble Audio: connecter l’une des extrémités du câble sur la sortie Audio de l’ordinateur, puis relier l’autre au moniteur. 8. Mise en route: démarrer l’ordinateur et le moniteur. Après le démarrage du moniteur, la LED s’éclaire en Vert ou Bleu. Si elle clignote en Rouge, vérifier le cable vidéo.
A05-17XM-L0X_MX01 Orange/Rouge ---- Hors fonction. 3.2 Comment ajuster les réglages 1. Pressez la touche MENU pour activer la fenêtre du menu OSD. 2. Pressez ou pour sélectionner la fonction désirée, puis pressez la touche MENU. 3. Pressez ou pour changer les réglages de la fonction en cours, puis pressez la touche MENU pour confirmer vos choix. 4. Si vous souhaitez ajuster d’autres réglages, répeter les intructions 2-3. 5.
A05-17XM-L0X_MX01 position de l’image. 3.2 Horloge: Pour ajuster l’horloge. 3.3 Phase: Pour ajuster la phase. 3.4 Position Horizontale: Pour ajuster la position horizontale de la fenêtre d’affichage sur l’écran. 3.5 Position Verticale: Pour ajuster la position verticale de la fenêtre d’affichage sur l’écran. 3.6 Sortie 4. OUTILS 4.1 Durée d’affichage de l’OSD: Pour ajuster le temps d’affichage du menu OSD avant fermeture automatique. 4.
A05-17XM-L0X_MX01 4.0 Disfonctionnement Problème & Question La LED est éteinte Pas de Plug & Play L’image est flou L’image n’est pas stable ou une vague la perturbe La LED est allumée en Rouge mais aucune image n’apparait Il manque une des couleurs primaires (Rouge, Vert, Bleue) L’image n’est pas centrée ou de mauvaise taille Les couleurs ne sont pas correctes ou le blanc n’est pas blanc La Luminosité ou le Contraste sont faibles Solution possible Le bouton M/A est bien sur Marche.
A05-17XM-L0X_MX01 Troubles verticaux ou horizontaux sur l’image 50%. Contactez votre revendeur pour une intervention de remplacement Utilisez bien l’arrêt du PC par Windows. Réglez l’Horloge et la Phase ou appuyez sur la touche Auto. APPENDICE A: SPECIFICATIONS A05-17AM-L03/ A05-17BM-L04 Modèle 17” Dalle 1280 x 1024 Résolution 337.920 x 270.336 mm Zone d’affichage 0.264 mm Taille des pixels 500:1 Contraste 300 cd/m2 Luminosité 8 ms Temps de réponse 16.
A05-17XM-L0X_MX01 APPENDICE B: TABLE de FREQUENCE FREQUENCE HORIZONTALE 31.47 kHz 31.469 kHz 37.861 kHz 37.5 kHz 35.156 kHz 37.879 kHz 48.077 kHz 46.875 kHz 48.363 kHz 56.476 kHz 60.023 kHz 63.981KHz 79.976KHz FREQUENCE VERTICALE 70.00 Hz 60.00 Hz 72.00 Hz 75.00 Hz 56.00 Hz 60.00 Hz 72.00 Hz 75.00 Hz 60.00 Hz 70.00 Hz 75.00 Hz 60.020Hz 75.
A05-17XM-L0X_MX01 APPENDICE D: CABLE D-SUB 15 PIN NO. 1. 2. 3. 4. 5. 6. 7. 8. DESCRIPTION Rouge Vert Bleu Masse Masse Masse Rouge Masse Vert Masse Bleu PIN NO. 9. 10. 11. 12. 13. 14. 15.
WEEE DISCLAIMER Important information for the correct recycle/treatment procedures of this equipment Information importante sur le recyclage et le traitement de cet équipement Wichtige Information über die ordnungsgemäße Entsorgung dieses Gerätes Información importante para el correcto procedimiento de reciclaje/tratamiento de este aparato Importanti informazioni per il corretto riciclaggio/smaltimento di questa apparecchiatura
Important information for the correct recycle/treatment procedures of this equipment The crossed-out wheeled bin symbol printed on the unit label or unit packaging indicates that this equipment must not be disposed of as unsorted municipal waste but it should be collected separately.
Information importante sur le recyclage et le traitement de cet équipement Le symbole représentant une poubelle sur roues barrée d'une croix, qui est imprimé sur l'étiquette ou l'emballage du produit, indique que cet équipement ne doit pas être éliminé avec les déchets municipaux non triés mais doit faire l'objet d'une collecte sélective.
Wichtige Information über die ordnungsgemäße Entsorgung dieses Gerätes Die durchgestrichene Mülltonne auf dem Gerät oder der Verpackung bedeutet, daß dieser Artikel nicht über den unsortierten Hausmüll (Siedlungsabfall) entsorgt werden darf, sondern an speziellen Sammelstellen in Ihrer Kommune abgegeben werden muß.
Información importante para el correcto procedimiento de reciclaje/tratamiento de este aparato El símbolo del contenedor de basura tachado sobre la etiqueta o envase indica que este aparato no debe ser eliminado como residuo urbano no seleccionado sino que debería ser recogido de modo selectivo.
Importanti informazioni per il corretto riciclaggio/smaltimento di questa apparecchiatura Il simbolo qui sotto indicato, riportato sull'apparecchiatura elettronica da Lei acquistata e/o sulla sua confezione, indica che questa apparecchiatura elettronica non potrà essere smaltita come un rifiuto qualunque ma dovrà essere oggetto di raccolta separata.
1 Il distributore non sarà tenuto a ritirare l'apparecchiatura elettronica qualora vi sia un rischio di contaminazione del personale incaricati o qualora risulti evidente che l'apparecchiatura in questione non contiene i suoi componenti essenziali o contiene rifiuti diversi da apparecchiature elettriche e/o elettroniche. NB: le informazioni sopra riportate sono redatte in conformità alla Direttiva 2002/96/CE ed al D. Lgs. 22 luglio 2005, n.
Atlantis Land S.p.A. Viale De Gasperi, 122 20017 Mazzo di Rho (MI) E-Mail: info@atlantis-land.com WWW: http://www.atlantis-land.