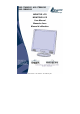
A05-17AM-D01 A05-17BM-D03 A05-19BM-D02 MONITOR LCD MONITEUR LCD User Manual Manuale d’uso Manuel d’utilisation A05-17AM-D01 - A05-17BM-D03 – A05-19BM-D02_X02
A05-17AM-D01 - A05-17BM-D03 – A05-19BM-D02_X02
ENGLISH IMPORTANT SAFETY INSTRUCTIONS 1 GETTING STARTED 1.1 Precautions 1.2 Cleaning the TFT LCD Monitor 1.3 Federal Communications Commission (FCC) Statement 2 INSTALLING THE MONITOR 2.1 Unpacking 2.2 Installing the Base 2.3 Installing the Monitor 3 CONTROL FUNCTIONS 4 FUNCTION SELECT 4.1 Input Select (only for A05-17BM-D03) 2 2 2 2 2 2 2 2 2 2 2 2 4.2 Video 2 4.3 Audio 2 4.4 Color 2 4.5 Language 2 4.6 5 6 6.1 6.2 7 7.
14.6 15 16 16.1 16.2 17 18 19 20 Strumenti vari CARATTERISTICHE MICROPROCESSORE MEMORIA MODALITÀ SCHERMO Area Impostazioni dell’Utente Area Impostazioni di Fabbrica PIEDINATURA DEL CAVO SEGNALE VGA FUNZIONI PER IL RISPARMIO ENERGETICO REGOLAZIONE DEL TEMPO SPECIFICHE FRANÇAIS INSTRUCTIONS 21 AVANT DE COMMENCER 21.1 Précautions 21.2 Propreté du panneau LCD 21.3 communiqué relatif aux interférences Radio 21.4 Précautions pour le câble d'alimentation 22 INSTALLER L’ECRAIN 22.1 Déballage 22.
ENGLISH Important Safety Instructions • • • • • • • • • • • • Read the Safety Instructions carefully and keep it for later use. Be aware of all warnings and instruction signs marked on the products. When cleaning, turn off the electrical supply at all times. Never use liquid or aerosol detergent, use a damp rag instead. For more details, please refer to Pag. 6 “Cleaning the Monitor.” Always keep the product away from heavy moisture. Keep this product stable all times.
ENGLISH • • 1.2 • • • When moving, always handle your LCD monitor with care. Do not forcefully press down against the LCD display as this will damage the monitor. Cleaning the TFT LCD Monitor Wipe the screen gently with a clean camel hairbrush, or a soft, clean, lint-free cloth. Removing the dust and other particles will prevent your LCD panel from being scratched. Never pour or spray any liquid onto the LCD monitor Do not apply pressure to the LCD panel. 1.
ENGLISH 3. 4. Connect the DC power cord to the DC jack. Connect the power cable. 3 Control Functions The monitor digital control functions are located on the front panel. They are shown in the figure below and described in the following paragraphs. 1. Power Switch with Indicator LED 2. Function Keys 4 Function Select With the U and V knobs, you can adjust the speakers volume. Press the 1 knob to show the OSD menu. Than use the U and V knobs to select a function. Press the 2 knob to close the OSD menu.
ENGLISH 4.4 Color 4.4.1 Color Temperature User Adjust the R.G.B. gain level. 6500K Select color temperature to 6500°K. 9300K Select color temperature to 9300°K. Exit Close the Color Temperature OSD menu. 4.4.2 Adjust the flesh tone of the image Shade Adjust the shade of the image color. Saturation Adjust the saturation of the image color. Exit Close the Color OSD menu. 4.4.3 Image Adjust 4.5 Geometry Adjust geometry of the image automatically.
ENGLISH 4.6.2 Recall the factory default setting 4.6.3 Sharpness Adjust the picture display more clear Exit Close the Tools OSD menu Exit Close the OSD menu 5 Micro-controller Features The micro-controller automatically detects the video board installed in your system. When you turn on the monitor, the micro-controller first checks the display mode memory stored in the user setting area of the video board, and then the factory presetting area. It then adjusts to the proper display mode.
ENGLISH 7.1 15-pin Mini D-type Male VGA Connector 1 2 3 4 Red Video Green Video Blue Video Ground 5 No Connection 6 7 8 9 Red Ground Green Ground Blue Ground No Connection 10 Sync Ground 11 12 13 14 Ground Serial Data/I/O H. Sync V. Sync 15 Serial Clock Input 8 Power Saving Feature When the power saving active them the power indicator LED will be from Green Light to Amber, And power saving feature complies with these VESA power saving modes: Mode H. Sync. V. Sync.
ENGLISH Resolution Primary Mode 1280x1024 @75Hz (Max.) Input Signal Video RGB Analog DVI Digital (not for A05-17AM-D03) Connectors Input Signal D-sub 15 pin DVI-D (not for A05-17AM-D03) Sync H. V., Separate Sync, TTL Compatible Video Sync Horizontal Frequency Vertical Frequency Audio 31-80kHz, 50-75Hz, Video Bandwidth 80MHz Input Stereo mini- Audio Line-in Speakers 3W x 2 (At 1KHz for THD 1% Amplifier) Power Voltage 220V - 12V / 4.
ITALIANO Avvertenze • • • • • • • • • • • • • • • Leggere attentamente queste informazioni e tenerle disponibili per una eventuale consultazione successiva. Tenere presente anche tutte le indicazioni riportate sul prodotto. Staccare ogni collegamento elettrico quando viene effettuata la pulizia. Non usare mai liquidi o un detergente a spruzzo, usare sempre un panno leggermente umido.
ITALIANO • • • Non rimuovere il guscio posteriore. Il monitor contiene un’area ad alta tensione e si corre il rischio di ricevere una forte scarica elettrica. Contattare il centro di assistenza per ogni necessità. Se è necessario muovere il monitor, usare sempre attenzione. Non fare pressioni sul pannello LCD in caso di malfunzionamenti. Fare riferimento alla pagina 15 per eventuali tarature. 11.
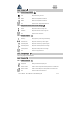
ITALIANO • Cavo Audio 12.2 Installare la base Segua questi passi per installare la base: 3. Capovolgere il monitor. 4. Fissare la base al braccio con la vite. 5. Stringere la vite con una moneta. 12.3 Installazione del monitor Questo monitor è dotato di un alimentatore DC che funziona con una tensione che deve essere compresa tra 100-240VAC 60/50Hz. Verificare la tensione indicata sul pannello posteriore del monitor. Per installare il monitor eseguire le operazioni seguenti: 1.
ITALIANO Contrasto Regola la differenza tra le aree luminose e quelle scure dell’immagine Livello del nero Regola il livello del nero. Exit Per terminare le regolazioni dello schermo 14.3 Audio Volume Regola il volume degli altoparlanti Bilanciamento Regola il bilianciamento del segnale tra destra e sinistra Exit Per terminare le regolazioni audio 14.4 Colore 14.4.1 Temperatura Colore User Regola i livelli di Rosso, Blu e Verde 6500K Posiziona la temperatura colore a 6500°K.
ITALIANO 14.5 Lingua Seleziona la lingua del menu. 14.6 Strumenti vari 14.6.1 Controlli OSD Temporizzazione Regola il tempo di visualizzazione dell’OSD Pos. Orizzontale Controlla il posizionamento orizzontale dell’OSD Pos. Verticale Controlla il posizionamento verticale dell’OSD Exit Chiude la regolazione dell’OSD 14.6.2 Richiama le regolazioni di fabbrica 14.6.
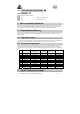
ITALIANO Modalità Risoluz. Freq.Orizz. Freq.Vert. (punti x linee) (KHz) (Hz) Note 1 2 3 4 5 6 7 8 9 10 VGA VGA VGA VESA/75 VESA/60 VESA/75 VESA/60 VESA/70 VESA/75 VESA/60 640x350 720x400 640x480 640x480 800x600 800x600 1024x768 1024x768 1024x768 1280x1024 31.5 31.5 31.5 37.5 37.9 46.9 48.4 56.5 60.0 64.0 70 70 60 75 60 75 60 70 75 60 Non Non Non Non Non Non Non Non Non Non interlacc. interlacc. interlacc. interlacc. interlacc. interlacc. interlacc. interlacc. interlacc. interlacc.
ITALIANO 20 Specifiche Dimensioni A05-17AM-D01 A05-17BM.D03 17.0" (full 17.0" viewable diagonal area) A05-19BM-D02 19.0" (full 17.0" viewable diagonal area) A05-17AM-D01 A05-17BM.D03 0,264mm A05-19BM-D02 0,294mm Tipo TFT (Thin Film Transistor), Active Matrix Panel Pixel Pitch LCD Colori 16.7M Trattamento superficie Anti-Glare & Hard Coat 3H Luminosità 250 cd/m2 Contrasto A05-17AM-D01 A05-17BM.
ITALIANO Risparmio Energetico On Off A05-17AM-D01 A05-17BM.
FRANCAIS Instructions • • • • • • • • • • • • • • Lire ces renseignements attentivement et les conserver pour une consultation ultérieure. Conserver aussi toutes les indications se reportant au produit. Déconnecter chaque liaison électrique avant d’effectuer le nettoyage de l’écran. Ne jamais pas utiliser de liquides ou de détergent, utiliser toujours un tissu légèrement humide. Consulter tout ce qu'a été reporté à la page 22 Nettoyage du panneau LCD, pour de plus ample informations.
FRANCAIS • • • Ne pas enlever le panneau arrière. L'écran contient une zone de haute tension, risque d’électrocution. Contacter le centre d'assistance en cas de nécessité. Tout déplacement de l’écran doit être fait avec la plus grande précaution. Ne pas faire de pression sur le panneau LCD même en cas de mauvais fonctionnements. Se reporter à la page 23 pour procéder aux réglages éventuels. 21.
FRANCAIS 22.2 Installer la Base 1. 2. 3. Eteindre le moniteur. Assembler la base au bras et visser la vis prévu à cet effet. Visser avec une pièce de monnaie. 22.3 Installer le Moniteur Le moniteur est équipé d’un adaptateur d’alimentation DC avec auto détection pour une tension comprise entre 100-240VAC, 60/50Hz. Suivez les étapes ci-dessous pour installer le moniteur. 1. Avant de connecter le câble, vérifier que l’interrupteur du moniteur est éteint. 2.
FRANCAIS 24.2 Video Luminosité Modifie le niveau de luminosité de l’image Contraste Modifie la différence de luminosité entre les parties sombres et éclairées de l’image. Niveau noir Modifie le niveau de noir de l’image. Sortie Ferme le menu Video OSD 24.3 Audio Volume Modifie le volume du haut parleur Balance Modifie le volume du haut parleur, gauche ou droite Sortie Ferme le menu Audio OSD 24.4 Couleur 24.4.
FRANCAIS Sortie Ferme le menu Image OSD 24.5 Langage Choisir la langue utilisée pour l’ OSD. ( affichage des réglages à l’écran) 24.6 Outils 24.6.1 Contrôle OSD Temporisateur Modifie le temps de visualisation de l’OSD Position H. Modifie la position horizontale de l’OSD Position V. Modifie la position verticale de l’OSD Sortie Ferme le menu de l’OSD 24.6.2 Rappel Remettre les paramètres usine par défaut. 24.6.
FRANCAIS 25.3 Réglage Pré-Configuré Dans cette partie, nous avons définit quelques modes d’affichages préférentiels utilisable par le microcontrôleur. Les modes d’affichages sont pré-configurés en usine, incluant les modes d’affichages disponibles les plus utilisés actuellement. Le microcontrôleur ne cherchera un mode d’affichage utilisable que dans cette partie Mode Résolution Fréq.Horiz. Fréq.Vert.
FRANCAIS 28 Définitions du Temps Les définitions du temps sont ajustées par le logiciel depuis l'unité du système. Pour répondre aux exigences des spécifications NUTEK 803299/94, le temps total d'inactivité indiquée en position A2 de l'Economiseur d'Energie ( VESA ARRET ) ne doit pas être défini sur plus de 70 minutes. Nous vous conseillons d'éteindre le moniteur lorsque vous ne voulez plus l'utiliser pendant une longue période. 29 Specifications Taille A05-17AM-D01 A05-17BM.D03 17.
FRANCAIS Emballé Normes Eclairage arrière Economiseurs d'énergie A05-17AM-D01 A05-17BM.D03 7.0 Kg A05-19BM-D02 7,5 Kg Sécurité (Safety) UL/CUL, TUV/GS, CE, CB, FCC-B Energy Star EPA Qualité ISO 13404-2 Class II Panneau LCD Grade A+ Durée de vie 50.000 H A05-17AM-D01 A05-17BM.
WARRANTY CERTIFICATE CONDIZIONI DI GARANZIA CERTIFICAT DE GARANTIE A05-17AM-D01 - A05-17BM-D03 – A05-19BM-D02_X02
A05-17AM-D01 - A05-17BM-D03 – A05-19BM-D02_X02
WARRANTY CERTIFICATE We thank You for your decision to have bought an ATLANTIS LAND® product. Our society, thank to the quality of its products, offers You an extended guarantee lasting 36 months, both if the product serves for a private use and if it works for a professional one. This service will be provided to you directly by ATLANTIS LAND®, without asking you for more interventions, for example brought off by your usual retailer or by others operators.
20. 21. 22. 23. 24. Possible updating of the software or of the firmware, revisions, settings or upkeeps are not covered by the Guarantee too. For each apparatus send for reparation and for which no defects will be found by the Assistance Service, you will have to pay for the transport (retire and return) and for a contribution of test that amount to €30. The total sum will be notified to you by ATLANTIS LAND®, and only the payment through an allowance will make the return of the apparatus possible.
CERTIFICATO DI GARANZIA La ringraziamo della Sua decisione di aver acquistato un prodotto ATLANTIS LAND®. La nostra società, in virtù della qualità dei suoi prodotti, Le offre una garanzia estesa di 36 mesi, sia che il prodotto sia utilizzato in ambito privato che in ambiente professionale. Tale servizio Le verrà fornito direttamente da ATLANTIS LAND®, senza richiederLe ulteriori interventi, da parte ad esempio del suo rivenditore di fiducia o di altri operatori del mercato.
18. 19. 20. 21. 22. 23. 24. Solo ed esclusivamente per la linea di prodotti UPS le batterie fornite a corredo del prodotto sono coperte da Garanzia di 12 (dodici) mesi. Anche gli alimentatori esterni, di qualunque apparato, sono coperti da Garanzia di 12 (dodici) mesi. Eventuali aggiornamenti di software o di firmware, revisioni, settaggi o manutenzioni non sono coperti da Garanzia.
CERTIFICAT DE GARANTIE Nous vous félicitons et vous remercions d’avoir acheté un produit ATLANTIS LAND. Notre société, grâce à la qualité de ses produits, vous offre une garantie étendue de 36 mois, que le produit soit utilisé dans un milieu privé, ou dans un milieu professionnel. Ce service vous sera fourni directement par ATLANTIS LAND, sans interventions ultérieure de votre part ou de la part de votre revendeur habituel ou d’autres opérateurs du marché.
19. 20. 21. 22. 23. 24. Les alimentations externes fournies avec le produits bénéficient d’une Garantie de 12 (douze) mois. Tout éventuel effacement du logiciel ne bénéficie pas de la Garantie. Pour les appareils envoyés en réparations, si aucun défaut de fonctionnement ni d’aspect n’est constaté par le Service Assistance, les frais de transport (aller/retour) additionné d’une contribution de vérification de 30 € seront à la charge du Consommateur.
WARRANTY CLAIM FORM Model Serial Number Family Name Name Company Address Post Code Town Country Tel Fax e-mail Date of Purchase FAULT DESCRIPTION Dealer Stamp Complete and fax this WARRANTY CLAIM together with the purchase bill to obtain
TAGLIANDO DI GARANZIA Modello Numero di serie (Serial Number o S/N) Cognome Nome Società Indirizzo CAP Città Pro Tel Fax e-mail Data di acquisto Il trattamento dei dati personali viene svolto soltanto nell’ambito della banca dati Atlantis Land SpA, al fine di una corretta gestione della garanzia e nel rispetto di quanto stabilito dalla legge sulla tutela dei dati personali.
DEMANDE DE GARANTIE Modèle Numéro de série Nom Prénom Société Addresse Code postal Ville Pays Tel Fax e-mail Date d’achats DESCRIPTION de la panne Compléter et faxer cette demande de garantie avec une copie de la facture d’achat afin d’obtenir un numéro de retour.
HEADQUARTER & EUROPE ATLANTIS LAND S.p.A. Viale De Gasperi, 122 Mazzo di Rho – MI – Italy info@atlantis-land.com sales@atlantis-land.com ATLANTIS LAND FRANCE CENTRE AMSTERDAM 7, RUE D’AMSTERDAM PARIS – FRANCE info.fr@atlantis-land.com sales.fr@atlantis-land.com FAR EAST AND USA SALES: Atlantis Land International Sales Office N° 249 Hsing South Rd. Taipei – Taiwan info.tw@atlantis-land.com sales.tw@atlantis-land.com Atlantis Land Technology L.t.d. 3rd.