ITALIANO Questo prodotto è coperto da garanzia Atlantis Land della durata di 2 anni. Per maggiori dettagli in merito o per accedere alla documentazione completa in Italiano fare riferimento al sito www.atlantis-land.com. ENGLISH This product is covered by Atlantis Land 2 years warranty. For more detailed informations please refer to the web site www.atlantis-land.com. For more detailed instructions on configuring and using this device, please refer to the online manual.
INDEX 1. Product Overview ............................................................................................... 7 1.1 Key Features .............................................................................................. 7 1.2 Network Scheme......................................................................................... 7 2. Cabling and Setup .............................................................................................. 8 2.1 Package Contents .........................
Copyright Statement No part of this publication may be reproduced, stored in a retrieval system, or transmitted in any form or by any means, whether electronic, mechanical, photocopying, recording or otherwise without the prior writing of the publisher. Windows™ 98SE/2000/ME/XP/VIsta are trademarks of Microsoft® Corp. Pentium is trademark of Intel. All copyright reserved. The Atlantis Land logo is a registered trademark of Atlantis Land.
Limited Warranty Our warranties (for hardware and software) do not cover data loss – back up the contents of your drive to a separate storage medium on a regular basis. Also, consequential damages; incidental damages; and costs related to data recovery, removal and installation are not recoverable under our warranties. Safety Information • Only qualified personnel should carry out technical work on the device.
Important information for the correct recycle/treatment procedures of this equipment The crossed-out wheeled bin symbol printed on the unit label or unit packaging indicates that this equipment must not be disposed of as unsorted municipal waste but it should be collected separately.
1. Product Overview Thank you for purchasing USB2.0 NAS Dongle storage device. 1.
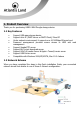
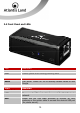
2. Cabling and Setup 2.1 Package Contents The package should contain the following items: • • • • • Disk Master USB NAS Dongle RJ45 CAT 5 cable One Quick Start Guide (English, Italian) One CD with driver, software, utility and manuals Power Adapter AC-DC (5VDC, 1.2A) If any item contained is damaged or missing, please contact your local dealer as soon as possible. 2.
• • • • • • Place the Disk Master close enough to a network jack for the Ethernet cable to reach it. Leave at least 10cm of space at the rear of the device for ventilation. Use a grounded wall outlet (uninterruptible online power supply with AVR is recommended.) Avoid an electrical outlet controlled by wall switches or automatic timers. Accidental disruption of the power source may wipe out data in the memory of your computer or Disk Array.
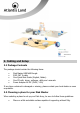
2.4 Front Panel and LEDs LED Power Link MEANING Lit blue if powered on. Flashes yellow when sending/receiving data. TASTO Reset MEANING Push RESET button for 30s to recovery default values on NAS Dongle. PORT Power Jack LAN MEANING Connect the supplied power adapter to this jack. Please use the Ethernet cable to connect the Disk Master to network. Please use the USB cable provided to connect an HDD enclosure or the printer cable to connect the device’s USB port (for printer server).
2.5 Factory Default Settings The TCP/IP protocol stack and Ethernet network adapter must be installed. If not, please refer to MS Windows relative manuals. Before you configure this device you need to know the following default settings: • • • • Username: admin Password: atlantis IP Address: Obtained by DHCP Server (if a DHCP isn’t available, the device will be reacheable with the following IP address: 192.168.1.1). Server name: DISKMASTER 2.6 Searching Disk Master NASF101 To run SearchUtility: 1. 2. 3.
3. Quick Configuration 3.1 Set a fixed IP address In order to map network drive permanently on any PCs that require them, we suggest to fix an IP Address to the LAN interface of NAS Dongle. To set a fixed IP address on the NAS dongle, click on IP Config menu’ and set this function on Static IP as below; after, insert the IP Address, Subnet Mask and Gateway to the NAS dongle.
Secondary DNS Insert the secondary DNS address. 3.2 Disk Format During the first installation, it is necessary to format the disk contained into HDD enclosure in order to create some default folder and save configuration (for BT client). Please select Disk Utility and press Format to start the formatting procedure. FIELD Disk ID Format Disk MEANING Show disk type ID and some disk information. Press this button to format disk.
Scan Disk Press this button to start a diagnosys procedure of the disk connected to the NAS dongle. 3.2 Map a network drive To create a new network drive, please see following procedure: • • • • • Click Start->Computer (for Windows VISTA) or My Computer->Tools (for Windows 2000/XP) Click on Map Network Drive Fullfill the field Folder with the path “//x.y.z.k/PUBLIC” (where x.y.k.z means the IP Address assigned to the NAS Adapter).
4. Advanced Configuration 4.1 Status Provide the basic information for NAS Dongle. 4.2 Identification You can change and modify your host & group name, and password from this page. Click “Apply” to save the setting. In Window O/S, right click on “My computer”, choose “Properties”, and go to the computer name tab to see your current workgroup.
FIELD Host Name Group Name MEANING This is used to identify your device on the network. If you prefer a different name, type in the new name and click “Apply” to save setting. This should be same as your workgroup. In general, the default “WORKGROUP” will be OK. But if your workstation belongs to different workgroup, type in the correct group name to modify. Press Apply to save configuration. We strongly suggest you to change the password as soon as you logged in, to prevent unauthorized access.
4.3 Data/Time Setting You can change time setting form this page. Clicks “Apply” to save the setting. By default SNTP is in network time service, your can also select “Synchronize to PC”. If internet access is available we recommended setting SNTP to Network time service instead. 4.4 IP Config By default, the “IP config” is set to “Automatic IP”. This is the recommended setting and will allow NAS Dongle to obtain its IP address automatically.
4.5 Disk Utility In this page, you can manage the hard disk setting. FIELD Format Disk Scan Disk MEANING For the first time installation, you need to format hard disk into FAT32 system file, this procedure applies to either new or used hard disk. After the scan, it will show the number of file content and health status for the hard disk.
4.6 Maintenance This page allows you to update NAS dongle firmware, to go back to default setting or to reboot NAS system. Follow the steps below to update the loader and firmware for NAS Dongle: 1. 2. 3. 4. 5. 6. 7. 8. 9. Obtain the latest firmware from your vendor. Store the firmware file in your computer and decompress them if necessary. Browse your system and locate the firmware (BIN file). Click on “Upload”. Confirm the pop-up massage to start the update.
Click on Reset and go back to default password setting. Besides SAMBA/FTP account setting will still remain in the NAS Dongle, rest of setting will go back to factory default. Press Reboot button to restart the USB NAS Dongle. 4.7 SMB Server SMB server allows you to share data or files through LAN environment. A default “guest” folder is created and shared to all from NAS Dongle. Use ONLY English alphabet for folder names and no special characters when creating new folders.
How to create a SMB user Click on the “Add” button and type new account name/password and than “Next”. In the same time, NAS Dongle will also crate a SAMBA folder named “atlantis”; now You have to select “atlantis” and add in to “Sharing List”.
You can “Run” from window start button, type \\ follow by the IP address (eg:\\192.168.1.121), and click OK to continue. Type “atlantis” and password to login. Now you have set up the folder that you wish to share on your NAS Dongle. The shared folder can be accessed from other computer on your local network.
How to modify account password Select the “atlantis” and than click “Modify”. Enter new password and click “Apply” to save setting.
How to delete a SMB (SAMBA) account Select an account you wish to delete, click “Delete” to proceed. Please note that all the data inside the folder will be lost after the delete. 4.8 FTP Server Remember to “Enable” the FTP service on the status page, when you plan on using the FTP server. The standard port for FTP service is 21. If required, you can change it into any port ranging from 1025-6550. But in general, we recommended using the default port of 21.
Port File Language Support Select the listening service port for FTP server. By default, the encoding is set to English. If you want to store or transfer files with a different encoding (different language), choose the corresponding language for the drop down list. In order to transfer and view the files correctly, it is important that you select the correct language. To be able to share FTP resource via internet, you need a router to assign the external IP to your NAS Dongle.
4.9 Media Server The Media server on NAS Dongle can be used to share your photo and music files with a XBOX360® video game console from Microsoft that is connected to the same local network. Before you start, make sure both devices are connected to the same local network and turned on. On your NAS Dongle, go to the XBOX360® media page and make sure photo and are set to share folder and not disable, e.g. the “PUBLIC” is enabled Photo directory. 1. 2. 3.
4.10 Print Server 1. 2. 3. 4. 5. 6. 7. 8. 9. Install your Printer driver into your computer, (for example. if Epson PL6200L Printer is connected to the NAS, you must install PL-6200L driver in to the computer first). After driver installation, please click “Start” → “Setting” → “Printer and Faxes” → “Add a printer”→ “Next”. Connect the USB printer in to NAS Dongle, your network environment should looks like diagram below: Select “Local printer” and click “next” to continue.
The NAS Dongle Printer server does not support GDI/Host-based printers. For some Multi Function Printers (MFP); scanning functions might not be functional probably. Please contact Printer Manufacture for detail Specifications. 4.11 BitTorrent Disk Master NASF101 supports Bit torrent download independently without using PC resource. Maximum of 4 bit torrent downloads can be running at the same time. FIELD System ID Download Path Server Port MEANING Show system ID for BT download.
Upload Limit Dowload Queue 1. 2. 3. 4. Set the upload limit for BT Server/Client Show current downloads status. Select “Bit torrent” server, choose the “Download Path” you wish to use, then click “Apply” to save setting. (DO NOT change path setting while perform BT downloading, otherwise the downloaded job will be missing). Server port range can be chosen from 6881 to 65535.
Mail Notification After the download is successful, an email will be send to designated email address. Click “Mail setup”, input SMTP server, recipient email, SMTP A/C, Password, and click “Apply” to save setting. FIELD Enable SMTP Server Sender Recipient Mail Authentication Username Password MEANING Enable email notification function. Insert SMTP server address. Inser the sender mail address that will be shown as email’s sender. Insert the recipient mail address.
APPENDIX A: Troubleshooting This chapter covers potential problems and the corresponding remedies. A.1 Using LEDs to Diagnose Problems The LEDs are useful aides for finding possible problem causes. A.1.1 Power LED The PWR LED on the front panel does not light up. Steps Corrective Action 1 Make sure that the Disk Master’s power adaptor is connected to the device and plugged in to an appropriate power source. Use only the supplied power adaptor.
2 3 custom configurations and restore all of the factory defaults including the password. Before you configure this device you need to know the following default settings: • Username: admin • Password: atlantis • IP address: by DHCP, (If a DHCP server isn’t available in the network, the Disk Master will use 169.254.0.1). • Server name: DISKMASTER It is highly recommended to change the default username and password. Make sure you store the username and password in a save place. A.
A.4 General Some of the functions and menus are not available! Steps Corrective Action 1 Many of the functions require a hard drive to be installed. Make sure you have at least one HDD installed and formatted in EXT2 or EXT3. What is the limitation of user on the NAS FTP, Samba and account mode? Steps Corrective Action 1 There are following limitations. 1. Maximum user number: FTP: 8 Users, Samba: 16 Users (total 64 sessions at the same time). 2.
Why My USB Printer can not be detected by the NAS Printer server? Steps Corrective Action 1 The NAS Printer server does not support GDI/Host-based printers. For some Multi Function Printers (MFP); scanning functions might not be functional probably. Please contact Printer Manufacture for detail Specifications A.5 Support For technical questions and support, please contact our help-desk by ticket on http://www.atlantis-land.com/ita/supporto.php.
Technical Specification Interfaces HDD Specifications File System Specifications Advanced Features OS Supported Dimensions Weight Operating Temperature Storage Temperature Operating Humidity Storage Humidity Input Power Power Consumption Agency and Regulatory LAN: Rj-45 10/100 Ethernet Port (auto MDI/MDI-X) USB: USB 2.
HDD Compatibility List Brand Hitachi Hitachi Hitachi Hitachi Hitachi Hitachi Hitachi Hitachi Hitachi Hitachi Hitachi Hitachi Hitachi Hitachi Hitachi Hitachi Hitachi Hitachi Hitachi Seagate Seagate Seagate Seagate Seagate Seagate Seagate Seagate Seagate Seagate Seagate Seagate Product Family Deskstar 7K1000 Deskstar 7K1000 Deskstar T7K500 Deskstar T7K500 Deskstar T7K500 Deskstar T7K500 Deskstar T7K500 Deskstar T7K500 Deskstar T7K500 Deskstar T7K500 Deskstar T7K250 Deskstar T7K250 Deskstar P7K500 Deskstar P7
Seagate Seagate Seagate Seagate Seagate Seagate Seagate Seagate Seagate Seagate Seagate Seagate Seagate Seagate Seagate Seagate Seagate Seagate Seagate Seagate Seagate Seagate Seagate Seagate Seagate WD WD WD WD WD WD WD WD WD Barracuda ES.2 Barracuda ES.2 Barracuda ES.2 Barracuda ES.2 Barracuda 7200.11 Barracuda 7200.11 Barracuda 7200.11 Barracuda 7200.11 Barracuda 7200.11 Barracuda 7200.11 Barracuda 7200.11 Barracuda 7200.11 Barracuda 7200.11 Barracuda 7200.11 Barracuda 7200.10 Barracuda 7200.
WD WD WD WD WD WD WD WD WD WD WD WD WD WD WD WD WD WD WD WD WD WD WD WD WD WD WD WD WD WD WD WD WD WD Caviar Green Caviar Green Caviar Green Caviar Green Caviar Green Caviar Green Caviar Green Caviar Black Caviar Black Caviar Black Caviar Black AV-GP AV-GP AV-GP RE3 RE3 RE3 RE3 RE3 RE2 RE2 RE2 RE2 RE2 RE2 RE2 RE2 RE2-GP RE2-GP RE2-GP Caviar SE16 Caviar SE16 Caviar SE16 Caviar SE16 WD20EADS WD15EADS WD10EADS WD10EACS WD7500AACS WD6400AACS WD5000AACS WD1001FALS WD7501AALS WD6401AALS WD5001AALS WD10EVCS WD75
WD WD Samsung Samsung Samsung Samsung Samsung Samsung Samsung Samsung Caviar SE16 Caviar SE16 Spinpoint F1 Spinpoint F1 Spinpoint F1 Spinpoint F1 Spinpoint F1 RAID Class EcoGreen F1 DT EcoGreen F2 EcoGreen F2 WD3200AAKS WD2500AAKS HD103UJ HD753LJ HD642JJ HD502IJ 320 250 1000 750 640 500 HE103UJ 1000 HD103UI HD103SI HD502HI 1000 1000 500 All rights registered Microsoft and Windows are registered trademarks of Microsoft Corporation All trade names and marks are registered trademarks of respective comp
Via Pelizza da Volpedo, 59 Cinisello Balsamo – MI – Italy info@atlantis-land.