I-Fly Wireless Router ADSL Manual (V1.
COPYRIGHT The Atlantis Land logo is a registered trademark of Atlants Land SpA. All other names mentioned mat be trademarks or registered trademarks of their respective owners. Subject to change without notice. No liability for technical errors and/or omissions. Copyright 2002 by this company.
Table of Contents CHAPTER 1........................................................................................................................... 1 1.1 AN OVERVIEW OF ADSL MODEM/ROUTER ................................................................................................. 1 1.2 PACKAGE CONTENTS .................................................................................................................................... 2 1.3 ADSL MODEM/ROUTER FEATURES ..................................
I-Fly Wireless Router ADSL 3.5.19 Admin Privilege – Miscellaneous Configuration .............................................................................. 50 3.5.20 Admin Privilege – Reset to Factory Default...................................................................................... 52 3.5.21 Admin Privilege – Diagnostic Test.................................................................................................... 52 3.5.22 Admin Privilege – Code Image Update.........................
Chapter 1 Introduction 1.1 An Overview of I-Fly Wireless Router ADSL ADSL Modem/Router provides a high-speed Ethernet port and an USB (Universal Serial Bus) port for high-speed Internet browsing. It can support downstream transmission rates of up to 8Mbps and upstream transmission rates of up to 1024Kbps. It is compliant with Multi-Mode standard (ANSI T1.413, Issue 2; G.dmt (G.992.1); G.lite (G992.2); G.hs (G994.1)).
I-Fly Wireless Router ADSL 1.2 Package Contents 1. I-Fly Wireless Router ADSL 2. One CD-ROM containing the driver and online manual 3. One Quick Start Guide 4. One RJ-11 ADSL/telephone cable 5. One CAT-5 LAN cable 6. One USB cable 7. One power adapter 1.3 ADSL Modem/Router Features ADSL Modem/Router provides the following features: ADSL Multi-Mode Standard: Supports downstream transmission rates of up to 8Mbps and upstream transmission rates of up to 1024Kbps.
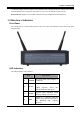
Chapter 1 Introduction can allocate multiple clients IP addresses and distribute them including IP address, subnet mask as well as DNS IP address to local computers. It provides an easy way to manage the local IP network. Web based GUI: Supports user-friendly web based GUI for configuration and management. 1.4 Hardware Indicators Front Panel Place the Router in a location that permits an easy view of the LED indicators shown in the front panel diagram below.
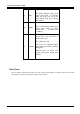
I-Fly Wireless Router ADSL 5 RxD 6 10/100 The RXD Indicator light green when data traffic is receiving from the WAN port, the LED will rapidly flash green during data transfer The 10/100 Indicator lights green when data traffic is data transfer.[On =100Mbps,Off =10Mbps] The LAN LINK Indicator lights green when your ROUTER is connected to your PC or Ethernet LAN.
Chapter 1 Introduction Port Meaning 1 Line(RJ11) Connect the supplied RJ-11 cable to this port when connecting to the ADSL/telephone network.
I-Fly Wireless Router ADSL 1.5 Hardware Installation Power on Connect the Adapter to power inlet and turn the power switch on, this product will enter a self-test phase. When it is in the self-test phase, the indicators READY LED will be lighted ON for about 8 seconds, and the READY LED will be flashed to indicate that the self-test phase has finished. Finally, the READY LED will be flashed to indicate that router is in normal operation.
Chapter 2 Using ADSL Modem/Router 2.1 Cautions for Using ADSL Modem/Router Do not place the router under high humidity and high temperature. Do not use the same power source for the device with other equipment. Do not open or repair the case yourself. If the device is too hot, turn off the power immediately and have a qualified serviceman repair it. Place the product on the stable surface. Only use the power adapter that comes with the package. 2.
I-Fly Wireless Router ADSL Since the product cannot auto-detect whether your cable is correct or not, please make sure you are using the right cable to a PC or a Hub.
Chapter 3 Installation and Configuration 3.1 Installing the USB Driver If you connect the ADSL Modem/Router through USB port, for the first time the USB cable is connected to the PC, Windows will automatically detect the device. Follow the steps to install the USB driver. 3.1.1 For Windows XP 1. When Windows tells you that the new device has been detected, select “Install from a list or specific location” and click “Next >”. 2. Insert the installation CD into the CD-ROM drive.
I-Fly Wireless Router ADSL 3. When windows titled “Hardware Installation” or “Software Installation” appears, press “Continue Anyway” to go on. 4. Then, click “Finish”.
Chapter 3 Installation and Configuration 5. After a few moments, Windows will show the new device, USB ADSL Adapter, has been detected. Select “Install from a list or specific location”. Click “Next >”. 6. Click “Next >” when the following figure appears. Check “Include this location for the search” and click “Browse”. (the folder CD:\A02-WRA-11B\Driver). Then, it takes seconds to search and install the software.
I-Fly Wireless Router ADSL 7. When windows titled “Hardware Installation” appears, press “Continue Anyway”. 8. Then, click “Finish” to end the installation.
Chapter 3 Installation and Configuration 9. After installing the driver, follow the section “3.2 Configuring the Network Properties” below to modify the network settings on your PC. 3.1.2 For Windows 2000 1. When Windows tells you that the new device has been detected, click “Next >” to continue. 2. Select “Search for a suitable driver for my device”. Click “Next>”. Then, insert the installation CD into the CD-ROM drive. 3. In next window, check “Specify a location” and click “Next>”.
I-Fly Wireless Router ADSL 4. Continuing through the Wizard, click the “Next >” button. 5. When window titled “Digital Signature Not Found” appears, press “Yes” to continue the installation. 6. Press “Finish”.
Chapter 3 Installation and Configuration 7. If the following window “Digital Signature Not Found” appears, press “Yes” to end the installation. 3.1.3 For Windows Me 1. When Windows tells you that the new device has been detected. Select “Specify the location of the driver” and click “Next >”.
I-Fly Wireless Router ADSL 2. Insert the installation CD into the CD-ROM drive and check “Specify a Location”. Click “ Browse “ and specify the folder CD:\A02-WRA-11B\Driver\. Click “Next>” to continue. 3. Continuing through the Wizard, click the “Next >” button. 4. Continuing through the Wizard, Windows will start copying files to your system. Then, click “Finish”.
Chapter 3 Installation and Configuration 3.1.4 For Windows 98 1. When Windows tells you that the new device has been detected, click “Next >”. 2. In the next window, select “Search for the best driver for your device” and click “Next >”. 3. Insert the installation CD into the CD-ROM drive and check “Specify a location”. Click “Browse…” to specify the driver directory such as D:\A02-WRA-11B\Driver\. Click “OK” and then “Next>” to continue.
I-Fly Wireless Router ADSL 4. Continuing through the Wizard, click the “Next >” button. 5. Windows will start copying files to your system. Then, click “Finish”.
Chapter 3 Installation and Configuration 6. You will see the following screen prompting for the path of the Windows source files. Please specify a location. Click “OK”. 3.2 Configuring the Network Properties This section describes the configuration required by LAN-attached PCs that communicate with the ADSL Modem/Router, either to configure the device, or for network access.
I-Fly Wireless Router ADSL Any TCP/IP capable workstation can be used to communicate with or through the ADSL Modem/Router. To configure other types of workstations, please consult the manufacturer’s documentation. 3.2.1 For Windows XP 1. Go to Start / Control Panel (in Classic View). In the Control Panel, double-click on Network Connections. 2. Double-click Local Area Connection. 3. In the LAN Area Connection Status window, click Properties.
Chapter 3 Installation and Configuration 4. Select Internet Protocol (TCP/IP) and click Properties. 5. Select the Obtain an IP address automatically and the Obtain DNS server address automatically radio buttons. 6. Click OK to finish the configuration.
I-Fly Wireless Router ADSL 3.2.2 For Windows 2000 1. Go to Start / Settings / Control Panel. In the Control Panel, doubleclick on Network and Dial-up Connections. 2. Double-click LAN Area Connection. 3. In the LAN Area Connection Status window, click Properties.
Chapter 3 Installation and Configuration 4. Select Internet Protocol (TCP/IP) and click Properties. 5. Select the Obtain an IP address automatically and the Obtain DNS server address automatically radio buttons. 6. Click OK to finish the configuration.
I-Fly Wireless Router ADSL 3.2.3 For Windows 95/98/Me 1. Go to Start / Settings / Control Panel. In the Control Panel, doubleclick on Network and choose the Configuration tab. 2. Select TCP / IP -> NE2000 Compatible, or the name of any Network Interface Card (NIC) in your PC. 3. Click Properties.
Chapter 3 Installation and Configuration 4. Select the IP Address tab. In this page, click the Obtain an IP address automatically radio button. 5. Then select the DNS Configuration tab. 6. Select the Disable DNS radio button and click “OK” to finish the configuration.
I-Fly Wireless Router ADSL 3.2.4 For Windows NT4.0 1. Go to Start / Settings / Control Panel. In the Control Panel, doubleclick on Network and choose the Protocols tab. 2. Select TCP/IP Protocol and click Properties. 3. Select the Obtain an IP address from a DHCP server radio button and click OK.
Chapter 3 Installation and Configuration 3.3 Factory Default Settings Before you configure this device, you need to know the following default settings. 1. Web Configurator Password: There are two levels of password protection, Administrator Level and User Level. User Name Password admin epicrouter user password Administrator Level User Level 2. Device IP Network settings in LAN site IP Address: 10.0.0.2 Subnet Mask: 255.0.0.0 3.
I-Fly Wireless Router ADSL IP addresses for distribution to PCs 12 IP addresses continuing from 10.0.0.4 through 10.0.0.15 (Actually, it can support up to 253 users.) 3.4 Information from ISP Before beginning the configuration of the Router you have to know the parameters of your subscription ADSL. There are five ways ― PPPoE, PPPoA, RFC1483 routed, IPoA, RFC1483 Bridge― for the device to have a public IP address and then to access Internet. You have to check with your ISP about which way is adopted.
Chapter 3 Installation and Configuration PPPoE VC-Mux VPI/VCI, Service Name, Username, Password, and Domain Name System (DNS) IP address (it can be automatically assigned from ISP or be set fixed). PPPoE LLC VPI/VCI, Service Name, Username, Password, and Domain Name System (DNS) IP address (it can be automatically assigned from ISP or be set fixed). PPPoE None VPI/VCI, Service Name, Username, Password, and Domain Name System (DNS) IP address (it can be automatically assigned from ISP or be set fixed).
I-Fly Wireless Router ADSL There are two levels of password protection. The first level is for administrator and the second one is for user. If you want to configure the device with administrator level, type admin in the username field and epicrouter in the password field. If you want to configure the device with the user level, type user in the username field and password in the password field.
Chapter 3 Installation and Configuration Then, click “OK” to log in. You can modify these passwords for security and management purpose. At the configuration homepage, the left navigation pane where bookmarks are provided links you directly to the desired setup page. Click on the desired item to expand the page in the main navigation pane. 3.5.
I-Fly Wireless Router ADSL 3.5.3 Status – LAN Displays the status of your Local Area Network (LAN) connection. 3.5.4 Configuration – WAN Configuration The screens below contain settings for the WAN interface toward Internet.
Chapter 3 Installation and Configuration System Wide Settings Default Gateway: Enter the gateway address provided by your ISP. Per VC Settings There are eight Virtual Circuit (VC) for you to set, from VC 0 to VC 7. Before you make the settings, please scroll down to the button of the page and select the item of Virtual Circuit you want to configure. Then, press the Execute button.
I-Fly Wireless Router ADSL Enabled? : Select Yes if you want to enable the settings of this VC or select No if you want to disable the settings of this VC. VPI: Consult the telephone company to get the Virtual Path Identifier (VPI) number. The default value is 0. VCI: Consult the telephone company to get the Virtual Channel Identifier (VCI) number. The default value is 32. Static IP Address: Enter the information provided by your ISP. Subnet Mask: Enter the information provided by your ISP.
Chapter 3 Installation and Configuration DHCP client enable: Check to enable the DHCP client function if you want the device to get an IP address automatically from your ISP. Host Name: Enter the name of your work group. All settings need to be saved and the device needs to be rebooted before the changes to take effect. 3.5.5 Configuration – LAN Configuration This screen contains settings for LAN interface attached to the LAN port.
I-Fly Wireless Router ADSL IP Address: Default at 192.168.1.254. This is the device IP address in LAN site. If you plan to change it to another IP address to a different range of IP subnet. Please make sure your PC is also located at the same IP subnet. Otherwise, you may not be able to access the ADSL Router. Subnet Mask: Default at 255.255.255.0. DHCP Server Check to enable the ADSL Router to distribute IP Addresses, subnet mask and DNS setting to computers.
Chapter 3 Installation and Configuration User Mode: There are two selections, Single User and Multi-User, for this setting. Ethernet Mode Setting Click this hyperlink to set the Ethernet mode of your LAN. There are five modes in total, including Auto Sense, 100 Full, 100 Half, 10 Full, and 10 Half. 3.5.6 Configuration – NAT Configuration The NAT feature allows multiple users to access Internet through a single IP account, sharing the single IP address from ISP.
I-Fly Wireless Router ADSL Whenever the NAT function is enabled, enter the Session Name Configuration page first. Session Name: Enter the desired session name. Virtual Circuit: Select the virtual circuit item you want to configure. One virtual circuit can have only one session name. Select Add or Delete and then press the Submit button to add or delete any NAT session name setting to/from the following table. Go back to the previous page, NAT Configuration, to continue further settings.
Chapter 3 Installation and Configuration Session Name: Enter the session name you set up in the session name configuration page. User’s IP: Enter the user’s IP address. Action: Select Add or Delete and then press the Submit button to add or delete any NAT user’s IP setting to/from the following table. 3.5.7 Configuration – Virtual Server Configuration Being a natural Internet firewall, the ADSL Router protects your network from being accessed by outside users.
I-Fly Wireless Router ADSL Public Port: Enter the public port number you want to configure. Private Port: Enter the private port number you want to configure. Port Type: Select TCP if you want to scope for the connection-based application service on the remote server using the port number. Or select UDP if you want to scope for the connectionless application service on the remote server using the port number.
Chapter 3 Installation and Configuration SSID: This is the name of the wireless LAN. All the devices in the same wireless LAN should have the same SSID. Channel: The channel used by the wireless LAN. All devices in the same wireless LAN should use the same channel. Security: Enable or disable Wireless encryption.(Disable Encryption,Enable Encryption) Key Length: You can select the Key Length for encryption, 64 bit or 128 bit. Key 1~Key 4: The key used to encryption data transmitted in the wireless network.
I-Fly Wireless Router ADSL 3.5.9 Configuration – Bridge Filtering Configuration Enable Bridge Filtering: Check Yes to enable this function or check No to disable. Source MAC: Enter the source MAC address. Destination MAC: Enter the destination MAC address. Type: Enter the Ethernet type. ~ Block ~ Forward: Check Block if you want to block requests from the source MAC address sending to the destination MAC address.
Chapter 3 Installation and Configuration 3.5.10 Configuration – DNS Configuration A Domain Name System (DNS) contains a mapping table for domain name and IP address. In the Internet, every host has a unique and friendly name such as www.yahoo.com and IP address. The IP address is so hard to remember that you may just enter the friendly name www.yahoo.com and then the DNS will convert it to its equivalent IP address.
I-Fly Wireless Router ADSL 3.5.11 Configuration – Save Settings Click the Submit button to write settings to flash. Then, the system will reboot for changes to take effect. 3.5.12 Admin Privilege – WAN Status Each VC setting you enabled in the WAN Configuration section except that uses the PPP encapsulation will be displayed in this table.
Chapter 3 Installation and Configuration 3.5.13 Admin Privilege – PPP Status Display the PPP and data transmission status of each VC. Select the virtual circuit you want to Connect or Disconnect and click Execute. System will start connecting. If you are not using the PPPoE or PPPoA encapsulation, the Connect command cannot be executed.
I-Fly Wireless Router ADSL If the VC setting is disabled in the WAN Configuration section, the line cannot be connected, either. 3.5.14 Admin Privilege – TCP Status Display the status of TCP. This screen will automatically refresh every two seconds.
Chapter 3 Installation and Configuration 3.5.15 Admin Privilege – Route Table If you have another router with a LAN-to-LAN connection, you may create a static routing on the router that is the gateway to Internet. Destination: Fill in the field required by this routing function. Netmask: Fill in the field required by this routing function. Gateway: Fill in the field required by this routing function.
I-Fly Wireless Router ADSL 3.5.16 Admin Privilege – Learned ( Bridge ) MAC Table Aging Timeout: Enter the time period for the router to memorize MAC addresses. 3.5.17 Admin Privilege – ADSL Configuration Trellis: Default at Enabled. Handshake Protocol: Default at Autosense – G.dmt first. You can also choose other protocols, such as Autosense – T1.413 first, G.dmt/G.lite, T1.413, G.dmt, G.lite.
Chapter 3 Installation and Configuration Wiring Selection: Default at Tip/Ring. Select Auto or A/A1 if necessary. 3.5.18 Admin Privilege – RIP Configuration RIP: Default at Disabled. Supplier: Default at True. Gateway: Default at False. Multicast: Default at False. Interval seconds: The default value is 30 seconds.
I-Fly Wireless Router ADSL 3.5.19 Admin Privilege – Password Configuration In factory setting, the default password for administrator is password, and that for user is also password. You can change the default password to ensure that someone cannot adjust your settings without your permission. Every time you change your password, please record the password and keep it at a safe place. Please note that the minimum input for password is 8 alphanumeric characters long.
Chapter 3 Installation and Configuration WAN side HTTP server: Default at Disabled. FTP server: Default at Enabled. TFTP server: Default at Disabled. HTTP server port: Default at 80. DMZ: Regarding the DMZ Host, it is a local computer exposed to the Internet. Therefore, an incoming packet will be checked by NAT algorithms in the ADSL Router, then passed to the DMZ host when the packet is not sent by hacker or not limited by the virtual server list. DMZ HOST IP: Enter the IP address of the DMZ host.
I-Fly Wireless Router ADSL 3.5.21 Admin Privilege – Reset to Factory Default If for any reason you have to reset this ADSL Router back to factory default settings, be careful that the current settings will be lost and the settings are reset back to its default state. The factory default values is detailed in section 3.2 ‘‘Factory Default Settings’’. 3.5.
Chapter 3 Installation and Configuration Checking LAN Connection Testing Ethernet LAN connection This test passes if the Ethernet LAN interface is working properly. Checking ADSL Connection Testing ADSL Synchronization This test checks your DSL modem to see if it can successfully negotiate and establish a DSL connection with your service provider's central office equipments. The test returns PASS if a DSL connection is established.
I-Fly Wireless Router ADSL Test PPPoE connection This test returns PASS if your login name and password have passed authentication with your service provider. If this test returns FAIL, run this test again a few minutes after this test is completed, especially if your PPP connection has just been improperly disconnected. If this test consistently fails, first make sure your login name and password are correct. Remember that login name and password are case sensitive.
Chapter 3 Installation and Configuration 3.5.23 Admin Privilege – Code Image Update To upgrade the firmware of the ADSL Router, you should download or copy the firmware to your local environment first. Press the “Browse…” button to specify the path of the firmware file. Then, click “Upload” to start upgrading. When the procedure is completed, please reboot the device to make the new firmware work. 3.5.
I-Fly Wireless Router ADSL 3.5.25 Admin Privilege – System Log Display the system logs cumulated till the present time. You can trace the historical information through this function. It refreshes every five seconds.
Chapter 4 Troubleshooting If the ADSL Router is not functioning properly, you can refer first to this chapter for simple troubleshooting before contacting your service provider. This could save your time and effort but if the symptoms persist, then consult your service provider. Problems Starting Up the ADSL Router Problem None of the LEDs are on when you turn on the ADSL Router. Corrective Action Check the connection between the adapter and the ADSL Router.
Chapter 4 Troubleshooting Problems Connecting to a Remote Node or ISP Problem Can’t connect to ISP. 58 Corrective Action Check section 3.4.12 “Admin Privilege – PPP status” to verify the line status.
APPENDIX Specification Protocols IEEE802.11b, IP, NAT, PPTP, ARP, ICMP, DHCP, PPPoE, PPPoA, IpoA, RIP1/2 and RFC1483 LAN 1 port 10/100Base-T,1 USB v1.1 port, 1 RS232 port WAN 1*RJ-11, 1 ADSL port + 1*RJ11 for phone (with ADSL Filter built-in) LED POWER, READY, ADSL, WLAN,10/100 LINK Radio IEE802.
Chapter 4 Troubleshooting APPENDIX ISP Scenario Bridge RFC 1577 RFC 1483 R PPPoA PPPoE WAN Configuration Default Gateway 0.0.0.0 VC Setting Enabled Enabled Enabled Enabled Enabled VPI 8 8 8 8 8 VCI 35 35 35 35 35 Static IP Address 0.0.0.0 Provided by ISP Provided by ISP 0.0.0.0 0.0.0.0 Subnet Mask 0.0.0.0 Provided by ISP Provided by ISP 0.0.0.0 0.0.0.
PPP password N/A N/A N/A Provided by ISP Provided by ISP DHCP Client Disabled Disabled Disabled Disabled Disabled Host name N/A N/A N/A N/A N/A Virtual Circuit 0 0 0 0 0 LAN IP 192.168.1.254 192.168.1.254 192.168.1.254 192.168.1.254 192.168.1.254 LAN subnet mask 255.255.255.0 255.255.255.0 255.255.255.0 255.255.255.0 255.255.255.
Chapter 4 Troubleshooting only only only Preferred DNS Server 0.0.0.0 Provided by ISP Provided by ISP 0.0.0.0 0.0.0.0 Alternate DNS Server 0.0.0.0 Provided by ISP Provided by ISP 0.0.0.0 0.0.0.0 Trellis Enabled Enabled Enabled Enabled Enabled Handshake protocol Autosense-G.dmt first AutosenseG.dmt first AutosenseG.dmt first AutosenseG.dmt first Autosense-G.
DMZ Disabled Disabled Disabled Disabled Disabled DMZ Host IP 0.0.0.0 0.0.0.0 0.0.0.0 0.0.0.0 0.0.0.
APPENDIX Support If you have any problems with the ADSL Router, please consult this manual. If you continue to have problems you should contact the dealer where you bought this ADSL Router. If you have any other questions you can contact the Atlantis Land company directly at the following address: AtlantisLand spa Via Gandhi 5 Ing2,Scala A 20017 Mazzo di Rho(MI) Tel: 02/93906085, 02/93907634(help desk) Fax: 02/93906161 Email: info@atlantis-land.com or tecnici@atlantis-land.com WWW: http://www.