
Use and Care Guide


11
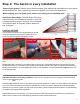
Maintenance & Helpful Tips
How do I keep my new gutter guard at peak performance?
Your new gutter guard is designed to be easy to maintain. Follow the tips below for easy maintenance.
1. Periodically inspect your gutter guard for any debris that may not have blown off. Particularly where
two sections of roof come together (valleys) or in areas that are protected from wind.
2. Brush off any accumulated debris. We created “The Gutter Guard Brush” for just this purpose. Just
screw the brush on the end of an extension pole, then from the ground, reach up and brush it off. Get
more information at TheGutterGuardBrush.com.***
***Patents pending
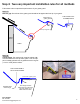
What do I do if I notice rainwater flowing over the front of my gutter?
1. Look on top of the gutter guard and see if there is any debris on it. Follow the maintenance instruc-
tions above to remove debris.
2. Confirm there is no gap between the front frame of your gutter guard and the gutter and that the mesh
trough is below the front lip of the gutter (see page 8). Adjust your gutter guard to match the recom-
mended installation to correct this.
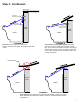
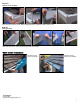
3. If the overflow is occurring where two sections of the roof come together (valley), remove any accu-
mulated debris. If there is still overflow, you may need a rainwater diverter. A rainwater diverter (see
photos below) helps disperse rainwater over a wider area, rather than at one point. The diverter is
made out of an aluminum material, perforated with small round holes and attaches to the end of your
roof valley or other high-flow areas of your roof, just above the mesh. You can get more information
and purchase rainwater diverters at www.RainwaterDiverters.com.
4. Contact our team at 844-359-7683 or at customerservice@gutterglove.com.
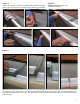
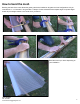
If removal is necessary. for
the tape method, use a
sharp knife and cut tape be-
tween the gutter guard and
gutter. To reinstall, follow the
screw down method.
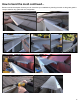
Removing gutter guard
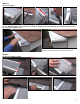
If removal is necessary, for
the screw method, reverse
screws with power drill and
magnetic hex driver bit. Re-
attach through same holes
from original installation.