
Use and Care Guide


4
Clean out your gutters: Take the time to clean the leaves, pine needles and other debris from your gutters
and downspouts first. Also, complete any necessary repairs to your gutters and downspouts.
When installing your new gutter guard, make sure to obey your local building code.
Important information in freezing conditions: If you live in an area that is prone to freezing, the following issues
can occur with any gutter guard.
ICICLES & ICE DAMS can form on your gutter during freezing conditions. Ice dams can cause water to leak back into
your home. Icicles can break and cause serious bodily harm. Properly installed, operated and maintained heating
elements on your roof and gutter can melt icicles and ice dams. Use a licensed electrical contractor in good standing
for installing any heating element products.
SNOW MELTING and running down your roof can run off the side of the gutter and refreeze on the ground below.
Water frozen on surfaces can create slipping hazards and cause serious bodily harm.
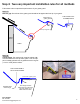
Step 2: The basics in every installation
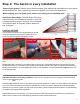
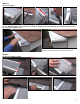
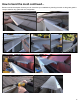
2 INSTALL OPTIONS
You can either use the 3M Very High Bond tape (A) that
comes pre-applied on each section of gutter guard, or
screw it on with the supplied self-tapping screws.
TAPE METHOD: For best results, install in 65 degree weather or above. Allow a minimum of 12 hours to cure for full
bond.
SCREW METHOD: There are no pre-drilled holes for the screws. The supplied self-tapping screws drill the holes
themselves while being screwed through the gutter guard into the front lip of the gutter. A magnetic Hex Head Driver
Bit (B) is also included. If you need additional screws for your installation, contact customerservice@gutterglove.com
or call 844-359-7683.
A
Tape it on
B
Use 3 screws per
4 foot section
Screw it on
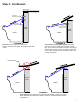
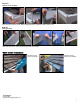
Ideal Gutter Guard Slope: The ideal slope of the gutter
guard is between 5 to 25 degrees. However, if your roof
is steeply pitched or gutter is hung low, it is recommend-
ed to drop the slope of the gutter guard to between 5
and 10 degrees.