
Installation Instructions


entire deck surface is required. Starting with a 19" wide strip at eaves and overhanging the eaves 1/4" to 3/8",
cover the first 19" course with a full 36" wide strip. Expose the first course 17" and continue up the deck with
36" wide strips, lapping each course 19" over the preceding course - providing a 17" exposure. End laps for low
slopes shall be of at least 12" overlap and staggered 6 feet apart. Install drip edge over the underlayment at the
rake and beneath the underlayment at the eaves.
5.) FLASHING
All flashing should be in place before shingles are installed. Cap flashings of sheet metal and base flashings of
metal or mineral surfaced roll roofing should be used at vertical surfaces such as chimneys, skylights, vents,
walls, etc. All flashings should be sealed with asphalt plastic cement. Consult the Residential Asphalt Roofing
Manual published by the Asphalt Roofing Manufacturers Association (ARMA) for details concerning specific
methods and types of flashing installation.
6.) ICE DAM PROTECTION
Eave and rake edge waterproof flashings must be installed per local building codes and where there is a
possibility of icing along the eaves and rake edges causing a potential for ice damming and a backup of water.
Atlas’s WeatherMaster® products, or equivalent must be applied directly over the decking according to
application instructions provided with the product, and local building codes. The waterproof flashing material
must extend up the roof at least 24" beyond the interior warm wall line,
and in areas of severe icing, at least up to the highest water level expected to occur from ice dams. If the
overhang requires flashing wider than 36", the horizontal lap must be located on the overhang area and
cemented or sealed. End laps must be 12" (minimum) and cemented/sealed. WeatherMaster® products, as
supplied by Atlas, are recommended as the first layer of Ice Dam Protection. WeatherMaster® products
conform to ASTM D--1970.
7.) VALLEYS
Valleys must be installed before Pinnacle® Pristine shingles are applied.
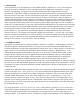
Open Valley: Apply a 36" ice & water product centered in the valley. Install 16" wide minimum copper flashing
(or equivalent) also centered in valley. Secure the copper flashing every 24" along both edges either with copper
cleats or large head copper nails with the shanks immediately adjacent to the copper edge. Overlaps in the
copper must be a minimum of 12".
Strike chalk lines on each side of the copper valley 3" from the center line. As shingles are applied, trim them to
chalk lines and, to direct water into valley, cut 2" diagonally off upper corner of shingles adjacent to chalk line.
Set valley edge of each shingle in a 3" wide band of asphalt plastic cement meeting ASTM D--4586 and nail no
closer than 6" from valley center line. See Diagram #1.
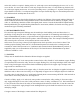
Closed Cut Valley: Apply a 36" wide ice & water product centered in the valley, nailing 2" from outer edges
only. Apply all shingles on one side of valley and across center of valley, a minimum of 12". Nail a minimum of
6" away from the center line of the valley on the unshingled side and strike a chalk line 2" from the center line
on the un--shingled side. Apply shingles on the unshingled side up to the chalk line and trim. Do not cut the
underlying shingle.
Cut upper corners of the shingle, cement and nail. See Diagram #2.