
Installation Guide
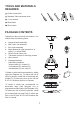

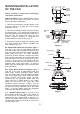
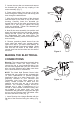
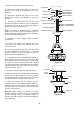

Table Of Contents

Figure 7
4
Before touching a screw driver thoroughly
read these instructions.
Warning/Caution: Before installing fan, turn off
power at service panel and check all visible
screws and bolts for tightness.
1. Remove the decorative canopy bottom cover
from the canopy by turning the cover counter
clockwise. (Fig. 5)
2. Remove the hanger bracket from the canopy
by removing the 1 of 2 screws from the bottom of
the hanger bracket and loosening the other one a
half turn from the screw head. Next, turn the
canopy counter clockwise to removing the
hanger bracket from the canopy. (Fig, 5)
3. Secure the hanger bracket to the ceiling outlet
box using screws and washers included with
your outlet box. (Fig. 6)
4A. Metal Blade Head and Decorative Cage: If
your fan is one with a metal blade head and
decorative cage, remove protective plastic sleeve
from the motor shaft, and then attach the metal
blade head and cage. The Atlas medallion
should be oriented correctly. Handle your blade
head carefully otherwise you will bend the blade
irons and cause your fan to vibrate when in use.
Caution: The set screw in the blade head hub
must be counter-sunk into the bore-hole on the
flattened side of the motor shaft - or else the
blade head may disengage from the motor shaft
during operation.
4B. Metal Blade Head and Safety Cage: If
your fan is one with a metal blade head and
safety cage, remove protective plastic sleeve
from the motor shaft, then and attach the back
side of the safety cage. Next, attach the blade
head. Handle your blade head carefully
otherwise you will bend the blade irons and
cause your fan to vibrate when in use. Finally
attach the front side of the cage with Atlas
medallion oriented correctly. Caution: The set
screw in the blade hub must be counter-sunk into
the bore-hole on the flattened side of the motor
shaft - or else the blade head may disengage
from the motor shaft during operation.
4 C. Wooden Blade Head: If your fan is one
with wooden blade head, attach your blades as
the last step in the assembly process. Do not
attach them now. Attach them in step No.: 9.
Handle your blade head carefully otherwise you
will bend the blade irons and cause your fan to
vibrate when in use.
Figure 5
Ceiling
hanger
bracket
Ceiling
hanger
bracket
Ceiling
canopy
Canopy
cover
Mounting screws
(supplied with
electrical box)
Hook
Electrical
box
Figure 6
120V Wires
Washers
Allen set screws
Allen set screws
Allen
wrench
MOUNTING/INSTALLATION
OF THE FAN
Supply wires
Downrod
Canopy
Canopy cover
Threaded pin