
Installation Guide
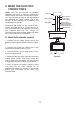
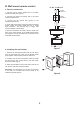
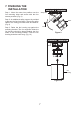
Table Of Contents

6. MAKE THE ELECTRIC
CONNECTIONS
NOTE: Your fan has included as standard
equipment two types of controls: a hand held
remote control and a wall mounted wall control.
You may use both as long as the dip switches
are calibrated the same. Select one of the
controls at this moment for installation and
programming of your fan.
Disconnect the power at the electrical box.
Follow the steps below to connect the fan to
your household wiring. Use the wire connecting
nuts supplied with your fan. Secure the
connectors with electrical tape. Make sure there
are no loose strands or connections.
A. Hand held remote control
1. Connect the fan supply (black) wire to the
black household supply wire as shown in Figure
6.
2. Connect the neutral fan (white) wire to the
white neutral household wire. (Fig. 6)
3. Connect the fan ground wire (green) to the
household ground wire.
4. Check that the two plugs, large and small are
making proper contact. One plug is small with
only a single wire connection. The second plug
is larger and connects multiple colored wires.
5. After all splices are made, check to make
sure there are no loose strands. As an
additional precaution we suggest to secure the
plastic wire connectors to the wires with
electrical tape.
Figure 6
White (neutral)
Green or bare
copper (ground)
White ("AC IN N")
Ground (green)
(Connect to ground wire
on hanger bracket if no
house ground wire exists.)
Outlet box
Black ("AC IN L")
Black (motor)
5