
Owner's Manual


2/2
AtlasIED.com
TELEPHONE: (800) 876-3333
FAX (800) 765-3435
1601 JACK MCKAY BLVD.
ENNIS, TEXAS 75119 U.S.A.
©2017 Atlas Sound L.P. The Atlas “Circle A”, Soundolier, and Atlas Sound are trademarks of Atlas Sound L.P. IED is a registered trademark of Innovative Electronic Designs LLC.
All Rights Reserved. All other trademarks are the property of their respective owners. All specs are subject to change without notice. ATS005580 RevA 1/17
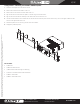
Configuration 2 - Mounting one AA35G or AA60G Amplifier
1. Disconnect the amplifier from the electrical source.
2. Remove the four feet from the bottom of the unit.
3. Remove the front two screws from both sides of the unit.
4. Align and secure the chassis extension plate to a rack ear using the enclosed screws.
5. Align the rack ear and extension assembly to the chassis holes on the side of the unit.
6. Use the enclosed chassis screws to attach the rack ear and extension assembly to the chassis. Secure firmly, do not over tighten. Attach the other
rack ear to the opposite side of the unit.
7. Install the amplifier into the rack using rack rail screws and washers.
8. Disregard any additional pieces.
Kit Contains
• (2) Rack Ears
• (4) Rack Ear Chassis Screws
• (1) Rack Extension Plate for Single Unit Mounting
• (2) Screws to Combine Extension Plate to Rack Ear
• (2) Bottom Joiner Plates
• (4) Bottom Joiner Plate Screws