
Owner's Manual
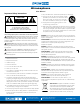


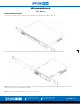

Table Of Contents
- User Manual
- Table of Contents
- Important Safety Instructions
- Introduction
- Key Features and Applications
- Package Contents
- Rack Installation Guide
- Hardware Overview
- Connections
- Network Connection Overview
- Software Overview
- Sources
- Zones (Zone Outputs)
- Zones-Limiter
- Zones-Groups Overview
- Room Combine Active
- Message Player Overview
- Messages
- GPIO Overview
- Scenes Overview
- Routines Overview
- Accessories Overview
- Accessories Page
- Print, Assemble, Place, and Scan
- X-ANS General Settings
- Accessories Connection Rules
- Scheduler, Steps to Create an Event
- Diagrams – Connection Diagram and Block Diagram
- Settings Page Overview
- Front Panel Display Menu Tree
- Specifications
- Mechanical Line Drawings with Dimensions
- Regulatory Information: AZM4 / AZM8 / A-BT
- Limited Warranty, Customer Service Online Warranty Claim Process
- Quick Start Guide
- Product Info
- System Examples

Atmosphere
User Manual
AtlasIED.com
TELEPHONE: (800) 876-3333
SUPPORT@ATLASIED.COM
1601 JACK MCKAY BLVD.
ENNIS, TEXAS 75119 U.S.A.
– 9 –
Hardware Overview
AZM4 and AZM8 Front Panel
1. WiFi Enable
Out of the box, the AZM is configured to connect to an existing network via the back panel ethernet port. However, there are two additional
methods for connecting to the AZM for configuration, WiFi or Access Point mode, enabled from the front panel menu. If no existing network
is available, it is recommended that the onboard WiFi (Access Point mode) be used for initial configuration.
2. Display
The Display is a multi-functional status interrogator and visual activity monitor. It is designed to provide “quick look” verification of selections
when in front of the unit and when the UI is not handy. It also allows configuration of network (ethernet, WiFi, and access point) settings.
When first powering the AZM, the Display will show the IP address and the Outputs activity. At the bottom is the Menu > Navigation.
Pressing the Navigation control knob will step thru the menu tree in the following order:
• Zone Control – Change sources, volumes, and mute state in any zone. The user can also recall Actions. This has to be configured
within the UI before access is given.
• Network – See network status and settings; change mode between access point, WiFi, ethernet; change connection to available
networks by signal strength, enter SSID.
• I/O Signals – Select Inputs or Outputs individually and see signal activity.
• Accessories – See Accessories connected to Ports A, B, (AZM4) and A, B, C, or D (AZM8) select and read specific menu of Accessory
and find location.
• Faults – – Displays “Live” fault events only. (Live faults also cause the light base to flash red.) To clear a live fault, you must resolve the
issue. Example: If two audio accessories (A-XLR, A-RCA, or A-BT) are plugged into the same bus-port, the “fault” appears in the menus
and will lead you to the description of the fault. In this example, the fault doesn’t go away until one of the two audio accessories on the
port is unplugged or removed. It can take up to 30 seconds to clear the display after correcting the fault.
• Sensor Data – Read temperature sensor data from I/O; CPU; PSU (power supply unit).
• System Clock – Read Time/Date; refresh NTP.
• Firmware Info – Read current firmware version and last updated Date/Time.
• Lock – Lock/Unlock menu display.
3. Navigation Control & Factory Reset
To cycle through display menus, press knob. To select an option, turn to move cursor & press.
To Factory Reset unit from the front panel, remove power and re-power, then press and hold front panel Navigation Control within 60 seconds.
Note: To save Settings prior to Factory Reset, go to Settings, Configurations and Save file to computer for upload after reset. When left
undisturbed for 60 secs, the display will return to the default = Outputs.