Atlona HDMI to HDMI Matrix Switcher AT-H2H-44M and AT-H2H-88M (pictured below) User Manual atlona.
Table of Contents 1. Introduction ............................................................................................ 3 2. Package Contents ............................................................................................ 3 3. Features ............................................................................................ 3 4. Panel Descriptions a. Front Panel ............................................................................................ 4 1.
Introduction Multiple control options, HD resolutions, and the best audio, the Atlona HDMI® to HDMI matrix switcher is built for your home and professional needs. With the ability to pass 1080p, 1920x1200, all Lossy and Lossless audio formats (including Dolby® TrueHD and DTS-HD Master Audio™), full 3D, and ARC, the AT-H2H Family provides a full range of features that ensures the highest quality experience whether you’re watching a movie, giving a presentation, and more.
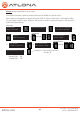
Panel Description Front Panel 1 2 3 5 6 4 A B C D 1. IR Receiver Window - Receives the signal from the included IR remote control or a 3rd party controler. 2. Power Button - Cycles the power between On (blue backlight) or Standby (red backlight) mode. 3. Enter Button - Use to view current status for inputs and outputs or to confirm a command. 4. Number buttons - Use these buttons to select input and output paths or use with the function button to change matrix settings. 5.
Back Panel 1 2 5 3 4 6 7 8 1. Matrix IR IN: Connect included IR receiver (see picture below) 2. RS-232: Connect to this port for control from a computer or 3rd control box. 3. Firmware Update: Type B USB Port used for updating the matrix firmware only 4. Coax Out: Audio de-embedding for distribution amplifiers and AVRs Compatible with PCM 2Channel, LPCM 5.1, Dolby 2.0, Dolby Digital 5.1, and DTS 5.1 5. Ethernet Port: Used for TCP/IP control 6.
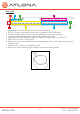
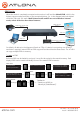
Connection Diagram ARC Digital audio de-embedding ARC atlona.
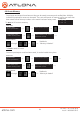
Matrix Front Panel Functions The AT-H2H’s front panel has 3 functions: I/O control, EDID, and matrix settings. The following sections go over step by step setup & control. I/O Control To set an input to an output (I.E. Input 1 to output 2) home screen AT-H2H-XXM Select Input Number ---> through ---> Select output number Press enter to confirm ---> through ---> ---> Feedback= ---> ”Input # saved to Output #” To mirror all inputs and outputs -- Ex. Input 1 to output 1, input 2 to output 2, etc.
I/O Route Memory Once inputs and outputs have been set they can be saved to memory and recalled later. Multiple individual input/output routes can be saved. The route will remain in memory until a new route has been saved to that memory number or the matrix has been factory reset.
EDID Set Up When the matrix is completely connected and turned on it will load the default EDID, which is the highest common native resolution of the connected devices. (i.e. In the diagram below the default would be 720p with 2ch audio. Multi-channel audio and 3D are not enabled on internal mode, unless all devices have these features.
Step 2: load a copied EDID onto an input Once EDIDs have been copied to memory they can be loaded to a specific input. Note: (refer to the diagram on page 9) Using the EDID of output 3 with input 1 will enable 1080p, 3D, and Dolby TrueHD to pass. Output 2 will receive no audio or video and output 1 will receive no audio with these settings.
Step 3: Load an internal EDID to an input If the first two steps don’t produce the correct resolution or audio configuration, the twelve internal EDIDs should resolve the issue. Internal EDID options Front panel display readout EDID 1: 1080P 2CH audio EDID 2: 1080P multichannel audio* EDID 3: 1080P Dolby Digital 5.1** EDID 4: 1080P 3D 2CH audio EDID 5: 1080P 3D multichannel audio* EDID 6: 1080P 3D Dolby Digital 5.1** EDID 7: 720P 2CH audio EDID 8: 720P Dolby Digital 5.
Matrix Settings When installing or troubleshooting it’s important to verify settings, or be able to come back to a project and see how it was set up. The AT-H2H has matrix settings viewable through the front panel. View current I/O settings, firmware version, FPGA version, and the baud rate of the matrix. View I/O settings home screen AT-H2H-XXM Select Input Number ---> ---> O 1 I x 2 x 3 x 4 x View Firmware/Baud Rate/FPGA settings home screen AT-H2H-XXM Select Input Number AT-H2H-XXM FW Ver: 0.
S/PDIF The S/PDIF port is used for two audio options, ARC or matrix source audio de-embedding. When using one, the other is disabled. By default the matrix comes with ARC turned off on all ports, this enables the S/PDIF to de-embed audio from the matrix source. To switch between ARC and matrix source audio, ARC must be turned on or off. Enable or disable ARC through RS-232 (see page 18) or front panel (see below).
Matrix source audio loop-out By default the matrix is enabled to de-embed source audio out through the S/PDIF port to an AVR or zone amp. NOTE: If audio does not pass through, check to make sure ARC is turned off. NOTE: HD audio formats are not supported through S/PDIF. Ex. Dolby TrueHD or DTS-HD Master Audio atlona.
RS-232 Connection RS-232 is connected through a 9-pin female DB connector. Only pins 2, 3, and 5 are terminated. 5 4 3 2 1 9 8 7 6 No. 1 2 3 4 5 6 7 8 9 Pin ---Tx Rx ---Gnd ------------- Function Not used Transmit Receive Not used Ground Not used Not used Not used Not used Set Up To set up the RS-232 hyperterminal (if not using 3rd party software) use the following steps: 1. Connect the matrix to a PC using a 9pin to 9pin cable 2. Go to the Device manager folder (see picture A) 3.
TCP/IP Warning!: Do not connect the matrix Ethernet port until the first steps have been followed. BEFORE YOU PLUG IN ANYTHING: Verify no other devices on the network have the IP of 192.168.1.10 (the matrix default is 192.168.1.10). There are two ways to set TCP/IP control when any of the products on the network have the same IP address as the matrix: RS-232 or through Ethernet on a non networked computer.
Step 5: Change IP to 192.168.1.2 and Subnet: 255.255.255.0 (see picture E) Step 6: Press apply Step 7: Close internet type connection and launch IP software Log in: Host: 192.168.1.10 (matrix IP) Port: 23 (matrix port) Step 8: Verify DHCP is off Send command “IPDHCPsta” followed by a carriage return -- Feedback should be “DHCPoff” If DHCP is on use command “IPDHCPoff” to turn it off Step 9: Change the current IP using the command “IPStatic 192.168.0.200 255.255.255.
Command Feedback Description ARConY ARCoffY ARCsta ARConY Enable ARC on an Output. Ex. Output 2 = ARCon2 ARCoffY Disable ARC on an Output. Ex. Output 4 = ARCoff4 ARCon1,ARCon2,etc Displays all ARC output status Statusx1 x7AVx1 Shows what input is connected to selected output Status x1AVx1,x2AVx2, x3AVx4, .... Displays which inputs are currently connected to which outputs SaveY (ex. Save2) SaveY (ex. Save2) Saves settings for future use, preset options 0 to 4 RecallY (ex. Recall2) RecallY (ex.
Remote Control Output selection. Numbers correspond with the HDMI outputs on the matrix. Arrow buttons are not functional for this product. Input selection. Numbers correspond with the HDMI inputs on the matrix. atlona.
Updating and Resetting Updating firmware Atlona has made field firmware updating easy. Simply download firmware from Atlona.com and upload the file to the matrix. NOTE: Only use a Windows computer to update the matrix. Use of an Apple computer to update will cause the matrix to be unusable until the update is redone with a Windows computer. Needs: • Verify the current firmware version • RS-232 9 Pin to 9 Pin cable.
Specifications Bandwidth Ports Video input Video output Audio output IR input Control: RS-232 Control: TCP/IP Firmware update Power Consumption Audio Resolution Dimensions Weight Rack Size Temperature Certifications atlona.com 6.75Gbps AT-H2H-44M AT-H2H-88M 4 x HDMI 8 x HDMI 4 x HDMI 8 x HDMI 4 x S/PDIF 8 x S/PDIF 1 x 3.5 mm 1 x 3.5 mm 1 x 9pin (RS-232) 1 x 9pin (RS-232) 1 x RJ45 1 x RJ45 1 x USB B 1 x USB B 20.
Safety Information Safeguards To reduce the risk of electric shock, do not expose this product to rain or moisture Do not modify the wall plug. Doing so will void the warranty and safety features. If the wall plug does not fit into your local power socket, hire an electrician to replace your obsolete socket. This equipment should be installed near the socket outlet and the device should be easily accessible in the case it requires disconnection.
Warranty Limited Warranty Atlona Technologies warrants that (a) its products (AT-H2H-XXM) will perform substantially in accordance with the accompanying written materials for a period of 3 years from the date of receipt and (b) that the product will be free from defects in materials and workmanship under normal use and service for a period of 3 years. In the event applicable law imposes any implied warranties, the implied warranty period is limited to 3 years from the date of receipt.
Atlona Product Registration Thank you for purchasing this Atlona product. - We hope you enjoy it and will take an extra few moments to register your new purchase. Registration creates an ownership record if your product is lost or stolen and helps ensure you’ll receive notification of performance issues and firmware updates. At Atlona, we respect and protect your privacy, assuring you that your registration information is completely secure.