
Installation Guide


Installation Guide
3
AT-RON-448
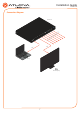
1. Connect an HDMI cable from the UHD/HD source to the HDMI IN port on the AT-RON-448.
2. Connect up to eight display/sink devices to the HDMI OUT ports on the rear panel of the
AT-RON-448.
3. OPTIONAL: Connect the included 5-pin captive screw connector from the ANALOG port to
the input of an analog output device. Refer to the wiring instructions in the diagram above.
4. OPTIONAL: Connect an RCA-type cable from the SPDIF connector to the digital input of
output device.
5. Connect the included power supply to the DC 5V power receptacle.
Installation
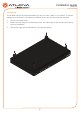
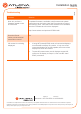
Analog Audio De-Embedding
The AT-RON-448 provides the ability to de-embed two-channel balanced or unbalanced analog
audio on the ANALOG port, using the included 5-pin captive screw connector. This step is
optional.
Use wire strippers to remove enough insulation to allow each wire to be securely fastened to
each terminal of the captive screw connector block and connect the wires as shown.
GND
Side View Side View
-
+
GND
+
-
NOTE: If not using power supply redundancy, connect the included power
supply to the MAIN power receptacle. If using a backup power supply (not
included), then connect the backup power supply from the BACKUP power
receptacle to an electrical outlet that is on a dierent circuit than the main power
supply. Additional power supplies can be purchased through Atlona.
1 2
3
1 2
3
GND GND
+
-
+
-
Balanced
Unbalanced