
User's Manual


14
AVR600
8293-AVR-02/10
7 Getting Started
This chapter describes how to get started with the RZ600 kit and run the demo
application in the most efficient way. Read section for section sequentially and follow
the directions carefully. The quick start guide assumes that the requirements in
section 3.2 are fulfilled.
7.1 Kit Unpacking
1. Open the box and verify that all items are present as outlined in section 3.1.
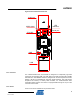
2. Locate the two processor boards and select a pair of radio transceivers to test –
they should be of the same type.
3. Mount the radio frequency board onto the processor boards 10-pin connector.
Make sure that pin 1 on both boards aligns.
4. Attach any of the auxiliary signals between the two units using the single wires.
7.2 USB Enumeration
1. Connect one of the board assemblies to you PC and let it start USB enumeration
process.
2. The first time this is done, the CDC driver will have to be installed. A “Found new
hardware wizard” will pop up. Select “No, not this time” and next.
3. Select “Install from a list or specific location (Advanced). Click next. Select “Include
this location in the search:”. Select the following folder:
/PAL/AVR32/UC3A3256/Boards
4. Click finish.
5. Verify what COM port that was assigned to the USB device. This can be done from
the Control Panel under the start menu. Select Administrative Tools from the menu
and then click the Computer Management. Now click on the Computer
Management item – and look under the Ports (COM & LPT) from the list. A new
COM port should be available
6. Repeat step 1 to 5 for the second board assembly.
7.3 Run the Example Application
Any terminal application can be used to connect to the COM ports, this section shows
how to do this with HyperTerminal.
1. From the start menu select All Programs, Accessories, Communications and finally
HyperTerminal.
2. Type in a name for the connection
3. A “Connect To” dialog will appear. Make sure to select the correct COM port.
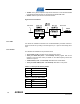
4. Press the Configure button and use the setting shown in Figure 7-1. Click the OK
button twice.
5. You now have a terminal window ready to use
6. Repeat steps 1 to 5 for the second board assembly.
7. Type characters in one of the terminals and verify that they are conveyed over to
the second terminal.