
User`s guide


www.uTasker.com
µ
Tasker – AT91SAM7X Tutorial
V1.4
uTaskerV1.4_SAM7X.doc/0.03 29/36 31.07.2009
Now do the following steps:
1. Start the demo project simulation as described in the first tutorial.
2. Open a DOS window and prepare the PING command “ping 192.168.0.3”.
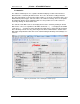
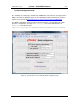
3. Start Wireshark and start monitoring the traffic on your local network (Capture | Start ->
OK).
4. Enter return in the DOS windows so that the PING test is started.
5. Wait until the PING test has completed; there are normally 4 test messages sent.
6. Stop the Wireshark recording and save it to the directory
Applications\uTaskerV1.4\Simulator\Ethereal\ with the name ping.eth
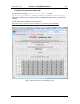
At this stage you can also look at the contents of the Wireshark recording and you will see
something like the following:
No. Time Source Destination Prot Info
1 0.437770 192.168.0.100 Broadcast ARP Who has 192.168.0.3? Tell192.168.0.100
2 0.439926 00:11:22_33:44:55 192.168.0.100 ARP 192.168.0.3 is at 00:11:22:33:44:5
3 0.439933 192.168.0.100 192.168.0.3 ICMP Echo (ping) request
4 0.449898 192.168.0.3 192.168.0.100 ICMP Echo (ping) reply
5 1.441345 192.168.0.100 192.168.0.3 ICMP Echo (ping) request
6 1.441650 192.168.0.3 192.168.0.100 ICMP Echo (ping) reply
7 2.442782 192.168.0.100 192.168.0.3 ICMP Echo (ping) request
8 2.442915 192.168.0.3 192.168.0.100 ICMP Echo (ping) reply
9 3.444225 192.168.0.100 192.168.0.3 ICMP Echo (ping) request
10 3.444344 192.168.0.3 192.168.0.100 ICMP Echo (ping) reply
It is also very possible that there are other frames on the network from other computers or
your own computer talking with others, and it is possible to perform many filtering functions to
remove these either from the visible display or from the recoding file – just look in the
Wireshark Help.
Here my PC has the local address 192.168.0.102 and initially doesn’t know how to find the
destination 192.168.03. An ARP resolve is sent and the simulator responds to it, informing at
which MAC address its IP can be found at.
The ping test is repeated four times, each time receiving a reply from the simulator.
So let’s see in some more detail how we can check the operation of this procedure and we
will begin at the deepest point in the code, the receiving interrupt routine in the Ethernet
driver, which is called when a complete Ethernet frame has been received.
In the VisualStudio project, locate the file SAM7X.c (in hardware\SAM7X\) and search for
the Ethernet reception interrupt routine called EMAC_Interrupt().In fact this interrupt
routine is common to all Ethernet interrupts so put a break point in the part which detects that
the RCOMP flag has been set by positioning the cursor over the appropriate line of the routine
and pressing F9.
It may be that you will find the code stopping at this break point before starting the ping test,
which is probably because the code is receiving broadcast frames from your network. If this
happens before you start the ping test just press F5 to let it run again (which you may have
to repeat if there is a lot of activity…).