
User`s guide


www.uTasker.com
µ
Tasker – AT91SAM7X Tutorial
V1.4
uTaskerV1.4_SAM7X.doc/0.03 6/36 31.07.2009
After making any modifications, simply compile the changes and we will be in
business.
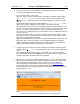
5. So now I can say EXECUTE (use F5 as short cut).
You will see the simulated device working away on your PC screen. If the define
SUPPORT_GLCD hasn’t been removed in config.h there will also be a simulated
graphic LCD displaying some images. This should be removed later for testing on the
target if there is no graphical LCD actually connected. There will also be one port
output toggling away. Let’s take a quick look at it. This is in fact the watchdog routine
which is called every 200ms which is also toggling the output so that we can see that
all is well (PB19]).
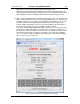
Figure 1. µTasker simulator running
If you hover your mouse over the port which is toggling, or other available ones, you
will see which pin number it has on the device, its name and present use as well as
the possible peripheral functions which it can be programmed to perform. In the
screen shove above this is seen by the line in blue at the bottom of the simulation
window.
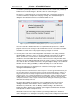
Open the file uTasker\Watchdog.c (in the VisualStudio project manager). Put your
cursor on the call to retrigger the watchdog “fnRetriggerWatchdog()” and hit the F9
key (set a break point). Almost immediately the program will halt and you can use F11
to step into the hardware specific routine responsible for triggering the watchdog and
in our case also toggling the port output. The routine writes to the corresponding
device registers and returns. Remove the breakpoint and let the simulated device run
again using F5.