Wireless USB Adapter User Manual 1
Table of Contents Trademarks.......................................................................................................................... 4 Introduction...................................................................................................................... 5 Check list..................................................................................................................... 6 System Requirements.............................................................................
Tutorial ............................................................................................................................ 76 Infrastructure and Ad-hoc modes.............................................................................. 77 Packet Fragmentation................................................................................................ 78 Encryption .................................................................................................................
Copyright © 2002 All rights reserved. The information in this document is subject to change without notice. The statements, configurations, technical data, and recommendations in this document are believed to be accurate and reliable, but are presented without express or implied warranty. Users must take full responsibility for their applications of any products specified in this document. The information in this document is proprietary to Manufacturer.
Introduction USB wireless LAN adapter enables high-speed access without wires to network assets. The adapter uses the IEEE802.11b protocol to enable communication between host computer and other computers, using the 2.4Ghz ISM Radio band for the communication medium. It enables true wireless communications between hosts, LAN’s and the Internet. Users can enjoy the convenience of mobile computing without any attached cables or wires.
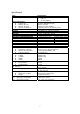
Specification Item Feature Network Interface Support OS Network Drivers Network Protocol Network Architecture Host Interface Roaming Configuration & Management Date Rate Aggregate Throughput DATA RATES DISTANCE RANGE @ 11 Mbps @ 5.5 Mbps @ 2 Mbps @ 1 Mbps ANTENNA Data Security Radio Specification Modulation Technique Wireless LAN Standard Frequency Range Modulation 11Mbps 5.
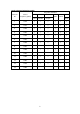
Radio Channel Selection Table Regulator domains Channel ID Center Frequency (MHz) FCC U.S.
Wireless LAN Technology Overview Technology overview A wireless local area network (LAN) is a flexible data communications system implemented as an extension to, or as an alternative for, a wired LAN. Using radio frequency (RF) technology, wireless LANs transmit and receive data over the air, minimizing the need for wired connections. Thus, wireless LANs combine data connectivity with user mobility.
Education: Wireless LANs in education offer a low-cost solution to highspeed Internet access with the flexibility to meet the needs of the everchanging educational landscape. Finance: In the fast-paced world of finance, access to real-time information is crucial. Financial traders employ wireless solutions to receive up-to-the-minute pricing information and real-time data anywhere on the trading floor.
Installation procedure for Windows 98SE Software Installation 1. Insert DRIVER CD into your CD-ROM. Following screen will appear. If the screen doesn’t appear, go to “Start” ⇒ “Run”, then type in F:\autorun\autorun.exe (where ‘F’ is your CD-ROM drive) and press the enter key. DO NOT PLUG YOUR USB WIRELESS LAN CARD INTO YOUR SYSTEM UNTIL THE DRIVER HAS BEEN INSTALLED. Refer to the trouble shooting section if you have already plugged in your WLAN card. 2.
3. Click “Next” to continue with installation. 4. If you accept the License Agreement, click “Yes”.
5. Select “Application and USB Drivers” and click “Next”. Note: You can choose Application only if you had previously uninstall your application utility. If you are unsure whether you have previously installed ATMEL USB Wireless LAN card, you should choose Application and USB Drivers. 6. Click “Next” to continue.
7. Click on Browse button to choose a path to install the software utility and click “Next”, or click on Next to accept default path. 8. Type a name to identify your Wireless LAN card, or click on Next to accept default name.
9. Confirm installation settings and click “Next” to continue, or you can click Back button to modify.
10. Window has finished installing. Click “Finish” to close this window. Proceed to Hardware Installation to install your USB Wireless LAN card.
Hardware Installation 1. Plug your USB Wireless LAN card into a spare USB port. Windows will detect Wireless LAN card and the following screen will appear. 2. Click “Next” to continue. 3. Click “Next” to specify the location of the driver.
4. Click the Specify a location check box and then type in the path: F:\Driver\Win98 (where ‘F’ is your CD-ROM driver letter) and click “Next”. Note: Make sure other two check boxes are not selected. 5. Window has located the driver information from your CD-ROM. Click “Next” to continue.
6. Window has successfully installed your USB Wireless LAN card. Click on “Finish” to finish installation. 7. You need to restart your computer before you can begin to use your USB Wireless LAN card. After window re-boot, you can configure its settings via “Configuration & Monitor Utility” located at “Start” ⇒ “Programs” ⇒ “ATMEL 802.11 Wireless LAN”. Refer to Configuring Your WLAN Card section on how to configure and setup your wireless LAN to your needs.
Installation procedure for Windows 2000 Software Installation 1. Insert DRIVER CD into your CD-ROM. Following screen will appear. If the screen doesn’t appear, go to “Start” ⇒ “Run”, then type in F:\autorun\autorun.exe (where ‘F’ is your CD-ROM drive) and press the enter key. DO NOT PLUG YOUR USB WIRELESS LAN CARD INTO YOUR SYSTEM UNTIL THE DRIVER HAS BEEN INSTALLED. Refer to the trouble shooting section if you have already plugged in your WLAN card. 2.
3. Click “Next” to continue with installation. 4. If you accept the License Agreement, click “Yes”.
5. Select “Application and USB Drivers” and click “Next”. Note: You can choose Application only if you had previously uninstall your application utility. If you are unsure whether you have previously installed ATMEL USB Wireless LAN card, you should choose Application and USB Drivers. 6. Click “Next” to continue.
7. Click on Browse button to choose a path to install the software utility and click “Next”, or click on Next to accept default path. 8. Type a name to identify your Wireless LAN card, or click on Next to accept default name.
9. Confirm installation settings and click “Next” to continue, or you can click Back button to modify.
10. Window has finished installing. Click “Finish” to close this window. Proceed to Hardware Installation to install your USB Wireless LAN card.
Hardware Installation 1. Plug your USB Wireless LAN card into a spare USB port. Windows will detect Wireless LAN card and the following screen will appear. If the following screen doesn’t appear, please refer to the trouble shooting section. 2. Click “Yes” when the Window digital signature request screen appears.
3. Window is installing the necessary files for your WLAN card. This window will close automatically once window finishes setup. Next time when you start windows, the Configuration and Monitor Utility will automatically be loaded onto your task bar. You can start the utility program straight away from the start menu, as shown below. Refer to Configuring Your WLAN Card section for more information on how to configure and setup your wireless LAN to your needs.
Installation Procedure for Windows ME Software Installation 1. Insert DRIVER CD into your CD-ROM. Following screen will appear. If the screen doesn’t appear, go to “Start” ⇒ “Run”, then type in F:\autorun\autorun.exe (where ‘F’ is your CD-ROM drive) and press the enter key. Warning: DO NOT PLUG YOUR USB WIRELESS LAN CARD INTO YOUR SYSTEM UNTIL THE DRIVER HAS BEEN INSTALLED. Refer to the trouble shooting section if you have already plugged in your WLAN card. 2.
3. Click “Next” to continue with installation. 4. If you accept the License Agreement, click “Yes”.
5. Select “Application and USB Drivers” and click “Next”. Note: You can choose Application only if you had previously uninstall your application utility. If you are unsure whether you have previously installed ATMEL USB Wireless LAN card, you should choose Application and USB Drivers. 6. Click “Next” to continue.
7. Click on Browse button to choose a path to install the software utility and click “Next”, or click on Next to accept default path. 8. Type a name to identify your Wireless LAN card, or click on Next to accept default name.
9. Confirm installation settings and click “Next” to continue, or you can click Back button to modify.
10. Window has finished installing. Click “Finish” to close this window. Proceed to Hardware Installation to install your USB Wireless LAN card.
Hardware Installation 1. Plug your USB Wireless LAN card into a spare USB port. Windows will detect Wireless LAN card and the following screen will appear. 2. Window will then install the necessary files to support your WLAN card. Please wait till window finishes copying the required files.
3. You can start to use your WLAN card once window finishes copying the required files into your system. You can configure your WLAN through Configuration and Monitor Utility located in your Start menu as shown. Note: Configuration and Monitor Utility will start automatically next time when you boot your system up. The utility icon will be located on the task bar. Refer to Configuring Your WLAN Card section for more information on how to configure and setup your wireless LAN to your needs.
Installation Procedure for Windows XP Software Installation Configuration and Monitor Utility software is not required to be installed onto Windows XP as Windows already has a more sophisticated software installed in it. Hardware Installation 1. Plug your USB Wireless LAN card into a spare USB port. Windows will detect Wireless LAN card and the following screen will appear. 2. Click “Next” to let Windows install the software for your WLAN automatically.
3. Choose the path: F:\driver\winxp\netvusba.inf and click “Next” to continue with installation. 4. Click “Continue Anyway” when the Windows compatibility screen appears.
5. Window is now backing up your current settings as a backup point. This can be restored if you encounter any problems with your WLAN card. 6. Window is now copying the necessary files into your system.
7. Your WLAN card has been installed successfully. Click “Finish” to start using your wireless LAN. Refer to Configuring Your WLAN Card section for more information on how to configure and setup your wireless LAN to your needs.
Installing Configuration and Monitor Utility Program To install configuration and monitor utility, insert your driver CD that came with your USB WLAN card. If the following screen doesn’t appear, go to “Start” ⇒ “Run”, then type in F:\autorun\autorun.exe (where ‘F’ is your CD-ROM drive) and press the enter key. Note: You are only required to install your configuration and monitor utility program if you have previously uninstall it. 2.
3. Click “Next” to continue with installation. 4. If you accept the License Agreement, click “Yes”.
5. Select “Application Only” and click “Next”. 6. Click “Next” to continue.
7. Click on Browse button to choose a path to install the software utility and click “Next”, or click on Next to accept default path. 8. Type a name to identify your Wireless LAN card, or click on Next to accept default name.
9. Confirm installation settings and click “Next” to continue, or you can click Back button to modify.
10. Window has finished installing. Click “Finish” to close this window. You can then locate your utility program from the start menu.
Configuring Your WLAN Card (for Windows 98SE/2000/ME) This section describes on how you can configure your WLAN card to your needs. Double click on Monitor and Utility icon (shown left) to pop up the program, as shown below. There are six tabs in the monitor utility. Each tab serves a different function.
Monitor Tab In the monitor tab, you can adjust the operating mode, infrastructure or ad-hoc, which channel that can be used, which host/AP (SSID) you want to connect to, the transmission rate (Tx Rate) and power management mode. Each of the setting is described below: Operating mode selection Channel selection SSID selection Setting the Transmission rate Selecting power management. • MAC address specifies the physical hardware address of your ATMEL USB Wireless LAN.
Ready – means that you are connected to another host through adhoc mode. • Signal Strength specifies the strength of your radio signal. Closer you get to the host/AP, the stronger the signal will be. Conversely, when you move away from the host/AP that you are connected to or being obstructed by a set of walls or ceilings, the signal strength will decrease. • Link Quality determines the volume of traffic in the network. Link quality will be good if the traffic in the network is low.
Operating Mode Selection There are two kind of operating mode, infrastructure and ad-hoc. If you are unfamiliar with the terms “infrastructure” and “ad-hoc”, you may want to refer to the tutorial section for further explanations. For infrastructure mode, you will need an access point to connect to the network. For ad-hoc mode, all is required is another host running their WLAN card in ad-hoc mode.
Channel Selection You cannot change the channel selection if you are using infrastructure mode. The utility program will choose the optimal channel for you when you are in infrastructure mode. If you are in ad-hoc mode, then you are required to select a channel. By clicking on the channel field, you can then select channels from 1 to 14. To communicate to your friends through ad-hoc mode, both you and your friends must set it to the same channel.
Selecting SSID Type the name of the remote host or access points you want to connect to in the SSID field. If you don’t know the name of the remote host/AP you want to connect to, an easier alternative is by double clicking on the BSSID field in the site survey.
Setting the Transmission Rate Tx rate or transmission rate is the rate that your WLAN will send out the data at. Available rate to adjust are 1, 2, 5.5 and 11Mbps. Reason for allowing adjusting the transmission rate is because when the traffic through the network is heavy, you may want to reduce the transmission rate to reduce the likelihood of data loss.
Selecting Power Management Modes Setting power management to Power Save will enable your wireless LAN to be in standby mode after a certain period of inactivity. Putting your WLAN into sleep mode will reduce your electricity consumption (hence reducing your electricity bill) and maximize the life of your WLAN card. Your wireless LAN will become active again if there is data to be send or received. In other word, power save mode acts like your monitors screen saver.
Statistics Tab Statistics tab contains information about how many data packets have been send and received. • Data packets: Specifies how many successful or unsuccessful data packets have been send and received. An unsuccessful data packet means it failed CRC checksum. • Management packets: Specifies how many successful or unsuccessful management packets have been send and received. Management packets include ICMP (e.g. PING) packets, data that contain encryptions that need to be decrypted and more.
Site Survey Tab Site survey lists all the available hosts/APs that are within your transmitting range. Site survey provides information such as channels they are using, signal strength to that host/AP, whether they have enable encryption and whether they are using infrastructure or ad-hoc mode. You can refresh the list by clicking on the Re-scan button. By pressing the re-scan button, it will scan and produce a list of all hosts and APs that are within the transmission range of your WLAN.
Encryption Tab Encryption tab allows you to enable or disable the use of encryption when sending or receiving data. Each of the setting is described below. Selecting the Encryption Type Setting the Encryption Keys Choosing the Encryption Key to Use Selecting WEP Mode Setting the Authentication Type. If you are unfamiliar with encryption and how encryption is created and used, please refer to the tutorial section for further explanations.
Selecting the Encryption Type Encryption field let you specify what encryption you want to use. There are three types of encryption, 64 and 1281 bits encryption and disabled. No encryption will be applied to data packets if the setting is being set to disabled. Both encryption types use the same algorithm to encrypt and decrypt data. Difference between these two types of encryption method is that 128bits encryption takes slightly longer time to decode (but more secure) then 64 bits.
Setting the Encryption Keys For 64bits encryption, 10 hexadecimal digits must be inputted in each of the 4 keys. 26 hexadecimal digits must be supplied in each of the 4 fields if 128 bits encryption is used. Refer to the troubleshooting section if you have trouble in setting your keys.
Choosing the Encryption Key to Use Choosing the key for encrypting and your data. When choosing the key to use, make sure other hosts or access points that you are communicating with have the same encryption value in the corresponding key number. Refer to the troubleshooting section if you encounter problems when sending data with the specified key.
Selecting WEP Mode WEP mode let you specify whether other users have to have WEP enabled in order to communicate with you. Setting the mode to Mandatory means that every other host or APs have to enable their WEP encryption in order for them to communicate with you. On the other hand, setting WEP mode to Optional will enable other hosts and APs to communicate with you regardless whether they have enabled their WEP encryption or not.
Setting the Authentication Type Authentication type determines which algorithm to be used to encrypt and decrypt data packets. Refer to the tutorial section if you are not sure about how open and shared key system work. Setting authentication type to automatic is highly recommended.
Advanced Tab Preamble helps to synchronize sender and receivers clocks and also help to identify the start of data. Setting the preamble type to long help to synchronize the clocks more accurately, but it takes up bandwidth. Setting preamble to automatic is highly recommended. Fragmentation threshold specify the maximum data size before the data is been fragmented. Refer to the tutorial section on why we need to fragment data packets.
Version Tab Version tab provide information such as your driver, application and firmware versions.
Configuring Your WLAN Card (for Windows XP) This will give you a quick run down on how to configure and use your WLAN under Windows XP operating system. For a more detail description, please refer to the Windows XP reference materials. Click on your network icon to open up the utility program. Window will list a set of available networks. To connect, select on the name of the network and click on the Connect button. Windows will advice you on whether you have successfully connected to that network.
In Wireless Networks tab, it will show all the available networks, select one then press the configure button. The network that you have chosen will be added to the preferred networks field once you have configured it. Press OK to connect to this network.
Network Configuration When the drivers are installed, the default setting is set to obtain IP dynamically through a DHCP server. Note: All the illustration and pictures are snap shots under Windows 98SE operating system. For Windows 2000/ME users, there will be a slight variation from the pictures shown. 1. You can check if your IP has been setup correctly by using the “ipconfig” (shown below) command under MS-DOS (command prompt). If your IP address is 0.0.0.
2.
3. Select “TCP/IP” or “TCP/IP → USB Wireless LAN (A)” and click “Properties” Note: If you have other Ethernet card connected to your PC, then there will be one TCP/IP setting for every Ethernet card you have in your system.
4. In the IP Address tab, select “Specify an IP Address” and enter an IP address. Consult your network administrator for appropriate IP settings.
5. Fill in the “New gateway” field in the “Gateway” tab and click “Add”. You can see the gateway address you just added in the “Installed gateways” field.
6. In the “DNS Configuration” tab, select Enable DNS. Enter a host name in the “Host” field and DNS IP address in the “DNS Server Search Order” field. Click on “Add” when you finish.
Click “OK” to finish TCP/IP settings. Note: Consult your network administrator for appropriate Gateway and DNS settings.
Click “OK” to confirm settings. Insert your Windows 98 Second Edition CD-ROM when prompt and click on “OK” button. You will need to restart for your settings to work. Click “Yes” to restart and proceed to the next section to test if you have successfully configured your IP.
Using PING Command This section describes how you can test if you are connected to the network. 1. Under MS-DOS (command prompt) type “ipconfig” to see your IP address. Note: If your IP address is 0.0.0.0 then you have an invalid address. Proceed to network configurations section to set your IP.
2. Try to ping yourself by typing the command: ping E.g. ping 192.168.1.166 If you receive replies then it means that your WLAN is working. Otherwise, proceed to the ping troubleshooting section to solve your connection problem. 3. Using the same procedure, try to ping your gateway (using your gateway IP address).
Tutorial This section explains some of the simple network concepts concerning wireless LAN’s and networking in general. Topics covered are: Infrastructure and Ad-hoc modes.
Infrastructure and Ad-hoc modes. • Network is in an ad-hoc state if it is only there temporarily, which means whole network is allowed to move from place to place. When three computers move, they can communicate with each other through the wireless LAN. This kind of network is said to be in ad-hoc state. Ad-hoc network • An infrastructure network is one that cannot be easily moved.
Packet Fragmentation Packet fragmentation means splitting a data packet into several smaller packets. We need to fragment packets because of: o Hardware limits – some hardware do not support packets up to certain threshold. o Operating system buffer constraints – depending on the system memory, buffer overflow means lost of data and waste bandwidth in unnecessary retransmissions.
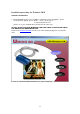
Encryption • All users throughout the Internet can read unencrypted data, illustrated below with a simple wired network. • B want to send some data to A, but the data was intercepted by C. • C then modifies the data and transmits it to A. A is unaware of C’s presents and thinks the data originates from B. With wireless networks, data is even more vulnerable to such attacks since everyone within your radio transmitting range can intercept your data.
For 64bits encryption, 10 hexadecimal3 values must be presented in the key field. While 128 bits encryption, 26 hexadecimal values must be in the key field. Authentication Type Share Key: Encryption algorithm used on each of the computers or access points might different. Hosts must discover which algorithm other remote hosts use before proper communication could be established. Open System: The IEEE 802.11 default authentication method, which is a very simple, two-step process.
Troubleshooting General: Problem: When I plug in my USB Wireless LAN card in, nothing happened. Answer: Window will remember the ID of the device if you have previously installed it. Proceed to hardware troubleshooting to test if you have previous installation of the hardware. Problem: I can’t get my USB WLAN card to work with non Intel USB host controllers. How can I solve this problem? Answer: You can connect your WLAN card to USB hub with self-power mode on.
Step – by – Step Debugging This section provides some debugging solutions for your WLAN if you are having problems in using your WLAN. i) Check your hardware is correctly installed. In device manager, if you can see an exclamation mark next to the USB device, then you need to re-install your hardware driver. Proceed to re-installing hardware driver for more details.
ii) Check your IP configurations. In command prompt, type “ipconfig” to see your IP configurations. If your IP, subnet mask or gateway address is invalid, that is, 0.0.0.0 (shown below) or contains one of the invalid IP addresses, then you need to configure your IP. Proceed to network configuration section for more details. For a list of invalid IP addresses, proceed to checking IP address section.
iii) Check if your WLAN is disabled. In device manager, if you can see a cross next to the USB device, then you need to re-enable your hardware driver (as shown below).
iv) Check if you have other Ethernet devices. If you have other Ethernet devices, then that device may conflict with your WLAN card. To check if you have other Ethernet card(s), open up device manager. If you can see other devices apart from USB Wireless LAN (A) after you expand “Network adaptors” icon, then you need to disable all the other devices. Proceed to disabling hardware devices for further details on how to disable your hardware.
Enabling Hardware Devices If your hardware is disabled, you need to re-enable it. To enable your hardware, right click on the disabled device and click on “Enable”. Picture below illustrate this: Note: For Windows 98SE users, to enable your hardware, right click on the disabled device, click on “Properties”. De-select the “Disable in this hardware profile” check box located in Device Usage area.
Disabling Hardware Devices To enable your hardware, right click on the disabled device and click on “Disable”. Picture below illustrate this: Note: For Windows 98SE users, to disable your hardware, right click on the disabled device, click on “Properties”. Select the “Disable in this hardware profile” check box located in Device Usage area.
Problems using encryption Following section discusses the problems that may arise when setting your encryption keys. I cannot communicate with other parties. It give me error messages when I press the submit button I can’t connect to other hosts/APs.
Problem: I cannot communicate with other parties. This is probably the most common error when setting encryption. Try one of the suggestions below to solve your dilemma. 1. Make sure you and the other party is using the same encryption type, that is, 64 bits or 128 bits. 2. Make sure the WEP key you are using matches the corresponding key the other party (and access points if you are using any) is using and vice versa.
Problem: It gives me error messages when I press the submit button. Error message type: Invalid WEP Key. Need hexadecimal digits. This problem arises because you have typed in a non-hexadecimal digit. That is, you have typed a key outside the range 0 ~ 9 and A ~ F. When you click on the “OK” button of the error screen, monitor utility will highlight the first occurrence of non-hexadecimal digit. Invalid WEP Key length.
Problem: I can’t connect to other hosts/APs “Association Denied. Check Capabilities.” error message This error message arise because of the following: 1. The authentication type used between you and other hosts are different. Set it to automatic for auto detection. 2. Other party may not have enabled WEP encryption while you have set it or vice versa. Other possible reasons for unable to connect to remote host might be: Other hosts/AP maybe off line or out of range.
PING Troubleshooting This section discusses possible solutions using ping command to find your problem if you can’t connect to the network. 1. Check if you have a valid IP address in the Checking Valid IP address section. 2. Test if your TCP/IP works. Under MS-DOS (command prompt), type “ping localhost”. If you didn’t receive a reply, then you need to re-install your TCP/IP. Proceed to next step if you have receive replies. 3. Using the same procedure, try to ping your IP and your gateway IP.
Checking Valid IP Addresses There are restrictions on which IP addresses you can and cannot use. Some IP addresses are reserved for testing, multicasting and some IP are restricted by your ISP. Following IP addresses cannot be used: • • • • • 127.X.X.X – this is a loop back address, used for testing 0.0.0.0 – this IP address represent the host address. 255.255.255.255 – this is local broadcast address First portion of IP cannot exceed 224, that is, IP addresses which is in the range of 224~239.X.X.
Hardware Troubleshooting To check if you have previously installed ATMEL Wireless LAN card, right click on “My Computer” and click on “Properties”. Click on the Device Manager tab. If you have previously installed WLAN card, then one of the following screen should appear. Note: Procedures described above is for Windows 98SE, for other users, follow these steps: Windows 2000: Right click on “My Computer” and select “Properties”.
Hardware Installation Hardware Installation for Windows 98 This section is for users that plugged in their WLAN card in before they installed the utility for the driver. When you insert your WLAN card into your system for the first time, the following screen appears. Click “Next” to continue.
Click “Next” to search the driver. Choose Specify a location and type in the following path: F:\Driver\Win98 or you can use the Browse button to browse for the file.
Window has found the driver for your WLAN card. Click “Next” to install the software for your driver or click “Back” if Window didn’t found the specified driver.
Window is now installing the necessary software for your WLAN. Window has finished installing. Click “Finish” to finish hardware installation. Click “Yes” to restart your computer. After the computer restart, please refer to the software installation section to install Configuration and Monitor Utility for your USB Wireless LAN.
Hardware Installation for Windows 2000 This section is for users that plugged in their WLAN card in before they installed the utility for the driver. When you insert your WLAN card into your system for the first time, the following screen appears. If the screen doesn’t appear, please refer to the hardware trouble shooting section. Click on “Next” to install the necessary software for your WLAN card.
Click “Next” to choose a suitable driver for your WLAN card.
Type in the location: F:\Driver\Win2000 and click “OK”. Window has detected the files required. Click “Next” to continue.
Click “Yes” to continue with installation when the digital signature screen appears. Window is installing he necessary software to support your hardware.
Window has finished installing. Click “Finish” to close this window. Please refer to the software installation section to install Configuration and Monitor Utility for your USB Wireless LAN.
Hardware Installation for Windows ME This section is for users that plugged in their WLAN card in before they installed the utility for the driver. When you insert your WLAN card into your system for the first time, the following screen appears. Click “Next” to search for the software automatically. Type in the location: F:\Driver\WinME and click “OK”.
Window is installing the necessary files for your wireless LAN. Window has finished copying necessary files to run your WLAN. Click “Finish” to close this window.
Click “Yes” to restart your computer. After the computer restart, please refer to the software installation section to install Configuration and Monitor Utility for your USB Wireless LAN.
Hardware Re-installation Hardware Re-installation for Windows 98SE This section describes the procedure for re-install or updating your WLAN driver. From “Device Manager”, right click on “USB Device” and click on “Properties” as illustrated below.
To re-install and update the driver, click on “Reinstall Driver”. Click “Next” to continue. Warning: Make sure your software CD is in your CD-ROM. Follow the instructions on screen to finish installation.
Hardware Re-installation for Windows 2000 This section describes the procedure for re-install or updating your WLAN driver. Right click on My Computer and click “Properties”. Click on the hardware tab then on Device Manager.
To re-install and update the driver, click on “Reinstall Driver”. Click “Next” to start installation.
Click “Next” to choose a suitable driver for your WLAN card. Check Specify a location check box and click “Next” Note: Please make sure that your driver CD is in your CD-ROM.
Type in the location: and click “OK”. F:\Driver\Win2000 Window has detected the files required. Click “Next” to continue.
Click “Yes” to continue with installation when the digital signature screen appears. Window is installing the necessary software to support your hardware.
Window has finished installing. Click “Finish” to close this window.
Hardware Re-installation for Windows ME This section describes the procedure for re-install or updating your WLAN driver. From “Device Manager”, right click on “USB Device” and click on “Properties” as illustrated below.
To re-install and update the driver, click on “Reinstall Driver”. Click “Next” to search for the WLAN driver. Note: Make sure that your driver CD is in your CD-ROM.
Window will automatically locate the location of your driver and will automatically begin installation. Window has successfully installed your WLAN. Click “Yes” to restart.
Hardware Re-installation for Windows XP This section describes the procedure for re-install or updating your WLAN driver. From “Device Manager”, right click on “USB Device” and click on “Properties” as illustrated below.
To re-install and update the driver, click on “Reinstall Driver”. Click “Next” to install the software for your WLAN automatically.
3. Choose the path: F:\driver\winxp\netvusba.inf and click “Next” to continue with installation. Click “Continue Anyway” when the Windows compatibility screen appears.
Window is now backing up your current settings as a backup point. This can be restored if you encounter any problems with your WLAN card. Window is now copying the necessary files into your system.
Your WLAN card has been installed successfully.
FAQ What is an Access Point (AP)? Ans: An AP is the bridge to connect two different protocols, Ethernet 802.3 and wireless 802.11b. It can be used as the center of a wireless infrastructure, providing connections to your wired networks. Or, it can act as a repeater, increasing wireless communication range. The maximum communication range is based on how you configure your wireless infrastructure.
How can I remove the USB Wireless LAN Monitor Utility in Windows? Ans: Use the following procedure to remove the monitor utility: i) Click on “Start” “Settings” “Control Panel” ii) Double click on “Add/Remove Programs” iii) Select “IEEE 802.11b USB Wireless LAN Monitor Utility” How can I configure the USB Wireless LAN adapter in Windows XP? Ans: Windows XP supports IEEE802.1x standard and allows easy to configure Wireless LAN. Further information can be found in Windows XP reference books.
Glossary Access Point (AP) A device that transports data between a wireless network and a wired network (infrastructure). Ad-hoc network A wireless network composed only of stations (no access point). Also known as peer to peer network Bandwidth Specifies the amount of the frequency spectrum that is usable for data transfer. In other words, it identifies the maximum data rate that a signal can attain on the medium without encountering significant attenuation.
IEEE 802.X A set of specifications for Local Area Networks (LAN) from The Institute of Electrical and Electronic Engineers (IEEE). Most wired networks conform to 802.3, the specification for CSMA/CD based Ethernet networks. The 802.11 committee completed a standard for 1 and 2 Mbps wireless LANs in 1997 that has a single MAC layer for the following physical-layer technologies: Frequency Hopping Spread Spectrum, Direct Sequence Spread Spectrum, and Infrared. IEEE 802.
Point Coordination Function (PCF) An IEEE 802.11 mode that enables contention-free frame transfer based on a priority mechanism. Enables time-bounded services that support the transmission of voice and video. Preamble In Ethernet, a 64-bit pattern of alternating 1’s and 0’s, ending in two 1’s, to synchronize transceivers and indicate the start of data. Quadrature Phase Shift Keying (QPSK) A modulation technique that changes the phase of a signal to represent different, four-bit binary words.
Federal Communications Commission Interference Statement FCC Class B Certification The device complies with Part 15 of the FCC rules. Operation is subject to the following conditions: 1. This device may not cause harmful interference. 2. This device must accept any interference received, including interference that may cause undesired operation. This equipment has been tested and found to comply with the limits for a Class B digital device, pursuant to Part 15 of the FCC Rules.