
Owners manual


©
2012 Escalade Sports
For Customer Service Call 1-888-996-2729
6
All Rights Reserved.
STEP 1:
Find a clean, level place to begin the assembly of your soccer table. We recommend building the table on the
box top to protect the parts during assembly.
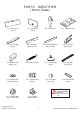
Attach P13 Plastic Rod Washer and P14 Rod Bumper to the rods as shown in FIGURE 1. Place one P1 Side
Apron UPSIDE DOWN with the laminated side facing out as shown in FIGURE 1.
Align the rods as shown in FIGURE 1.
Please note the location of the hole that is near one end of each rod. This is the handle end of the rod.
There will be four handles on each side of the table. It is critical that you set the rods as shown below so
the table will be correct when flipped over.
PARTS REQUIRED:
1 pc - P1 Side Apron 1 pc - R1 2 Player Rod Assembly Black 1 pc - R4 2 Player Rod Assembly Ivory
16 pcs - P13 Plastic Rod Washer 2 pcs - R2 3 Player Rod Assembly Black 2 pcs - R5 3 Player Rod Assembly Ivory
16 pcs - P14 Rod Bumper 1 pc - R3 5 Player Rod Assembly Black 1 pc - R6 5 Player Rod Assembly Ivory
FIGURE 1
P1
P14
P13
P13
P14
R2
R1
R3
R6
R2
R5
R4
R5
R1, R2 and R3
Hole/Handle End
R4, R5 and R6
Hole/Handle
goes on the
other end of
these rods
C1 Rod Bushing
Note: C1 Rod Bushings
are already attached
onto P1 Side Apron