TABLE OF CONTENTS INTRODUCTION HOME and BROADCASTER VERSION SETUPS CONFIGURATION OPTIONS DEFINED BASIC (QUICK) CONFIGURATIONS HEADPHONES EXTERNAL MIXERS MICROPHONE LINE INPUTS ADVANCED CONFIGURATION BASIC (QUICK) CONFIGURATIONS ADVANCED REWIRE RECORD LOOPBACK TIMECODE BASIC (QUICK) CONFIGURATION ADVANCED CONFIGURATION CALIBRATION SOUND CONFIGURATION ERROR MESSAGES LEGAL INFORMATION 3 3 4 5 5 8 11 12 13 13 14 18 19 20 20 21 22 26 28 2
INTRODUCTION VirtualDJ‟s sound configuration options can be found in the Configuration (Settings) dialog under the tab labeled “Sound Setup”. Depending on platform version you are running there are different options you may have to choose from. By default, when VirtualDJ is first installed, the SIMPLE configuration setup is used. Simple configuration uses the system identified “Primary Sound Driver” as the Master Output.
CONFIGURATION OPTIONS DEFINED When working with the PRO BASIC and PRO FULL versions, it is important to understand the various elements of the Sound Setup tab as these become important in getting to the more advanced setups.
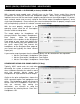
BASIC (QUICK) CONFIGURATIONS - HEADPHONES Basic computer setups are configured for using one Master output and a Microphone input. So the default SIMPLE configuration will get you started initially. But, if you wish to use headphones or an external mixer, so that you can play one track to the crowd and listen to the next track in headphones; you will need to utilize one of the following configurations. HEADPHONES WITH 1 OUTPUT Change the Outputs option from Single Output to Headphones.
BASIC (QUICK) CONFIGURATIONS - HEADPHONES HEADPHONES USING 4.1 SURROUND (or better) SOUND CARD With surround sound capable cards, VirtualDJ can use the Front, Center, and/or Rear channel assignments for routing the Master and Headphone outputs. When using this configuration, it is important to ensure that the sound card is properly configured to use the multiple outputs. By default, most surround sound cards are only setup for one Master output (Headphones/Speakers) and a single input (Microphone).
BASIC (QUICK) CONFIGURATIONS - HEADPHONES HEADPHONES USING Core Audio SOUND CARDS (Mac Only) In most cases to properly use a multi-channel sound card in OSX, you first need to create an aggregate device for that sound device. Depending on the OSX version you are using the Aggregate Device setup is slightly different, so please search the Apple support pages for your OSX version and correct Aggregate Device setup instructions.
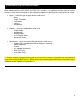
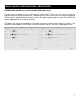
BASIC (QUICK) CONFIGURATIONS – EXTERNAL MIXER When planning to use and external mixer, one of the following configurations might be used. All are very similar to the Headphone options just covered. However; instead of splitting the signal to have Master and Headphone outputs, the two virtual decks are routed to their own audio channels which are then mixed together by the external mixer. You can see in the following screen captures that Mono-Separated, 2-card, and 4.
BASIC (QUICK) CONFIGURATIONS – EXTERNAL MIXER The most common External Mixer configuration is using the ASIO driver (PC) or 4-out Card (Mac) option. In this configuration, the sound card of choice typically has multiple stereo out combinations. Most common are 2 stereo (4 mono) outputs. In the following examples, we use the Hercules DeeJay Trim 4&6 sound card for the various external mixer combinations.
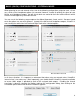
BASIC (QUICK) CONFIGURATIONS – EXTERNAL MIXER EXTERNAL MIXER – LEFT DECK AND RIGHT DECK ON SEPARATE OUTPUTS With the Mac version, the same options as before; Inputs set to None, Outputs set to External Mixer, and Sound card is set to 4-out Card. For the Outputs the assignment is Left Deck: Chan 1&2 and Right Deck: Chan 3&4. Again with this configuration, connections of the 1&2 and 3&4 outputs of the DeeJay Trim are connected to the appropriate Line level input channels on the mixer.
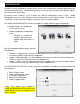
BASIC (QUICK) CONFIGURATIONS – MICROPHONE With some sound cards or hardware controllers with built-in sound card capabilities, there may be the need to route the microphone input through VirtualDJ. This can be done by selecting the Microphone option from the Inputs drop-down. This is only necessary when the device containing the microphone input requires the software to provide the routing of the input to the software‟s master output.
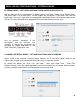
BASIC (QUICK) CONFIGURATIONS – LINE INPUTS VirtualDJ can also be configured to pass the line inputs of the sound card through software interface. As depicted in the below images, the sound configuration being used is with the Inputs set to the LINE-INs option. Then by assigning the VDJScript action „linein‟ to an available deck, the audio sent in on the line input will pass through VirtualDJ providing a rhythm wave display and dynamic BPM display on the deck.
ADVANCED CONFIGURATIONS Advanced Configuration is accessed by changing the Outputs selection to Advanced Config choice. In this configuration mode, you are able to select multiple configurations using a single or multiple sound cards with VirtualDJ. It is recommended to use the Quick Setup options if possible. First take a look at how some of the prior Quick Setups are configured, if using the Advanced Config options. HEADPHONES WITH 1 OUTPUT - Using your built-in headphones jack.
ADVANCED CONFIGURATIONS EXTERNAL MIXER – LEFT DECK AND RIGHT DECK ON SEPARATE OUTPUTS USING WDM DRIVERS USING ASIO DRIVERS 3-CHANNEL EXTERNAL MIXER – LEFT AND RIGHT DECKS WITH SAMPLER USING HERCULES DEEJAY TRIM IN 2IN/6OUT MODE TIMECODE (SINGLE DECK) CONFIGURATION The above examples are just some of the Quick Setup options to demonstrate how easy the choices translate when using the Advanced Config option.
ADVANCED CONFIGURATIONS With the Advanced Config, you can route some more complex options based on your available sound card outputs and inputs or in the case of using multi-deck skins. As shown in the prior screen captures, it is first important to understand the options that are available for assignment of the Outputs and Inputs. Based on selection of skin the choices of Outputs and Inputs will vary for routing of the skin elements displayed.
ADVANCED CONFIGURATIONS Now take a look at how a 6 deck skin could be setup using the Hercules DeeJay Trim in 4IN/4OUT mode along with a second card. This setup will include the ability to use the 2 stereo (4IN) inputs for routing the microphone and using a single deck timecode or line in and route those two inputs to the second sound card. The control of the inputs will use Decks 5 and 6, while the remaining 4 decks are used for regular track playback.
ADVANCED CONFIGURATIONS To make this all work correctly, a couple keyboard shortcuts will need to be made. The example to the right shows CTRL+C and CTRL+V, but you can choose any key combination best for you. Assign one shortcut to the VDJScript of – deck 5 linein „mic‟ and the other the VDJScript of – deck 6 linein 2. This will assign the two decks the respective inputs so VirtualDJ‟s volume controls and effects can be applied to the inputs.
ADVANCED CONFIGURATION - ReWire VirtualDJ can interface with ReWire capable applications. Setting up VirtualDJ to use ReWire is the same as routing a sound card‟s input to be used with an available deck, expect you are routing the ReWire output (usually the Master Out) of the application; through one of VirtualDJ‟s decks. Before setting up the ReWire routing in VirtualDJ, install and configure the ReWire capable application first.
ADVANCED CONFIGURATION - ReWire With the setup complete, VirtualDJ can be used to perform the following actions using the assigned deck: Control Play/Pause of the playback Apply VirtualDJ effects to the playback signal Use the Pitch control to change the pitch of the incoming source Sync the playback deck‟s pitch to other decks ADVANCED CONFIGURATION – RECORD LOOPBACK VirtualDJ has the ability to record your mixes when using the internal mixer capabilities.
TIMECODES Timecode setup can be used with either the External or 3-Lines Mixer option. To setup VirtualDJ for use with Timecode Vinyl or CDs, change the Inputs option to Timecode. TIMECODE (SINGLE DECK) CONFIGURATION For use with a single timecode source, chose the Single Timecode option from the Input drop-down. TIMECODE (DUAL DECK) CONFIGURATION For use with 2 Timecode input sources, choose the Timecodes option from the Input drop-down.
TIMECODES – ADVANCE CONFIG With VirtualDJ‟s Multi-Deck features, you may want to use a single sound card or multiple sound cards providing multiple inputs. Using the Advanced Config, you can setup each timecode input to be used by VirtualDJ. Just like the Deck output options the Timecode input options will vary based on the number of decks available on the used skin. The following example uses a 4 deck skin to configure a Timecode source for each deck.
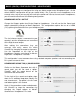
TIMECODE SETUP AND CALIBRATION After clicking on the Timecode Config, you will see the configuration dialog below. Start playing your Vinyl or CD to see the signal level information in the configuration display. For a 100% quality signal, you may need to adjust the following options: Vinyl – Select what kind of timecode control record you will be using. Mode – Select what timecode mode you want to use.
TIMECODE SETUP AND CALIBRATION DEBUG The Debug button provides access to additional fine tuning options for gaining a better quality signal of your DVS and its control of the VirtualDJ interface. The following visuals are available and features that can be adjusted to obtain better DVS performance. Signal Grid – displays the DVS signal being read by VirtualDJ. By adjusting the various settings you should see concentric circles displayed in this area.
TIMECODE SETUP AND CALIBRATION Disable ClearSound – ClearSound uses a technology that gives a better sound when you don't scratch, at the expense of a very small delay when you scratch. When playing certain types of heavy tremolo music pitch changes with the DVS can cause artifacts in the sound quality. Disable AntiSkip – uses a technology that will ensure that VirtualDJ will not skip even if your needle skips on your record.
TIMECODE SETUP AND CALIBRATION VirtualDJ supports other manufactured DVS formats. Here are a couple screen captures using the Serato DVS Vinyl or CD format. The left is vinyl the right is CD.
TIMECODE SETUP AND CALIBRATION Here are some examples of poor signal setups that may be encountered. Poor cable signal – left cable unplugged or not sending a signal Poor cable signal – right cable unplugged or not sending a signal Gain to high – if the signal is box shaped then the input signal from the sound card is too high. Adjust the sound card‟s gain level until the signal changes to concentric circles.
SOUND CONFIGURATION ERROR MESSAGES When configuring VirtualDJ there are some common messages you may encounter when things are not properly configured. Here we explain what those messages mean and how to get VirtualDJ properly configured. The most common is when VirtualDJ cannot find the selected sound card or, if using the Advanced Config; you have selected an invalid Ouput or Input for the card. For cards using DirectX/WDM (Windows Direct Media) drivers, you will receive the following error dialog.
LEGAL INFORMATION http://www.atomixproductions.com http://www.virtualdj.com Atomix Productions Inc. Los Angeles CA 90036, USA VirtualDJ Copyright: Copyright 1997-2010 Atomix Productions All Rights Reserved Number IDDN.FR.001.040012.01.R.C.2000.000.31400.