
User's Guide

29
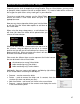
4. Waveform display for currently - This view shows the visual waveform of the entire
track, allows for viewing the remaining duration of the audio, as well as what has
already been played. When highlighted in blue or red (Using the default skins), that area
of the waveform indicates what has been played and the current position of the audio.
The remaining grey area of the waveform shows the length of the audio remaining.
Inside the waveform itself, the lighter part indicates the presence of beats whereas the
darker part indicates the presence of vocals
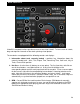
5. Effects
Effects Selection Drop-down arrow - Select which effect to apply.
Effects Selection Drop-down window - When clicked this will apply the effect
selected.
Parameter 1 & 2 knobs - These two knobs adjust parameters of the effect selected in
the drop-down window, although not all effects require or make use of these knobs.
6. Loop Sampler -
Sample Selection Drop-down arrow - Choose which sample to use. There are 12
slots which are available to record, load and play samples.
Sample Selection window - When clicked this will play the sample listed in the
selection window.
VOL - Controls the level of gain applied to the loop sample.
REC button - When initiated, this function records the loop to the sample slot selected.
If no loop is currently set on this deck, a 4 bar loop will be recorded by default.
Sampler Loop controls – used to half or double the samples length.
7. Loop Set /Control
Loop In/Out - A loop is any area of a track that repeats seamlessly. Press ―Loop In‖ at
the point where the loop is to start. Press ―Loop Out‖ when the desired point to mark the
end point of the loop. The audio between the two points will begin to loop continuously.
To release the loop and continue play of the track press ―Loop Out‖ again and the audio
will continue from the end point of the loop. To set a new loop, just press ―Loop In‖
again while the loop is disengaged, and then press ―Loop Out‖ to begin the new loop.
Shift Knob - Adjusts the loop length by half length or double length increments.
Smart Lock button - Allows the loop buttons to work together to create loops
synchronized to BPM.
Loop Length - This indicates the length of the loop according to beat measures.
Increase or decrease the length of the loop from 1/4 to 16 measures.
8. Virtual Turntable – can be used with the mouse to scratch, back cue, and pause a
playing track. The virtual table also has a position marker on it for visualizing a scratch
position. Around the outer edge of the virtual table is a position ring that gives a
reference to percentage of a tracks completion.
DECK CONTROLS