Version 6
TABLE OF CONTENTS INTERFACES – ZONES BROWSER FILE SYSTEM / FOLDER STRUCTURE FILE / SEARCH RESULTS AUDIO AND VIDEO TAG SUPPORT DATABASE MANAGEMENT GLOBAL SEARCH SEARCHING NETSEARCH TRACK OPTIONS BPM ANALYSIS AND KEY DETECTION COMPUTER BEAT GRID (CBG) AND MANUAL BPM CORRECTION PLAYLIST AND AUTOMIX EDITING AUTOMIX MIX POINTS SIDELIST FILE SYSTEM / FOLDER STRUCTURE ORGANIZATION FAVORITE FOLDERS VIRTUAL FOLDERS FILTER FOLDERS DECK CONTROLS INTERNAL MIXER CONTROLS TOOLBAR CONTROLS RHYTHM WINDOW CONFIGURATION SET
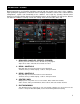
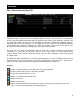
INTERFACE - ZONES Before beginning to use VirtualDJ, familiarize yourself with the controls and “zones” of the software. Upon opening the application, an interface menu is displayed. Interfaces called “skins” feature different configurations, layouts and functionality of the software. Let’s begin by selecting “Internal mixer interface” to become familiar with the most important features of the software.
BROWSER The Browser Zone is the area where to navigate and organize files stored on a local, external, or network hard disk. The browser contains the compatible file types (i.e. whose extensions are associated with the decoders in VirtualDJ) to access the compatible extensions list. Click the “Config” menu then choose the “Codecs” tab. See the “Codecs” section of the manual for further details. The Browser zone is divided into panels. 1. 2. 3. 4.
BROWSER Genres – provides a generated tree of Genre types based on the imported ID3 tag Genre field. By selecting on the various listed genres the file browser panel (2) only shows those entries that match the tag. History – provides access to data stored about each session use of VirtualDJ. The data is stored as .m3u playlist files and it is stored in the My Documents -> VirtualDJ\Tracklisting folder.
BROWSER File / Search Results Panel (2) VirtualDJ provides several elements of information about each track. The information is a combination of ID3 Tag and VirtualDJ defined data fields. By default the title of the song and artist are listed for each file along with columns for beats per minute (BPM) and duration (Length) with additional columns, explained further in the manual (page 13). The width size for each column can be modified individually and by clicking on a column the contents are sorted.
AUDIO AND VIDEO TAG SUPPORT VirtualDJ supports ID3 tagging of MP3 audio files and MP4 and MOV tagging of video files. VirtualDJ has always provided the fasts information access about one’s collection by using VirtualDJ’s database. Adding direct tag access to every file considerably slows applications ability for timely browsing and searching. VirtualDJ retrieves and stores the tag information in similar fields as part of its own database.
AUDIO AND VIDEO TAG SUPPORT Another method of retrieving tag info is through the browser directly with multiple files selected.
AUDIO AND VIDEO TAG SUPPORT Here is a screen shot of the fields being displayed in the browser – [Typical ID3 tags + Key field] Additional VirtualDJ Data Fields The VirtualDJ database now stores additional data about each track for additional search features and Filter folders.
DATABASE MANAGEMENT The database management system comes with additional tools found on the Config -> Browser tab. • • • • • Save ‘On the Fly’ during each session use Automatic check of database integrity at start Manually check the database integrity Fix database error(s) Clean out database entries for missing/moved files VirtualDJ updates and saves the database immediately when changes are made. At start of the application the integrity of the database file(s) are validated.
SEARCHING The search field is located at the top of the browser panel. To search the files listed in the database, left click on the search field then type your search text. Searching is instant and it is generally not necessary to type the text in its entirety — a few letters are enough to reduce the list to the single title.
NETSEARCH NetSearch is an online searching capability that can provide the user with access to tracks not currently in their collection. NetSearch also leverages VirtualDJ’s MusicGroup service for providing suggestions of other tracks that one could play based on the current track playing. NetSearch can be used by either selecting the NetSearch option from the left navigation panel or by having the NetSearch options activated in for the entire database.
TRACK OPTIONS Right clicking on a track displays many options: • • • • • • Preview – for launching the separate track preview interface File Info – for launching the File Info dialog to modify data field content File Operations like - copy, move, and delete files o When selecting Delete a warning is displayed about deleting the file(s) from your system BPM analyze track options – Re-Analyze or Manual Edit Add OR Remove songs from the search database Remove the link to a video file for audio tracks BPM AN
COMPUTER BEAT GRID (CBG) AND MANUAL BPM CORRECTION With the ‘Adjust BPM Values’ dialog you are provided several options to make the adjustments. EDIT BPM tab BPM – manually move the value up or down in .1 increments with the arrow buttons. Or, quickly half or double the shown value with the /2 and x2 buttons. Phase – used to adjust the CBG markers. The left and right arrows makes very fine adjustments, where the ¼ +/- buttons provide ¼ beat adjustments.
PLAYLIST & AUTOMIX The Automix feature works from a single deck. By default it is Deck 1; however, prior to starting the Automix if Deck 2 is selected as the active deck then Deck 2 is used. By utilizing 1 deck this frees the opposite deck for staging the first song to be used once you decide to stop the Automix process. In addition to drag and drop, playlists can be created. Playlists are groups of tracks prearranged in a desired order of play.
PLAYLIST & AUTOMIX Playlist & Automix Management Using the Playlist management menu by clicking on the [+] icon and choose from the available options for how the automix will function and tracks are managed in the playlist.
PLAYLIST & AUTOMIX Deck Waveform Display – Mix Point Markers When automix is active, the deck being used for automix play will show both the current track (top) playing and the next track (bottom) to be played. The currently playing track will display an EXIT mix point marker. The track to be played next will show an ENTRANCE mix point marker. Based on the Automix Type settings the markers can be moved within the tolerance of the type and time selections made.
EDITING AUTOMIX MIX POINTS Even with the mix point markers available for on-the-fly adjusts, the mix points for a track can be set prior to using that track as part of a automix playlist. The adjusted mix points are only utilized when using the SMART automix type. To edit a tracks Automix mix points, load a track to a deck, then select the respective BPM button for that deck. In the ‘Edit BPM’ dialog select the ‘Edit Automix’ tab. Then select which kind of mix point to edit (Mix Fade, Mix Cut, Mix Tempo).
SIDELIST VirtualDJ incorporates its own version of a waitlist called the Sidelist. The Sidelist panel (4) can be used to hold tracks that you know will played sometime during your session. It also provides a location for VirtualDJ to moved tracks that were loaded but never played because a new track was loaded to the deck. The Sidelist can also be use to stage and construct Playlists and VirtualFolders by drag-anddrop of tracks to the panel.
FILE SYSTEM / FOLDER STRUCTURE ORGANIZATION In order to simplify browsing and provide better and robust file management capability, VirtualDJ provides three (3) methods for the user to organize the database.
Please note that dragging tracks into a virtual folder will not physically move the files into that folder — it will only create a shortcut to where the files are located. To remove a virtual folder, right-click on it and select “remove.” FILTER FOLDERS A highly dynamic and creative way to organize a collection of tracks is to apply conditions that automatically filter (search) the database for tracks that match the criteria outlined. VirtualDJ calls these types of folder FilterFolders.
The filter dialog provides some great examples but to get it’s real power need to now what are the appropriate elements, operators, and a few keywords that are used.
DECK CONTROLS VirtualDJ’s interface provides access to two virtual “decks”. To load a track to a deck, drag and drop files into each of the decks spinning virtual platters. The two decks are equipped with the following controls and displays: 1. Information about track currently loaded – provides key information about the currently loaded track. Artist, Title, Elapse Time, Remaining Time, Gain level, Key of Track, Current Pitch position. 2. Hot Cues - Use the three (3) buttons to set cue points.
DECK CONTROLS 4. Waveform display for currently - This view shows the visual waveform of the entire track, allows for viewing the remaining duration of the audio, as well as what has already been played. When highlighted in blue or red (Using the default skins), that area of the waveform indicates what has been played and the current position of the audio. The remaining grey area of the waveform shows the length of the audio remaining.
DECK CONTROLS 9. Pitch slider / Pitch buttons Controls the speed/pitch of the track when moving the slider. Moving it downward the speed of the music speeds up. By moving upward the speed slows down. The “Zero” button lets you smoothly bring the pitch back to 100%. Double click on it to bring it back instantly. The two Pitch buttons are used to temporarily change the speed of the track playing.
INTERNAL MIXER CONTROLS VirtualDJ features an internal mixer section as part of the Mixer panel. It can be used just like a regular DJ mixer. The controls on the mixer include: 1. Panel selection buttons 2. Master and Headphone Cue volume knobs 3. Channel Gain This knob sets the gain level for the corresponding channel (deck). (Right clicking will bring it to the value that matches the other deck level.
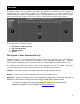
TOP TOOLBAR CONTROLS PC Version Mac Version ZOOM LEFT ZOOM RIGHT Items found on the toolbars – 1. 2. 3. 4. 5. VirtualDJ Logo CPU – usage graph of the CPU 4/4 CBG Beatkeeper Clock – Displays time, and when clicked with mouse can act as a counter. Config – Provides access to the configuration settings dialog. See “Configuration Settings” section of this manual for more information. 6. Window controls – window controls provide the Minimize, Maximize, and Close application options.
RHYTHM WINDOW Above the players, a window posts curves corresponding to the two rates/rhythms of the music. These curves are represented in a waveform, allowing you to see your music. The peaks in the curve represent beats. In order to synchronize the music, these peaks should occur at the same time. The present is represented by the feature in the middle of the screen. All on the left was already played, while what is on the right represents the next seconds of the track.
CONFIGURATION SETTINGS VirtualDJ is designed to be very simple and easy to use yet it is also fully customizable to match your preferred system performance. To make changes to VirtualDJ’s configuration, click on the (CONFIG ) button. This will bring you to the “Settings” dialog.
OPTIONS The Options settings control the multiple features and actions that accommodate the your style for using VirtualDJ. Crossfader – This option allows you to select the cross fader curve. There are four different options including: Full, Cut, Scratch, and Smooth. (other curves can be set through plug-ins). Pitch Range – Allows you to change the pitch range of the pitch slider. Reducing the range of pitch can increase the precision with which you are able to control the pitch (speed) of the records.
OPTIONS AutoUpdate – Automatically checks for new versions of VirtualDJ (internet connection required). Charts - Authorizes VirtualDJ to send anonymous statistics about your sessions, compile charts of the most played tracks all over the world. These statistics are available on www.virtualdj.com/charts.html. No personal information will be collected. MSN – When activated, this option will allow your MSN Messenger to show the music you are playing.
OPTIONS Disengage Beatlock – Once engaged, the Beatlock feature will keep the deck locked to the beat on the other deck, no matter if you are scratching or changing the pitch on the other deck. Disengage “on load” or “on switch” will automatically disengage the beatlock feature when the deck is loaded/switched. Smart BeatTap – When enabled and using the beat_tap action, it will automatically "snap" to the nearest plausible BPM and phase.
PERFORMANCE SETTINGS VirtualDJ provides a simple, yet complex; interface for optimizing performance to the capabilities of the computer based on its specifications. Depending on the system’s resources, some settings will work better than others. It is recommended that you take time to adjust these settings to find the optimum setting for your system.
PERFORMANCE SETTINGS Overclock – This setting can make your computer run faster (especially on laptops) and therefore be compatible with lower latencies. Scratch – Allows for adjustment to how VirtualDJ reacts to scratch motions Optimize for: Quality – VirtualDJ will more accurately represent how a scratch sounds when moving the virtual record back and forth Latency – VirtualDJ reacts as quickly as possible but might result in a somewhat more metallic sound.
PERFORMANCE SETTINGS Master Tempo The master tempo is the algorithm controls how VirtualDJ changes the pitch of the song without changing its tone (“KeyLock feature”). The default “Fast” algorithm takes only a small percentage of the CPU power, and produces good results at pitches in the range of -10% to +10%. For more extreme pitching, the fast algorithm can produce some choppiness. If your system is strong enough, this can be corrected by using the Advanced algorithm option.
MAPPERS VirtualDJ provides a very powerful mapping capability to support almost any external controller on the market today. Utilizing device definition and mapping files natively embedded in VirtualDJ and/or externally hosted in VirtualDJ’s file structure and created by you, almost any controller can be used with VirtualDJ. Along with VirtualDJ’s own action scripting (VDJScript), you have complete access in assigning the functionality of the controller to VirtualDJ’s capabilities.
MAPPERS Mapper Options – to the right of the Connected Devices drop-down, click on the button for accessing the various mapper options. • Rescan for New Devices – when selected VirtualDJ scans for any devices connected after VirtualDJ was opened. Toggle On/Off the use of these various type of devices. Checked is On, Unchecked VirtualDJ will not use that type of device(s).
MAPPERS Assign a Key and Action using Auto-Learn + WYSIWYG The fastest and most likely the easiest is using the Auto-Learn in combination with the WYSIWYG skin selection options. 1. Select your controller from the devices dropdown 2. Click the Plus button at the bottom to Add a new entry (Auto-Learn is on by default) 3. Press or Move the appropriate item on the controller. You should see a key descriptor show in the Key drop-down list that represents the key you just touched/moved. 4.
MAPPERS Actions and Parameters (VDJScript) There are a large number of actions that have various types of parameters that can be added to give various levels of control when the action is applied. The standard for using the action with the parameter is - . e.g. pitch +0.05 – changes the pitch slider to a position +0.05 from zero position. * To learn more about the actions visit our wiki at http://www.virtualdj.com/wiki and review the VDJScript section.
SKINS VirtualDJ allows you to choose between several different interface designs called “skins”. By default, VirtualDJ provides you with several skin options. This manual references the VirtualDJ6:Pro skin within the text. But you can choose from the pre-installed skins or visit our website and download other user created skins. VirtualDJ6:Pro – 1024x768 resolution of the skin referenced throughout this manual.
MULTI-INSTANCE VirtualDJ can be synchronized between multiple instances and/or synchronize multiple computers running VirtualDJ. No synchronization – turns synchronization off. Local synchronization – allows multiple instances of the VirtualDJ software to run and synchronize together on the same computer. Network synchronization – allows several computers running VirtualDJ to synchronize over a network.
INTERNET VirtualDJ can now take advantage of many features while connected to the Internet. These features (MusicGroups, NetSearch, etc...) require you to have an active Membership on this website, and to provide your login and password on this tab. The MusicGroups feature is the ability for a DJ to show their playlists to other DJs, and help new DJs improve their music selection.
CODECS VirtualDJ is able to decode several formats natively with its audio and video decoders. The Codec tab identifies what file types (by extension) use what specific decoder for play in VirtualDJ. At install, VirtualDJ includes the some of the common sound and video file extensions. If, VirtualDJ is not already associated with a specific extension for an audio or video codec then select the ‘Add’ button.
VIDEO ENABLE / DISABLE – Provides the ability to have the application’s video engine enabled or disabled. By disabling the video engine ALL video features of the application are not usable and may increase performance for DJ’s using only the AUDIO features of the application. Activate – Turn the video engine on or off. TV Output – Select the monitor that will display the video master output. NOTE: Only Monitors which are part of the windows desktop can be selected.
VIDEO Fade to black on volume sliders – Deck will FADE to BLACK when the volume fader is moved to 0. And will fade up in intensity as the fader is moved towards FULL level. Keep ratio (crop) / (full) – Audio Only Plug-in – Check this option and select the desired plug-in from the drop-down box. When playing audio-only files, this option will activate the plug-in to act as a visual. Example plug-in selection is the Clipbank.
SAMPLER VirtualDJ features a powerful sampler, which provides the ability to record, load, save and play samples on the fly. The sampler can be accessed by clicking on the “Sampler” tab in the lower window and features 12 slots for samples which are available to use at any given point in time. There are two types of samples that are supported – linear (one shot), and circular (looping) samples. Linear samples are samples which are played beginning to end.
SAMPLER Samples can be played from the skin’s interface. The sampler is found just below the ‘Effects’ interface on the skin. Simply select the sample from the pull-down menu, and then click on the sample title to begin play. The frame around the title will light up during playback. If the sample is a loop, then click the sample title again to stop the loop. Linear samples will stop when the end is reached. The play volume of the sample can also be controlled using the Volume knob.
EFFECTS VirtualDJ features a comprehensive set of audio and video effects and transitions which can be accessed by clicking the “Effects” tab. The effects list is displayed on the left side. Each of the effects can be activated for both decks. Multiple effects, both audio and video; can also be activated. To use an effect, select the effect and activate it by clicking the ‘Activate’ button for the desired deck and the effect will be applied.
VIDEO In addition to mixing traditional audio, VirtualDJ makes it possible to mix video content with the ease and familiarity of a DJ interface. Instead of audio files (.mp3, .wma, .m4a, etc.), video files (.avi, .mpg, .wmv, .vob, etc.) can be played. VirtualDJ’s interface provides all the same features to mix, scratch, effect, and transition video content, just as with audio content. Additionally, you can link video files to audio files to produce a video enhanced combination.
VIDEO Video Files in the Browser Video files are distinguished in the Browser with a small, blue “V” on their icon . And, audio files with linked videos are distinguished in the Browser with a small, blue “L” on their icon playing a video/linked audio file, a video window will open in VirtualDJ. . When If the installed video card has a TV output or a second output screen, the secondary output can be specified as the output for full-screen display, instead of the windowed output.
KARAOKE In addition to being able to play music and other video content, VirtualDJ allows provides support to play and mix karaoke files. VirtualDJ is compatible with MP3+G, WAV+G, WMA+G, OGG+G, and .ZIP files. The tracks will appear with a “K” in its icon . When loaded on the deck, VirtualDJ will load the audio track on the deck and display the CDG file in the video mixer. VirtualDJ supports the binding of the CDG files with its MP3 counter parts as one single .ZIP file.
KARAOKE ROTATION PLUG-IN Between Songs o Show Bitmap – a Bitmap can be used to display a background in between each song played o Show Text – use to show information about specials or next song/singer between the songs. Use the X and Y coordinates for where to display the text. Available variables to be used with the displayed text are %SONG, %SINGER, %NEXTSONG, and %NEXTSINGER.
BROADCASTING AND RECORDING VirtualDJ provides an additional ability to record or broadcast the output. To access the recording and broadcasting features click on the “Record” tab. The following interface is displayed. The following methods are available: • • • • Record Audio Burn CD Broadcast Record Movie To access the recording settings click on the “Config” button at the top center of the interface. Record From In the “Config” dialog, three different sources for recording are available.
Record Audio “Record Audio” provides recording a mix session to a .WAV or .MP3 file direct to the system’s hard drive. When the recording is completed, it can then be listened to in VirtualDJ, edited with an audio editing application, or written to a CD using a CD burning software. To setup the “Record Audio”, click on “Config” to access the configuration settings for recording a file.
Burn CD VirtualDJ can record the session in a CD image format for quick burning of a session to CD. Select “Burn CD” for VirtualDJ to record the session as a .BIN/.CUE file type which contains all the necessary information for burning software that supports image types of BIN and CUE. Click on “Config” to access the configuration settings for CD recording. Record From – • chooses the recording source • Auto-Start – checking this box will automatically begin the recording when the first track begins playing.
Broadcasting to the Internet (“Broadcast”) VirtualDJ provides a method for broadcasting the session in realtime on the Internet as a “webcast.”. This way people around the world can listen to the mix session. Click on “Config” to access the configuration settings for recording a file. Record From – • chooses the recording source • Auto-Start – checking this box will automatically begin the recording when the first track begins playing.
Caution: To listen to the mix, the software used by the listeners must be able to communicate with the broadcasting computer via the webcast server. This means that the broadcasting computer may need additional configurations and/or any software firewalls protecting the broadcasting Internet connection be set to authorize incoming and outgoing connections to and from the broadcasting computer.
RECORD MOVIE Record Movie VirtualDJ can record the session using the Microsoft MPEG4 codec installed on the computer as part of the Windows Media Player install. The Microsoft MPEG4 codec is used by default because it's the best codec to be used in live scenarios. For example, with the Divx codec a video can not record if the size is greater than 320x320 whereas Microsoft MPEG4 codec can record at least at 1024x768 and more. Click on “Config” to access the configuration settings for video recording.
TIMECODE SETUP In addition to using external controllers, VirtualDJ also provides the ability to control each deck via a time sequenced control vinyl. There are several makes of the digital timecode vinyls on the market. VirtualDJ support most Digital Vinyl System (DVS) signals. To use a DVS with VirtualDJ, start by referencing the VirtualDJ Quick Guide for setup of your soundcard within VirtualDJ.
TIMECODE SETUP – DEBUG DEBUG The Debug button provides access to additional fine tuning options for gaining a better quality signal of your DVS and its control of the VirtualDJ interface. The following visuals are available and features that can be adjusted to obtain better DVS performance. Signal Grid – displays the DVS signal being read by VirtualDJ. By adjusting the various settings you should see concentric circles displayed in this area.
TIMECODE SETUP – DEBUG Disable ClearSound - ClearSound uses a technology that gives a better sound when you don't scratch, at the expense of a very small delay when you scratch. When playing certain types of heavy tremolo music pitch changes with the DVS can cause artifacts in the sound quality. Disable AntiSkip – uses a technology that will ensure that VirtualDJ will not skip even if your needle skips on your record.
LEGAL INFORMATION http://www.atomixproductions.com http://www.virtualdj.com Atomix Productions Inc. Los Angeles CA 90036, USA VirtualDJ Copyright: Copyright 1997-2007 Atomix Productions All Rights Reserved Number IDDN.FR.001.040012.01.R.C.2000.000.31400. Trademarks: The Logo is a registered trademark of Atomix Productions VirtualDJ is a registered trademark of Atomix Productions Windows and DirectX are registered trademarks of the Microsoft Corporation.
EULA SUMMARY: ------------- This license gives you the right to install and use the software on a maximum of two computers, by one person. - It does not give you the right to rent or sell computer systems on which the software is installed, or to rent or sell the software or part of it. - The software is distributed "as-is" and no warranty of any kind is expressed. - Atomix Productions and its suppliers retain all intellectual property rights in the software.
2 Copyright © 2009 written by Christopher J.