
User Manual


Atomos Ninja V – User Manual Edition 1: November 2018 6
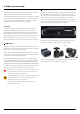
3. Mounting disks in the Master Caddy II
Mounting drives in the Master Caddy II
If you choose to use your own disks instead of a pre-built AtomX SSDmini
then follow this procedure to install it in the provided Master Caddy II.
Insert the disk into the caddy, and secure with four screws. These screws
shouldbetightenedsothescrewheadsareushwiththecasingofthe
caddy. The caddy is light and the disk just needs to be held securely.
Don’t over-tighten the screws. There are no connections to make because
sliding the Master Caddy II into the Ninja V or the docking station makes all
the connections for you.
The Master Caddy can’t be inserted the wrong way round. Always make
sure that the disk connector faces the slot in the Ninja V. Push the Master
Caddy II into place, but never force the disk just in case something isn’t
set up or aligned properly.
There is very little that can cause problems and the most likely thing is
thattheMasterCaddyisn’tproperlyushwiththedriveinside.Aquick
visualcheckwillconrmthis.
Spinning disks and SSDs are very sensitive to damage from
static electricity. Please observe all the usual precautions
when handling them, especially DO NOT EVER touch the
exposed SATA connector as static electricity may be harmful
to your disk.
Master Caddy II drives are backwards compatible with previous
Atomos recorders, however Master Caddy 1 is not forward
compatible with the Ninja V due to the compact latch design.
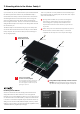
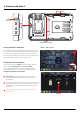
1
Carefully assemble the
Master Caddy II and disk
Ensure all 3 parts aligned
and insert 4 x screws (supplied)
Do not over-tighten screws or alignment can
not be guaranteed. We suggest squeezing
the corners together near the screw you are
tighteningforoptimalt.
Insert screw
Align all parts
Insert screw
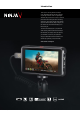
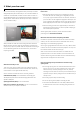
Introducing AtomX SSDmini
Atomos has teamed with the world’s leading media manufacturers to
design SSD media that is better suited to our ever evolving Monitor
Recorders. The new AtomX SSDmini is a little over 1/4 inch tall and 3” long.
It is also 20% shorter than traditional SSDs, yet keeps the standard SATA
III connector. It is backward compatible with previous Atomos devices by
adding a clever extension handle (SSDmini Adaptor). These tiny, slimline
SSDs are a true innovation by our close drive partners Angelbird and Sony.
1TB AtomX SSDmini by Angelbird pictured (right).
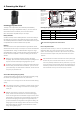
2
If using Master Caddy II with Ninja V ensure all screws
are tight and not protruding from casing. Loose screws
may cause the caddy to become lodged in the disk slot.