ATOMOS SHOGUN USER MANUAL EDITION 1: DECEMBER 2014 Have you registered your Shogun yet? Upgrade to 3 year warranty now Register now to receive communication on all future updates Web: www.atomos.com Sales: sales@atomos.com Support: support@atomos.
Contents Safety Instructions Warranty & Conditions 1 Introduction 2 1. What’s included 5 2. What you also need Spinning Disk Drives (HDD) Mechanical Shock and Vibration 6 6 Solid State Drives (SSDs) 6 6 Backing up and archiving 7 4K SDI Cables 7 Standard 1/4” Camcorder Mount 7 3. Mounting disks in the Master Caddy 4. Connecting and powering up Batteries Power ON/Power OFF 5. Shogun connections 6.
Warranty & Conditions Notice Copyright © 2014 ATOMOS Global Pty Ltd (‘referred to as ATOMOS’). All rights reserved. All information in this document is subject to change without notice. No part of the document may be reproduced or transmitted in any form, or by any means, electronic or mechanical, including photocopying or recording, without the express written permission of ATOMOS. A reference to ATOMOS includes its related entities, subsidiaries and parent company.
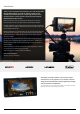
Introduction Thank you for choosing the Atomos Shogun: your 10-bit 4K SDI / HDMI Recorder/Monitor/Player. It’s the most compact portable recorder available, with excellent battery life, a super high-resolution screen, waveform monitor, vectorscope and on the fly conversion between HDMI & SDI input/output sources. Shogun preserves the pristine uncompressed video quality from your camera’s sensor by directly encoding it into Apple ProRes® or (optionally) Avid DNxHD®.
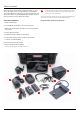
What’s Included Atomos does not sell storage and your package will not contain We try to provide you with as complete a package as possible: you don’t have to add anything except 2.5” storage media (you can buy additional packs of empty Master Disk Caddies from your Atomos Reseller) and some accessories to suit your set-up, like HDMI/SDI cables and tripod screws. All other parts necessary to use the Shogun are included. any spinning disks or SSDs.
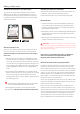
What you also need Spinning Disk Drives (HDD) up to 1080 30p/60i HD Only These are the raw storage medium for Shogun. You can use either traditional “spinning” disks, or the new solid state drives. Choose 2 ½” spinning drives if your Shogun is going to be attached to a tripod or if it Solid State Drives (SSDs) up to 3840x2160p30 These are Flash memory devices that come in the same form-factor as 2 ½” disk drives, and they are fully supported by the Shogun.
What you also need Here are some things that you should bear in mind when using spinning disks: • Even though spinning drives can withstand substantial shocks Backing up and archiving Remember that no storage medium, including tape, optical disks, spinning disks and flash memory, is completely immune from failure. when they are not in use, they are more vulnerable when running.
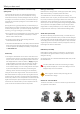
3. Mounting disks in the Master Caddy II Mounting drives in the Master Caddy II This is simplicity itself. Just insert the disk into the caddy, and secure with four screws. The caddy is light and the disk just needs to be held securely. Don’t over-tighten the screws. There are no connections to make because sliding the caddy into the Shogun or the Docking station Spinning disks and SSDs are very sensitive to damage from static electricity.
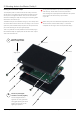
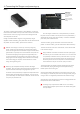
4. Connecting the Shogun and powering up Battery Battery slot Gently slide down into battery slot and lock into position Push the release button to eject the battery. The Shogun is a battery powered device. Like all batteries, you will need to take care of them. Make sure that you don’t short circuit the connections because this can result in very high currents that can damage the cells and could pose a fire hazard.
4. Connecting the Shogun and powering up On + forced power down Turning OFF power via touchscreen Menu Power off Turning ON power to the Shogun Tally Light Flashes red when recording Battery latch The start button is located on the top right hand side of the unit (as you look at the screen). Momentarily press the circular button on the top right side of the Shogun as you look at the screen to power up the unit. After a couple of seconds you will see the Atomos logo, and then the Shogun Home Screen.
5. Shogun Connections The Shogun is equipped with the following interface connections HDMI in: The video input connection used to record to the Shogun’s storage media HDMI out: This is for connection to an external monitor or other device with an HDMI input. It carries a delay-free loop-through of the incoming HDMI or SDI signal in record and standby mode, and the playback signal when the Shogun is in playback mode.
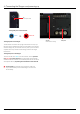
7. Using the Shogun The Shogun is controlled via an intuitive touchscreen interface. Icons and buttons have been designed and laid out in a specific way to ensure operation is simple and fast. Video Input Format and Pulldown Status Recording Quality File Name Recording Time Remaining Continuous Power/ Battery Indicator The high definition 1920x1200 Home Screen displays all necessary technical and functional information.
7. Using the Shogun cont. Home screen and menu functions Rec (Record) Shogun uses a unit name, scene, shot and take convention to name the This is the icon you touch to begin a recording. Touch it again to stop clips. Select the clip you want to play by touching the file name and this a recording. While recording the Rec icon changes to a Stop icon and will start to playback. a red frame is present around the screen.
7. Using the Shogun cont. File Naming Allows you to select the scene and shot number that will be recorded as well as change the unit / media name. To change the unit name tap the arrow under UNIT/MEDIA NAME, Use the left and right arrows to select a letter, and the up and down arrows to change its value. To modify the scene and shot number under CONFIGURE FILE NAME, select plus or minus next to scene or shot (up to 999).
UNLOCKED 7. Using the Shogun cont. UNLOCKED Lock the Display Screen LOCKED You can lock the display of the shogun so that no changes can be made by mistakenly touching the screen, to lock the shogun simply short tap the power button UNLOCKED LOCKED Short tap the power button again to unlock the unit Only use this option if your camera model is listed. LOCKED Timecode Takes you to the dedicated timecode configuration page. Refer to Part 7 of this manual for more information.
7. Using the Shogun cont. 7 3 2 4 5 6 1 1. Source Displays the input source currently being recorded to the media inside the shogun, simply tap to toggle between HDMI & SDI. You can 5. Record The record menu allows you to toggle between available frame rate options based on your current source input.
7. Using the Shogun cont. 8. Battery Indicator Shows whether you’ve got one or two batteries connected, this includes DC connections from external power sources. If there is no Battery connected a number will not be displayed in the appropriate slot. Touching the Battery Indicator takes you to the Batteries screen where you can closely monitor the status of the Batteries. When a battery is running low its icon will flash.
7. Using the Shogun cont. 10. Monitoring & Recording Audio Channels Audio During Playback Mode Audio panel and quick headphone volume adjustment bar. channels 1/2 on the headphones, please bear this in mind when you Located on the bottom left corner of the home screen you will see the When you enter into Playback mode on the Shogun it will only output select the audio channels for recording. Tap the audio bars to bring up the audio panel.
8. Monitoring and Recording Connect to input As soon as you connect a supported input to the Shogun input and have inserted a formatted drive: • The Rec icons will go solid and colourful Before Recording • Check there is a valid signal by checking the input menu ensuring all fields display a green tick.
8. Monitoring and Recording cont. SmartControl SmartControl is a versatile set of functions used to control the starting and stopping of recording by automatic or external means. This section outlines the different methods to start and stop recording. Shogun Start and Stop record control can be triggered by the following methods: 4. SDI Camera Trigger record The SDI Camera trigger is manufacturer-specific, you will need to select the appropriate manufacturer for your camera from the input menu.
8. Monitoring and Recording cont. 2 3 4 5 6 7 8 1 Waveform Monitoring AtomOS6 has a newly improved Waveform Monitoring control panel which can be enabled with only a few button presses. 1. Waveform Monitoring 6. Waveform Size (1/4, 1/3 and Full Screen view) 2. Luma Overlay 7. Transparency 3. RGB Parade Display 8. Dynamic Range 4. Vectorscope 5. Vectorscope Zoom What is Waveform Monitoring? How to use chroma values from a video input signal.
8. Monitoring and Recording cont. Waveform Monitor Types Vectorscope are available for use: as a phase vector), vector and color strength (measured by outward Inside the Waveform Monitoring menu, two types of Waveform Monitors The Vectorscope display shows empirical color information of hue (shown distance from the centre).
8. Monitoring and Recording cont. 2 3 4 5 6 7 8 9 1 Monitor Assist AtomOS features Smart Monitor tools that help with making your shot picture perfect. Easily access Zebra bars, Focus Peaking, False Colour and Blue Only Exposure. 1. Monitor Assist 6. Safe Area / Grid Lines 2. Focus Peaking 7. Focus Peaking Mode (Colour, Monochrome, Outline) 3. Zebra Pattern 8. Zebra Threshold 4. False Colour 9. Focus Zoom 5.
8. Monitoring and Recording cont. Focus Assist Types Zebra for use: the % level set. 95% is usually used for objects, windows and surfaces. Inside the Focus Assist menu, four types of focusing tools are available Zebra lines show the parts of the image that are over exposed relevant to 75% is used for checking over exposure of human faces this will indicate reflective or shiny areas on the face.
8. Monitoring and Recording cont. Blue Only Exposure Focus Assist Settings the input signal. Used to observe the noise content of a video image and access the display settings for Focus Peaking, Zebra, False Colour and the judge the overall exposure quality. Blue Only Exposure.
8. Monitoring and Recording cont. SmartLog How to use in Playback mode* playback, more on this later). the Play icon on the bottom of the screen. SmartLog gives you the ability to tag your clips during recording (or To review and use the Cut and Tag feature in playback mode, press on By the pressing the Favourite and Reject icons you can assign a “good clip” or “bad clip”.
8. Monitoring and Recording cont.
8. Monitoring and Recording cont. Atomos Anti-Shock Technology File Recovery movement and vibration are minimal and within the capabilities of the the recording is stopped suddenly, without closing the file properly, you devices. They are ideal for low-cost recording, but will suffer reduced will only ever lose 8 seconds of material. Spinning disks are very reliable in a controlled environment where performance if they are jolted or receive a sudden impact.
9. Timecode Using Timecode If SDI or HDMI timecode is selected and the camera is in REC RUN Touching the timecode display on the home screen, just above the three mode, the user has the choice to start and stop recording remotely from main coloured controls, will take you to the Timecode setup screen (this the source camera SDI timecode. is also accessible by touching Menu and then Timecode) To enable rolling Timecode Start/Stop functions, simply press the TC icon shown here.
9. Timecode cont. If recording is stopped and then restarted while in this mode, there will be a time gap between the last clip and the next one, equal to the length of time the Shogun has been out of record. The start timecode of each clip will be the exact time of day when recording started. Time of Day timecode is useful as a reminder of the time that clips were recorded.
10. HD Pulldown What is Pulldown? Many professional and consumer 1080p23.98 or 1080p24 cameras available today do not send true 1080p24, 1080p23.98, 1080p25, 1080p29.97 or 1080p30 signals down their SDI or HDMI outputs. Instead they send 1080i59.94 in NTSC regions (eg USA, Japan), and 1080i50 in PAL regions (eg Europe) In order to convert the signal from the internal recording format to 1080i5994 or 1080i50, they use a process called 3:2 or 2:2 pulldown.
11. Playback & Playout Available from next firmware update.
12. Connecting and Editing Connect To access and edit your recorded material, connect the Master Caddy Docking Station to a Mac® or Windows® editing workstation via USB 2.0 or USB 3.0. The Master Caddy Docking Station is a sophisticated device supporting two different data interfaces: USB 2 and USB 3. Note that when using the Master Caddy Docking Station you may need to connect an additional USB cable to the 5v power input.
12. Connecting and Editing cont. Importing Final Cut Pro (version 7), Final Cut X , Adobe CS5 (with 5.51 update), You’ll see the folders in the Shogun drive. Select the folder containing the footage you want to import: EDIUS 6, Sony Vegas 10, Lightworks and Avid Media Composer 6 support imported files from your Shogun disk. Importing Shogun footage into Final Cut Pro You can import Shogun footage into Final Cut Pro (FCP) in just a few simple steps.
12. Connecting and Editing cont. SmartLog with FCP X 2.
15. Software Updates AC Adapter (included) This connects on the battery slot on the back of the Shogun. Please ensure it is connected to slot 1. The end of the adapter will connect to a mains plug. Alternatively you can use any NP-Compatible Charger or power supply, as long as they use a “Dummy Battery”.
Shogun specs SHOGUN SPECIFICATIONS SHOGUN SPECIFICATIONS Weight Realtime hardware encoding Without batteries & HDD 460g/16oz With batteries & HDD 645g/23oz Dimensions (W x H x D mm) 196 x 110 x 47mm, 7.7 x 4.3 x 1.
Construction note: Your Shogun is designed to operate in ambient temperatures up to 45°C/113°F. It features a heat pipe design with a silent fan to circulate air and remove excess heat from the rear vents . If you wish to extend the temperature of operation in high temperature conditions, you can choose an SSD drive, and set the TFT brightness to a minimum. Atomos (HQ) 29 Nott Street, Port Melbourne Victoria 3207 Australia Tel: 1300 ATOMOS www.atomos.