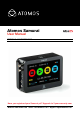
Atomos Samurai User Manual EDITION 2: NOVEMBER 2012 Have you registered your Samurai yet? Upgrade to 3 year warranty now. Website: www.atomos.com | Sales: sales@atomos.com | Support: support@atomos.
Contents Safety Instructions Warranty & Conditions . . . . . . . . . . . . . . . . . . . . . . . . . . . . . . . . . . . . . . . . . . . . . . . . . . . . . . . . . . . . . . . . . . . . . . . . . . . . . 1 The Samurai is designed to a high standard but there are some things you should be aware of to prolong the life of the unit and for your own safety. Introduction . . . . . . . . . . . . . . . . . . . . . . . . . . . . . . . . . . . . . . . . . . . . . . . . . . . . . . . . . . . . . . . . . . . . .
Warranty & Conditions Notice Software License Agreement Copyright © 2012 ATOMOS Global Pty Ltd (‘referred to as ATOMOS’). All rights reserved. All information in this document is subject to change without notice. No part of the document may be reproduced or transmitted in any form, or by any means, electronic or mechanical, including photocopying or recording, without the express written permission of ATOMOS. A reference to ATOMOS includes its related entities, subsidiaries and parent company.
Introduction Thank you for choosing the Atomos Samurai: your 10-bit HD-SDI Recorder/Monitor/Player. It’s the most compact portable recorder available, with extremely long battery life, a high-resolution screen, uncompressed-quality playout and real-time pulldown removal. Software updates for your Samurai will be issued regularly. Registering your Samurai now will ensure you are kept abreast of any updates. Software updates and information will also be available at: www.atomos.
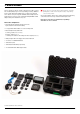
1. What’s included We try to provide you with as complete a package as possible: you don’t have to add anything except 2.5” storage media (you can buy additional packs of empty Master Disk Caddies from your Atomos Reseller) and some cables to suit your set-up, like SDI BNC cables and tripod screws. All other parts necessary to use the Samurai (including Mini-BNC to BNC adaptor cables) are included in the carry case.
2. What you also need Spinning Disk Drives (HDD) These are the raw storage medium for Samurai. You can use either traditional “spinning” disks, or the new solid state ones. Choose 2 ½” spinning drives if your Samurai is going to be attached to a tripod or if it is not going to be subject to excessive vibration. For harsher conditions, choose a solid state drive.
2. What you also need cont. HD/SD-SDI cables (included) Standard 1/4” Camcorder Mount • 2 x Mini-BNC > BNC cable adaptors are provided. This must fit a standard 1/4” screw mount. Select the type that best suits your application and conditions. • 1 x 70cm Mini-BNC Male to BNC Female to connect a camera or switcher to the Samurai input, or the output directly to a monitor. • 1 x 23cm Mini-BNC Male to BNC Male is also provided.
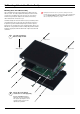
3. Mounting disks in the Master Caddy Mounting drives in the Master Caddy This is simplicity itself. Just insert the disk into the caddy, and secure with four screws. The caddy is light and the disk just needs to be held securely. Don’t over-tighten the screws. There are no connections to make because pushing the caddy into the Samurai or the Docking station makes all the connections for you. Spinning disks and SSDs are very sensitive to damage from static electricity.
4. Connecting the Samurai and powering up Batteries Battery number 1 Gently slide down into battery slot/s and lock into position. Push latch to release battery The Samurai is a battery powered device, and has a special feature to ensure that you never have to interrupt a recording to change a battery. We will come to this shortly. Like all batteries, you will need to take care of them.
4. Connecting the Samurai and powering up Turning ON power to the Samurai The start button is located on the right hand side of the unit (as you look at the screen). Momentarily press the circular button on the right side of the Samurai as you look at the screen to power up the unit. After a couple of seconds you will see the Atomos logo, and then the Samurai Home Screen.
6. Other physical features Master Caddy Slot Release and remove Master Caddy On the left hand side of the unit (as you face the screen) is a slot for Samurai Master Disk Caddies. To insert a caddy, gently push until it clicks into position. To eject it, use the latch on the right hand side of the Samurai (as pictured) Formatting disks - see page 14 The Master Caddy is hot-swappable, so you can do this at any time - even while the unit is turned on.
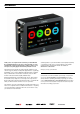
7. Using the Samurai Using the Samurai The Samurai Touchscreen The Samurai is controlled via an intuitive touchscreen interface. There are large, obvious controls for Record, Play, Monitor, and Menu, as well as the following information: Samurai features a very high quality 800x480 pixel video touch screen. Most of us are now familiar with the idea of touchscreens, but there is an important difference between Samurai’s screen and those you might find on a smartphone.
7. Using the Samurai Home Screen and Menu Functions Rec (Record) This is the icon you touch to begin a recording. Touch it again to stop a recording. While recording the Rec icon changes to a Stop icon. Once your recording has started you have the option to touch the Mon icon to view the signal you are recording. Samurai uses a unit name, scene, shot and take convention to name the clips. Select the clip you want to play by touching the file name and this will start to playback.
7. Using the Samurai Scene & Shot You will see Locked will flash on the screen. Press again to Unlock. Allows you to select the scene and shot number that will be recorded next. To select press scene or shot at the top and the number you wish to use from the list below (up to 999). The number you choose will then be shown underneath the word Scene or Shot in a larger font and will be underlined. The take number is automatically increased with each take.
7. Using the Samurai Battery Indicator Shows whether you’ve got one or two batteries connected. If there is no battery connected a number will not be displayed in the appropriate slot. Touching the Battery Indicator takes you to the Batteries screen where you can closely monitor the status of the Batteries. When a battery is running low its icon will flash.
7. Using the Samurai Audio In You can adjust the analogue audio gain by pressing the + and - buttons next to the channel pair. There is also a slider to control the line out level. Press any point along the line or slide your finger to the left or right to adjust. Located in the bottom left corner of the main screen you can see the Audio Monitoring Levels, with access to Audio in. You can see 12 digital channels (via SDI input) and 2 analogue audio channels (via the Stereo Line in).
8.
8. Monitoring and Recording SmartControl You can use this mode with either Free-Run or Record-Run timecode SmartControl is a versatile set of functions used to control the starting and stopping of recording by automatic or external means. This section outlines the different methods to start and stop recording.
8. Monitoring and Recording Using the Samurai as a field monitor and viewfinder With its 5” high-resolution color TFT 800x480pixel screen, the Samurai makes a great field monitor. So good, in fact, that you don’t need any separate monitoring equipment. You could even say that the Samurai is a “Recording Monitor”. SmartMonitor Focus Peaking Focus peaking allows the user to ensure their recordings are always in focus. The parts of the image in focus are indicated by the selected colour.
8. Monitoring and Recording False Colour Blue for Exposure Displays a black-and-white image that is based on the blue channel of the input signal. Used to observe the noise content of a video image and the judge the overall exposure quality. Settings On the bottom left side is the icon to amend the settings of the tools. Current settings are for Focus Paking, Zebra and False Colour. SmartLog SmartLog gives you the ability to tag your clips during recording (or playback, more on this later).
8. Monitoring and Recording You will use these icons as an in and out point on the file, pressing once to set the in point then again to set the output. When you have selected Favourite, the icon colours will invert (Green background with black text) and the Reject Icon will disappear. When Reject is selected the icon colours will invert (red background with black text) and favourite will disappear.
8. Monitoring and Recording Organising material on the disk Samurai uses a convention: unitname, scene, shot and take naming You can see along the top you have scene and Shot with a large underlined number, this is the current selection. SAMMI_S001_S001_T001 This was recorded on a Samurai unit called SAMMI, the scene selected was 1, the shot selected was 1 and it was take 1. Below is an example of your playback browser window showing file names.
8. Monitoring and Recording Atomos Anti-Shock Technology File Recovery Spinning disks are very reliable in a controlled environment where movement and vibration are minimal and within the capabilities of the devices. They are ideal for low-cost recording, but will suffer reduced performance if they are jolted or receive a sudden impact. From AtomOS 3.0 onwards, a file recovery feature is included, in the event of a disk being removed, or a battery running out, while recording.
9. Timecode Using Timecode Time of Day Touching the timecode display on the Samurai’s home screen, just below the four main coloured controls, will take you to the Timecode setup screen (this is also accessible by touching Menu and then Timecode) With this selected, each new clip that is created will contain embedded timecode accurately showing the time of day that it was recorded, based on the internal Samurai Time of Day clock.
10. Pulldown What is Pulldown? 1080p23.98 or 1080p24 Many professional and consumer cameras available today do not send true 1080p24, 1080p23.98, 1080p25, 1080p29.97 or 1080p30 signals down their SDI or HDMI outputs. Instead they send 1080i59.94 in NTSC regions (eg USA, Japan), and 1080i50 in PAL regions (eg Europe) In order to convert the signal from the internal recording format to 1080i5994 or 1080i50, they use a process called 3:2 or 2:2 pulldown. Camera Setting Pulldown Samurai Receives 1080p23.
11. Playback & Playout Using the Playback and Playout features FAT32 Disks The Samurai has a powerful playback function that allows you to playback pristine Apple ProRes or (optionally) DNxHD recordings in real-time with controls to navigate quickly to any part of a clip, the ability to play recorded content faster than normal playback speed or step through the clip frame-by-frame to check your footage very accurately. If the disk has been formatted on Ninja it will use the FAT32 file system.
11. Playback & Playout Scrub Bar Pause mode This is the thick blue line along the bottom of the playback screen. A vertical white “now” line shows the current playback position. You can think of the scrub bar as representing the length of the clip. If you touch the scrub bar, playback will start from that position. Simply by running your finger along the scrub bar, you can move forwards or backwards through any clip - even if it is eight hours long - at any speed.
11. Playback & Playout Loop Mode LOOP MODE The Samurai has the ability to play back a single clip in loop mode via the SDI output. This can performed with captured clips at full broadcast quality or the final edited clips from your hard drive. To do this: • Go into Playback mode REMOVE OVERLAY At any time, you can hide all the visible controls by simply touching the screen (away from any controls) once. Touch it again to bring back the controls.
12. Connecting and Editing Connect To access and edit your recorded material, connect the Master Caddy Docking Station to a Mac® or Windows® editing workstation via USB 2.0, USB 3.0 or FireWire® 800 port. Eject the Master Caddy from your Samurai and insert it into the Docking Station. After a short wait, the recorded video will be accessible to the target computer via a standard disk (exFAT) file system.
12. Connecting and Editing Importing Final Cut Pro (version 7), Final Cut X , Adobe CS5 (with 5.51 update), EDIUS 6, Sony Vegas 10, Lightworks and AVID Media Composer 6 support imported files from your Samurai disk. You’ll see the folders in the Samurai drive. Select the folder containing the footage you want to import: Importing Samurai footage into Final Cut Pro You can import Samurai footage into Final Cut Pro (FCP) in just a few simple steps.
12. Connecting and Editing SmartLog with FCP X 2.
13. Using Samurai with external power supplies D-Tap Connector This adaptor allows you to take the power supply from any source that has a D-Tap connection such as V-Lock The D-Tap also connects to the battery slot of the Samurai, please ensure it is in slot 1. There will be a D-Tap to D-Tap cable. Voltages up to 20.0V. AC Adaptor (not included) Available from your reseller as an optional accessory, this connects on the battery slot on the back of the Samurai. Please ensure it is connected to slot 1.
15. Software updates Updating AtomOS (Firmware) Problems when installing AtomOS From time to time we will issue software updates for your Samurai. To update the firmware (that’s the software that runs inside your Samurai), there is a simple procedure you have to follow. Very occasionally, the firmware update process can go wrong. This might be because of an incomplete or corrupted download. • Go to www.atomos.com/samurai/firmware • Locate and download the firmware upgrade 1. Extract the file ATOMSAM.
16. Samurai Technical Specifications Construction note: Samurai Main Unit Your Samurai is designed to operate in ambient temperatures up to 40°C/105°F. It features a fanless design which dissipates internal heat through the aluminium chassis. Lightweight 390g (without batteries & HDD) 690g (with batteries & HDD) Dimensions 140mm (W) x 87mm (H) x 41mm (D) Construction Aircraft-grade aluminium for durability + portability. Fanless for silent operation. Operating Power 3.3W (Monitoring Only) / 6.
Sales & Technical Support Website: www.atomos.com | Sales: sales@atomos.com | Support: support@atomos.com © ATOMOS Global Pty. Ltd. trading as ATOMOS under license November 2012. All trademarks are the property of their respective owners.