
User's Manual


ABLEPick pick-to-light user manual
7
Self-test function enabled
Step1: Press the “up-count” button, then “Confirmation Button” at the same time. 7-segment
LED display will show the address ID of the tag. For example: “[001]”. However, there is
no digit is blinking which is different from the address configured procedure.
Step2: Press the “Confirmation button”. The 7-segment LED display will show the baud rate of
the tag. For example: “57600” is 57600 bps. The tag will detect the baud rate of the host
and configure itself automatically.
Step3: Press the “Confirmation Button” to test the LED light and the 7-segment LED display. The
display will show “-----“, “00000”, “11111” , “22222”…...”99999” sequentially. And the LED
light also will change color: from RED, GREEN and AMBER sequentially.
Step4: Press the “Confirmation Button” to test both of the small buttons and the Confirmation
button. To press the “Confirmation button” to add a “[” character on the 7-segment LED
display”. To press the “up-count” and “down-count” button to decrease a “[” character on
the display.
Step5: Press the “Confirmation Button” many times to exit the self-testing procedure
Specification
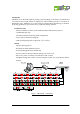
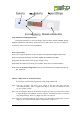
1) 5-digits display ,2 color 7-segment display by 2 digits with Green , 3 digits with Red.
2) 3 function keys
3) 1 large illuminated confirmation button with 6-color LED.
4) RF reader.
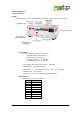
5) Power requirements: DC12V ; 100mA
5) Operating temperature: 0 °C to 40 °C
6) Size : 200(L) * 46 (W) * 30(H) mm