
User manual


Copyright©
2008.
All
Rights
Reserved by ATP Electronics Inc.
14
Photo Finder Detailed Usage Instructions
1. Install the AAA batteries with the correct polarity +/-.
2. Push the Power button for 2~3 seconds to start the system.
2.1. The LED light flashes green for 2~3 seconds and the LCD willdisplay information regarding the
Photo Finder version.
3. The ATP GPS Photo Finder automatically begins to search for satellite signal.
3.1. The LCD screen will display ‘Acquiring GPS Signal’ and the blue LED light will flash twice rapidly for
1 second. Acquisition time can take several minutes depending on position and environmental
conditions.
3.2. As the device starts to receive radio signals from satellites, the LCD screen will display ‘Current
Date and UTC time’ The yellow LED light will flash once slowly for 2~3 seconds to signal that
location data is being logged to internal memory.
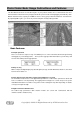
3.3. Adjust the clock setting of your camera accordingly. The easiest way to do this is to set the
camera to your local time. You can then fine tune the camera setting by referencing the ‘UTC
time’ displayed from the Photo Finder. The closer your camera is synced to this ‘UTC time’ the
more accurate the GPS tags will be in your photos!
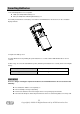
4. Position the Photo Finder correctly so that the GPS antenna is oriented upward (see previous section
for a visual description of this).
5. You can now begin to take pictures as you normally would with your digital camera.
6. Sync the GPS position data to your pictures on a memory card.
6.1. Remove the memory card form your digital camera.
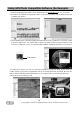
6.2. There are several ways in which you can plug your memory card into the Photo Finder:
a) Open the bottom rubber cover on the Photo Finder and plug in your SD, MMC, or
Memory Stick memory card into the card slot.
b) Using the included mini-USB to standard USB adapter, plug your memory card into
your USB reader, and your USB reader to the standard USB port on the adapter. Then
open the bottom rubber cover on the Photo Finder and plug the mini-USB part of the
adapter into the mini-USB port.
c) If your camera has a USB output and can be read as a ‘removable drive’ on a PC, you
can actually plug your camera in directly to the Photo Finder. This will allow the Photo
Finder to tag your JPEG files directly on your camera without removing your card!
6.3. See page 9 for a step by step guide to the tagging process once you’ve plugged in your memory
card.
6.4. DO NOT remove the memory card or batteries when the device is writing data or else data
corruption can occur. (*1)
6.5. After the Photo Finder finishes writing the data, you can remove the memory card.