!1 Atrix ERGOPRO Backpack Vacuum OWNER’S MANUAL Model: VACBPAI 120V 12A, 1400W ETL US Canada Atrix International, Inc. 1350 Larc Industrial Blvd. Burnsville, MN 55337 www.atrix.com sales@atrix.com 952.894.6154 Tel 800.222.6154 Toll Free Tel 952.894.
!2 IMPORTANT SAFETY INSTRUCTIONS When using an electrical appliance, basic precaution should always be followed, including the following: READ ALL INSTRUCTIONS BEFORE USING THIS APPLIANCE WARNING To reduce the risk of fire, electric shock, or injury: 1. Do not leave vacuum cleaner when plugged in. Unplug from outlet when not in use and before servicing. 2. Electrical shock may occur if used outdoors or on wet surfaces 3. Do not allow to be used as a toy.
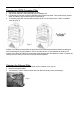
!3 GETTING TO KNOW YOUR Ergo Series VACUUM 1A 1B ! 1. Replacement 1.5” Lid Grey (VACBPAILIDG) 1A. Replacement Latch (BP34-38) 1B Replacement Handle, Webbing and Harness Assembly (VACBPHARNESS) 2. Replacement Hose (VACBPAI39) 3. Floor Tool w/Scallops (VACBPAI34) 4. Crevice Tool (VACBPAI36) 5. Round Dusting Brush (VACBPAI33) 6. Floor Tool with Bristles (VACBPAI35) 7. Upholstery Tool w/Brush (VACBPAI32) 8. Aluminum Wand (VACBPAI37 “hose end” and VACBPAI38 “utensil end”) 9. HEPA Bag (VACBP6-10P) 10.
!4 Operating Instructions Warning: To reduce the risk of electric shock, the power cord must be disconnected from the wall outlet before removing and replacing filters or performing maintenance. Replacing the HEPA Bag 1. To open the canister lid, pull up the canister lid tabs on each side of the unit and remove canister lid. (Fig.1) 2. Pull the tab on the HEPA bag holder out slightly and flip upwards.(Fig. 2) 3. Holding the HEPA bag in your hand, slide/pull it out of the bag holder and dispose. (Fig.
!5 Cleaning the HEPA Pre-motor Filter 1. Press/pinch both tabs and pull upwards on filter. 2. Tap out the contents of the HEPA filter over a garbage can. 3. If necessary, thoroughly rinse the HEPA filter using regular tap water. Then shake off any excess water and allow to dry completely before reinserting it. 4. To reinsert, place filter over the tabs and press down. You should hear two "clicks" if installed correctly. (Fig. 5) Fig.
!6 Assembling Your Vacuum • Push/press fit the hose into the lid opening. (Fig 7) ! Fig. 8 Fig. 7 • • To connect the hose and attachment wand, slide the hose over the hose end wand attachment and over the bump by approx. ½”. (Fig. 8) Take the hose end attachment wand and insert it into the lower attachment wand (utensil end). (Fig.9) Fig. 9 ! • Secure the utensil to the end of wand. Align the brass ring with the groove on the floor tool to ensure a secure fit (Fig. 10) Fig.
!7 Using Your Vacuum 1. Connect the extension cord to extension cord relief (BP99) (Fig 12) and connect vacuum plug to extension cord. Plug extension cord into the electrical outlet. 2. Connect hose and wand and/or utensil. 3. Correctly place shoulder straps on each shoulder and secure the waist band with hook and loop strips. (Fig. 11) Shoulder Strap Shoulder Strap Waist Band and Tool Storage Fig. 11 ! Fig.
!8 (The Atrix Advantage) Atrix Ergo Series Commercial Backpack Vacuum WARRANTY INFORMATION Warranty/Service Information: Atrix Ergo Series Backpack Vacuum Limited Warranty: To the original purchaser/user of the Atrix Ergo Series Backpack Vacuum, Atrix warrants that the vacuum, filters, utensils, motor, battery or charger will be free of defects in material and manufacture for a period of one (1) year from the date of invoice.