3M™ Home Curfew RF (Cellular) Monitoring System User Manual © 3M 2011.
Table of Contents Overview ........................................................................................................................................................................................... 3 Base Unit 3000 Operating Features ................................................................................................................................................. 4 Base Unit 3000 LEDs..............................................................................................
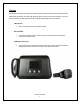
Overview 3M Electronic Monitoring’s Home Curfew RF Monitoring System provides an effective curfew compliance system. 3M Electronic Monitoring’s Home Curfew RF Monitoring System consists of three main components: The 2 Way Bracelet, the Base Unit 3000, and 3M Electronic Monitoring’s EM Manager (Smart View) Software.
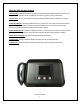
Base Unit 3000 Operating Features Communication: The Base Unit 3000 will call 3M Electronic Monitoring to download event data every 6 hours. If the contract specifies, it will also call out immediately upon a violation or “Home” or “Away” status change. Motion Sensor: There is a motion sensor located inside the Base Unit 3000 to allow it to determine if it is being moved. 30 Day Event Memory: The Base Unit 3000 will store up to 11,000 events.
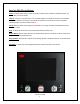
Base Unit 3000 LEDs and Buttons Power: The Power LED is solid green when connected to a power source. If the Base Unit 3000 loses power, the LED will blink red once per second. Cell/Line: If solid green, the phone line is in use. If cellular coverage is not available at the time of a call, the Base Unit 3000 will continue to try and call in. The line LED will continue to turn on and off until a call is completed. If cellular coverage is lost, the Line LED will blink red.
2 Way Bracelet Operating Features Electronic Tether The bracelet serves as an electronic tether to the Base Unit 3000. The bracelet communicates with the Base Unit 3000 via Radio Frequency. Adjustable Range The distance allowed between the bracelet (offender) and the Base Unit 3000 is adjustable. Low Range is approximately up to 50 ft. Medium Range is approximately up to100 ft. High range is approximately up to150 feet. (This is clear line of sight and is also dependent on environmental conditions.
Enrollment EM Manager (Smart View) Log In To access the secure website, go to https://smartview.ptm.com. You will be required to enter a user ID and password. When using EM Manager (Smart View) for the first time, you will create your own password. Enter your User ID (often your three initials and last four digits of your social security number), the temporary password that was emailed to you, and click OK. The next screen will tell you that your password has expired.
Enroll a Contact The Enroll Contact link is located on the left side of the Home page (see below). It is here that you will enter the officer’s information (name, address, phone number, etc.), report types, and default notification settings. 1. Click the Enroll Contact link on the left side of the Home page. 2. You will be redirected to the Enroll Contact page (see below). Enter all Contact information. 3. Click Save.
Enroll a Contact, cont.
Enroll a Contact, cont. Demographic Data 1. Enter the Contact’s information. • All fields with red asterisks (*) are required fields. Report Options 2. Enter an email address where the selected reports will be sent. 3. Choose Daily Event Summary Report and/or Case Management Activity Report. Default Notification Options 4. Select the type of Notification you would like to be your default method.
Contact Information Page When you click Save, you will be taken to the Contact Information page (see below). Here, you can edit the contact information, as well as disable the contact. 1. To edit the contact information, move your mouse cursor over the Contact Functions dropdown menu and left click Edit. 2. To disable the contact, move your mouse cursor over the Contact Functions dropdown menu and left click Disable Contact.
Enroll an Offender The Enroll Offender link is located on the left side of the Home page (see below). 1. Click the Enroll Offender link.
Supervision Level Clicking on the Enroll Offender link will redirect you to the Level of Supervision page (see below). 1. Click on the Level of Supervision drop down menu. 2. Select your Level of Supervision (see below). 3. Click the Continue button.
Offender Enrollment After selecting the Level of Supervision, you will be redirected to the Enroll Offender page (see below). It is here that you will select an Assigned Officer, enter the Offender’s Information, select the Notification Contact and Method, Assign Hardware, and select the Basic Rule Setup.
Offender Enrollment, cont. Demographic Data 1. Enter the Offender's Information. • All fields with red asterisks (*) are required fields 2. Click the Map button to geo-code the offender’s address. 3. Enter the offender’s home number 4. Select the Offender Type. 5. Select the Time Zone. Hardware Assignment 6. Locate the serial number on the device(s). 7. Click on the drop down menu and select that serial number for the device. Notification Contacts 8.
Map Offender’s Address Clicking the Map button on the Offender Enrollment screen will generate a map that displays a pushpin at the offender’s residence. Ensure that the pushpin location is correct and click the Submit button. It is also possible to edit the location by clicking the Edit Pushpin button.
Offender General Information Page When Enrollment has been completed, you will be redirected to the Offender General Information page (see below). Here, you can Edit Offender Information, Disable the Offender, Unassign Hardware, conduct an Equipment Range Test, and Edit Rules.
Create Schedule for Curfew The Curfew schedule determines when the offender should be home (or in range of the Base Unit 3000). Failure to be in range of the Base Unit 3000 during the scheduled time will result in an immediate violation. 1. Click on the Curfew Rule (see below).
Create Schedule for Curfew, cont. 2. Move your mouse cursor over the Rule Functions dropdown menu and left click Edit.
Create Schedule for Curfew, cont. 3. 4. 5. You will be redirected to the Edit Rule page. Enable the Caller ID feature. a. Click the box next to Enabled b. Enter the offender’s home phone number or click the Home Phone # box if the offender’s phone number was entered on the Offender’s General Information page Scroll down to the Permanent Rule Schedule.
Create Schedule for Curfew, cont. 6. Each block represents a 30 minute increment of time. Left-click and drag the cursor along the blocks during the times that the offender is allowed to leave. By default, the blocks are blue. As you move the cursor, the blocks will turn white. The white blocks that remain equal the times that the offender is allowed to be out of the home (see below). 7. Click the Save button.
2 Way Bracelet Attachment Attaching the 2 Way Bracelet Step 1: Push tamper plugs into the back of the brackets of the Bracelet. Be sure to insert the left side first. After the left side has been secured, press the right side of the tamper plug down. Issue Date: 8/19/2015 22 Step 2: Place the pin tray on a flat surface (such as a desk) and push one end of the strap into the pin tray until it is level with the “lip” of the pin tray.
2 Way Bracelet Attachment Attaching the 2 Way Bracelet, cont. Step 3: Insert strap with attached pin tray into one side of the Bracelet until it snaps in place. Step 4: Place the Bracelet on the offender’s leg, just above the ankle bone. Issue Date: 8/19/2015 23 Step 5: Wrap the strap around the offender’s leg and measure to the line shown above so that it allows approximately ¼ inch of space between the offender’s leg and the strap to ensure comfort.
2 Way Bracelet Attachment Attaching the 2 Way Bracelet, cont. Step 6: Using the strap cutters, cut the strap according to the measurement taken in step six. Wipe off any fiber optic cable residue left on the strap after cutting has been completed. Step 7: Place remaining pin tray on a flat surface and insert measured end of the underneath side (the bottom) of the strap into the pin tray.
Activating the Base Unit 3000 Connecting the Base Unit 3000 Power: Base Unit 3000 Violation Status LEDs: Plug A/C adapter into a wall outlet. Power: The Base Unit 3000 has lost power. Cell/Line: If solid green, the phone line is in use. If cellular coverage is not available at the time of a call, the Base Unit 3000 will continue to try and call in. The line LED will continue to turn on and off until a call is completed.
Unassigning Hardware 1. 2. Move your cursor over the Hardware Functions menu. Left click Unassign.
Unassigning Hardware, cont. 3. 4. Click the checkbox next to the Base Unit 3000 and bracelet (see below). Click the Save button.
Unassigning Hardware, cont. 5. A popup will generate with a warning that the unassignment is immediate. Click OK.
Unassigning Hardware, cont. 6. You will be returned to the Offender Information page, where the hardware will be pending unassignment. The device is now required to call 3M Electronic Monitoring and transmit its final data. The hardware will only be unassigned once this final call has occurred.
2 Way Bracelet Removal Removing the 2 Way Bracelet Step 1: Cut the strap by using the strap cutters and remove the Bracelet from the offender’s leg. Step 2: Using a 3M Electronic Monitoring flathead screwdriver, push on the tamper plugs to break them. Issue Date: 8/19/2015 30 Step 3: Use the screwdriver to remove the tamper plugs from the brackets.
2 Way Bracelet Removal Removing the 2 Way Bracelet, cont. Step 4: While keeping the latch depressed, pull the strap with the attached pin trays out of each bracket. Discard the tamper plugs, pin trays, and straps. Note: Do NOT reuse the tamper plugs. Note: Do NOT remove tamper plugs from the brackets of the Bracelet unless there is a strap with an attached pin tray inside the bracket.
Appendix Violation Definitions Curfew: The schedule that determines when the offender should be home (or in range of the Base Unit 3000). Failure to be in range of the Base Unit 3000 during the scheduled time will result in an immediate violation. Must Leave: An option associated with the “Curfew Rule” where the offender must leave their home (or be outside the range of the Base Unit 3000) during the time when they are not under a curfew schedule.
Connect Method If there is no cellular coverage available at the offender’s home, officers can choose to change the connect method to utilize a landline. 1. Left click the Go to Dropdown menu. 2. Left click Device Parameters.
Connect Method, cont. 3. Left click Edit.
Connect Method, cont. 4. Click the Land option. 5. Click on the checkbox next to Base Unit Callback and enter the phone number where the Base Unit 3000 will call from. This information must be entered in order to access the Download Events function. 6. Click Save.
Download Events If this feature is enabled, it allows the user to send a download command to the Base Unit 3000. This feature is useful for downloading any rule or schedule changes made immediately to the Base Unit 3000. 1. To download all points, click on the Download Events button.
Download Events, cont. 2. A pop up box will appear informing you that the command has been sent. Click OK.
Equipment Range Test The Equipment Range test offers the flexibility to the supervising officer to verify that the offender has the mobility to move around the residence, or other location that the Base Unit 3000 may be placed, without creating Curfew (range) violations. This feature is useful in verifying discrepancies between a true violation and any offender claims of compliance. 1. Move your cursor over the Hardware Functions menu. 2. Left click Equipment Range Test.
Equipment Range Test, cont. 3. Set the amount of time you would like the test to run for in the Test Minutes field. The time entered must be greater than five minutes, but less than 60 minutes. The test will automatically end after the time expires. 4. Click Submit.
Equipment Range Test, cont. • If the Base Unit 3000 Callback feature has been enabled, 3M Electronic Monitoring will send a command to the Base Unit 3000 to begin the test • When the test begins, the Curfew LED light will start to blink red • When the Base Unit 3000 detects the Bracelet, the Curfew LED light will turn solid red accompanied by a 1 second beep. As long as the LED light is solid red and the Base Unit 3000 is beeping, the Bracelet is still in range of the Base Unit 3000.
The FCC Wants You to Know This equipment has been tested and found to comply with the limits for a Class B digital device, pursuant to Part 15 of the FCC rules. These limits are designed to provide reasonable protection against harmful interference in a residential installation. This equipment generates, uses and can radiate radio frequency energy and, if not installed and used in accordance with the instructions, may cause harmful interference to radio communications.