
User's Manual
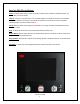


Table Of Contents
- Default Notification Options
- Finish Enrollment
- Notification Contacts
- Finish Enrollment
- 2. Move your mouse cursor over the Rule Functions dropdown menu and left click Edit.
- 3. You will be redirected to the Edit Rule page.
- 4. Enable the Caller ID feature.
- a. Click the box next to Enabled
- b. Enter the offender’s home phone number or click the Home Phone # box if the offender’s phone number was entered on the Offender’s General Information page
- 5. Scroll down to the Permanent Rule Schedule.
- 1. Move your cursor over the Hardware Functions menu.
- 2. Left click Unassign.
- 3. Click the checkbox next to the Base Unit 3000 and bracelet (see below).
- 4. Click the Save button.
- 5. A popup will generate with a warning that the unassignment is immediate. Click OK.
- 6. You will be returned to the Offender Information page, where the hardware will be pending unassignment. The device is now required to call 3M Electronic Monitoring and transmit its final data. The hardware will only be unassigned once this final ca...
- 4. Click the Land option.
- 5. Click on the checkbox next to Base Unit Callback and enter the phone number where the Base Unit 3000 will call from. This information must be entered in order to access the Download Events function.

Enroll a Contact, cont.
Demographic Data
1. Enter the Contact’s information.
• All fields with red asterisks (*) are required fields.
Report Options
2. Enter an email address where the selected reports will be sent.
3. Choose Daily Event Summary Report and/or Case Management Activity Report.
Default Notification Options
4. Select the type of Notification you would like to be your default method. The notification method is
dependent upon the information that you enter into the Notification Email or Text Message fields.
• Pager
• Fax
• E-mail
• Text Message
Finish Enrollment
5. When you have completed the form, click Save.
Issue Date: 8/19/2015
10